User manual for the universal remote control for AUX air conditioner YKR-T/121E (YKR-T/011E)
Руководство / инструкция
Купили сплит-систему 【AUX】 с пультом 【YKR-T/121E】 и не знаете, с чего начать? Спокойно. Это устройство управляет всеми основными функциями кондиционера: от базового включения до сложных режимов самоочистки и ионизации. Разобраться можно за пару минут — интерфейс интуитивный, кнопки подписаны понятно.
(!) Важный момент: монтаж сплит-системы должен выполнять только квалифицированный специалист. Не пытайтесь установить кондиционер самостоятельно — это может привести к поломке оборудования и потере гарантии. Доверьте дело профессионалам.
Быстрая настройка пульта за 3 простых шага
Подготовка к первой синхронизации
Перед началом работы установите две батарейки типа 【AAA】, соблюдая полярность. Убедитесь: между пультом и приёмником внутреннего блока нет препятствий, расстояние — не более 8 метров для надёжного сигнала.
Проверка базовых функций
Нажмите кнопку 【ON/OFF】 — если индикатор передачи мигнул, а кондиционер издал короткий звуковой сигнал, всё работает. Не сработало? Проверьте батарейки и повторите попытку. Всё логично.
Меры безопасности при повседневном использовании
Правила эксплуатации для долгой службы
- ✔️ Направляйте пульт строго на приёмник кондиционера, без препятствий
- ✔️ Избегайте падений, ударов и попадания жидкостей внутрь корпуса
- ✔️ Не оставляйте устройство под прямыми солнечными лучами или рядом с обогревателями
- ✔️ Держите пульт на расстоянии не менее 1 м от ТВ и радиоаппаратуры
- ✔️ Не используйте острые предметы для нажатия кнопок
Есть важный нюанс. Если пульт не реагирует — выньте батарейки на 30 секунд, затем вставьте заново. Это сбрасывает временные ошибки. Впрочем, такое требуется редко.
Панель индикации: расшифровка символов
Что означают значки на дисплее
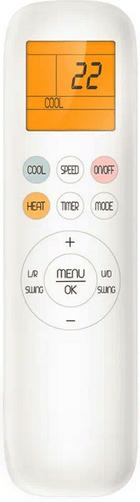
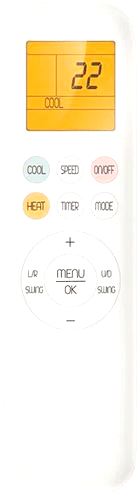
ЖК-экран пульта отображает текущее состояние системы. Разберём ключевые индикаторы:
| Индикатор | Значение |
|---|---|
| Сигнал передачи | Мигает при отправке команды на внутренний блок |
| Режим работы | 【AUTO】/【COOL】/【DRY】/【HEAT】/【FAN】 |
| 【RUN】 | Показывает, включён или выключен кондиционер |
| Температура | Заданное значение 16–32 °С (кроме режима 【FAN】) |
| 【ROOM】 | Отображение текущей комнатной температуры |
| 【TIMER ON/OFF】 | Активный таймер включения или выключения |
| Скорость вентилятора | 【LOW】/【MID】/【HIGH】/【TURBO】/【AUTO】 |
| 【SWING】 | Автоматическое качание вертикальных/горизонтальных жалюзи |
| 【iCLEAN】/【Anti-F】 | Активна функция самоочистки или защиты от плесени |
Практика показывает: достаточно один раз разобраться с индикацией — дальше всё становится интуитивно понятным.
Обзор кнопок и функций: что за что отвечает
Базовые кнопки управления
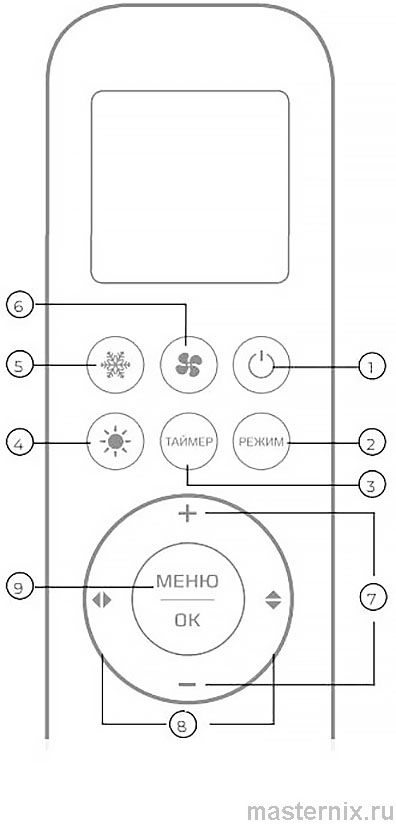
→ 【ON/OFF】: включение/выключение устройства, сброс настроек таймера и режима сна.
→ 【РЕЖИМ】: циклическое переключение — 【AUTO】 → 【COOL】 → 【DRY】 → 【HEAT】 → 【FAN】.
→ 【+】 / 【−】: регулировка температуры в диапазоне 16–32 °С.
→ 【Скорость вентилятора】: выбор ступени — 【Низкая】 → 【Средняя】 → 【Высокая】 → 【ТУРБО】 → 【Автоматическая】.
(!) Обратите внимание: в моделях только с функцией охлаждения режим 【HEAT】 отсутствует. В режиме 【FAN】 температура не регулируется.
Управление направлением воздушного потока
→ 【L/R SWING】: активация качания вертикальных жалюзи (горизонтальное направление).
→ 【U/D SWING】: активация качания горизонтальных жалюзи (вертикальное направление). Повторное нажатие фиксирует положение.
Есть нюанс. Удержание кнопки 【U/D SWING】 более 3 секунд переключает режим на позиционную настройку (5 фиксированных положений). Для возврата к качанию — снова удержите 3 секунды. И не поворачивайте жалюзи вручную — это может повредить механизм.
Управление режимами: охлаждение, обогрев, осушение
Переключение между режимами работы
Кнопка 【РЕЖИМ】 циклически переключает режимы. В автоматическом режиме 【AUTO】 кондиционер сам выбирает охлаждение или обогрев, поддерживая комфортную температуру. Целевое значение не отображается и не регулируется вручную — система работает автономно.
В режиме 【COOL】 или 【HEAT】 вы задаёте температуру кнопками 【+】 / 【−】. В режиме 【DRY】 (осушение) скорость вентилятора фиксирована — система фокусируется на удалении влаги, а не на обдуве.
Режим вентиляции 【FAN】
В этом режиме работает только вентилятор внутреннего блока. Температура не поддерживается, не регулируется. Полезно для циркуляции воздуха без охлаждения или обогрева.
(!) Важно: кондиционер не подаёт свежий воздух с улицы — он лишь обрабатывает воздух в помещении. Для притока нужна отдельная система вентиляции.
Таймер включения и выключения: настройка по расписанию
Пошаговая установка таймера
→ Нажмите 【ТАЙМЕР】: индикатор 【ON/OFF】 начнёт мигать.
→ Кнопками 【+】 / 【−】 установите время (шаг 0,5 ч, диапазон 0,5–24 ч).
→ Повторно нажмите 【ТАЙМЕР】 для подтверждения — мигание прекратится.
→ Если не нажимать кнопки 10 секунд — настройка завершится автоматически.
Есть важный момент. Таймер включения работает только при выключенном устройстве, таймер выключения — только при включённом. Повторное нажатие 【ТАЙМЕР】 отменяет установку.
Специальные функции: очистка, ионизация, энергосбережение
Доступ к дополнительным функциям через меню
Нажмите кнопку 【МЕНЮ】 для входа в выбор функций: 【iFEEL】 / 【HEALTH】 / 【ECO】 / 【SLEEP】 / 【SILENCE】 / 【DISPLAY】 / 【LIGHT】 / 【ANTI-F】 / 【iCLEAN】. Используйте стрелки для выбора, кнопку 【OK】 для подтверждения.
Функция 【iCLEAN】 для глубокой самоочистки
Трёхэтапная программа поддержания чистоты теплообменника:
- Охлаждение до 15 минут: накопление конденсата и намораживание инея
- Нагрев до 10 минут: размораживание, сушка и стерилизация
- Вентиляция до 10 минут: финальная сушка и выравнивание температуры
На дисплее внутреннего блока отображается код 【CL】. Функция активируется только при выключенном кондиционере.
Защита от плесени 【Anti-F】 и ионизация 【HEALTH】
→ 【Anti-F】: после выключения в режиме охлаждения/осушения вентилятор работает ещё 3 минуты, просушивая теплообменник. Это предотвращает рост плесени и появление запахов.
→ 【HEALTH】: включение встроенного ионизатора воздуха для улучшения качества атмосферы.
Скажу прямо: не пренебрегайте этими функциями. Регулярная самоочистка продлевает срок службы кондиционера и сохраняет здоровье.
Энергосбережение 【ECO】 и тихий режим 【SILENCE】
→ 【ECO】: оптимизация работы компрессора и вентилятора для снижения энергопотребления.
→ 【SILENCE】: минимальная скорость вращения для максимально тихой работы. Отключается нажатием кнопки скорости вентилятора.
Ночной режим и тихая работа для комфортного сна
Активация режима 【SLEEP】
Нажмите 【SLEEP】 для перехода в энергосберегающий режим. Дисплей внутреннего блока отключается, температура корректируется автоматически:
- ✔️ В режиме охлаждения: +1 °С через 1 час, ещё +1 °С через 2 часа, далее без изменений
- ✔️ В режиме обогрева: −1 °С через 1 час, ещё −1 °С через 2 часа, далее без изменений
- ✔️ Через 10 часов система возвращается к обычному режиму
Это удобно: вы спите комфортно, а счёт за электроэнергию не растёт. Обратите внимание: в режиме 【SLEEP】 скорость вентилятора не регулируется автоматически — настройте её заранее при необходимости.
Функция 【I-FEEL】 для точного контроля температуры
Кондиционер ориентируется на датчик температуры в пульте, а не на внутренний блок. Это обеспечивает комфорт именно там, где находитесь вы.
(!) Для работы функции: держите пульт в прямой видимости внутреннего блока (не далее 8 м), не закрывайте вентиляционное отверстие на задней панели пульта.
Установка батареек: пошаговая инструкция
Пошаговая замена элементов питания
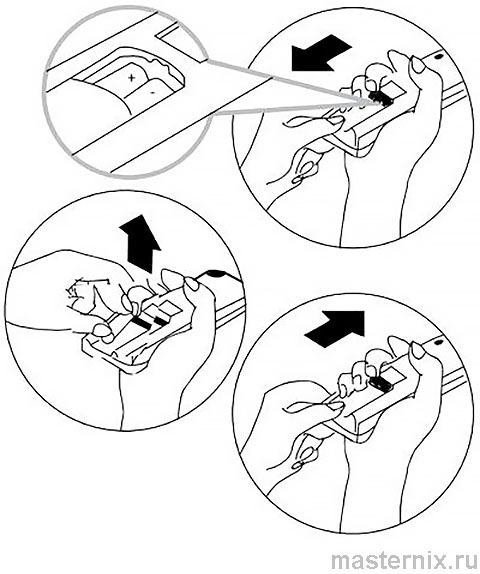
→ Сдвиньте крышку батарейного отсека на задней панели.
→ Вставьте две батарейки 【AAA】, соблюдая полярность 【+】 и 【−】.
→ Закройте крышку до фиксации.
→ На ЖК-дисплее появится индикация — пульт готов к работе.
(!) Критически важно:
✖️ Используйте только новые щелочные батарейки типа 【AAA】.
✖️ Не смешивайте старые и новые элементы, разные типы или бренды.
✖️ Если пульт не используется более месяца — извлеките батарейки, чтобы избежать утечки электролита.
Решение проблем: если пульт не реагирует
Диагностика типичных сбоев
Пульт не управляет кондиционером? Не спешите расстраиваться. Чаще всего проблема решается просто:
→ Проверьте батарейки: возможно, они сели или установлены неправильно.
→ Убедитесь, что между пультом и приёмником нет препятствий (мебель, шторы, люди).
→ Попробуйте подойти ближе: для тестов — не более 2–3 метров.
→ Избегайте прямых солнечных лучей на приёмник внутреннего блока — это может нарушить работу.
→ Держите пульт вдали от источников электромагнитных помех (бытовая техника, роутеры).
Аварийное управление без пульта
Если пульт потерян или неисправен, используйте аварийный переключатель на внутреннем блоке:
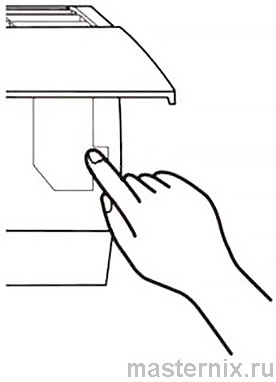
→ Кратковременно нажмите кнопку аварийного управления — кондиционер включится в режим 【AUTO】.
→ Аккуратно закройте переднюю панель.
→ Для выключения повторно нажмите ту же кнопку.
(!) Не держите кнопку нажатой долго — это может вызвать сбой в работе системы.


