User manual for the universal remote control AUX YKR-P/002E (YKR-P/001E) for air conditioners
Руководство / инструкция
Потеряли пульт от сплит-системы 【AUX】 или он перестал откликаться? Универсальный пульт 【YKR-P/002E】 решает проблему быстро и без лишних затрат. Большой ЖК-дисплей, интуитивная раскладка, таймер, ночной режим — всё, что нужно для комфортного управления климатом в доме или офисе.
Практика показывает: разобраться с управлением можно за пару минут. Инфракрасный сигнал уверенно работает на расстоянии до 8 метров, а эргономичный корпус удобно лежит в руке. Это серьёзно упрощает жизнь.
Быстрая настройка пульта за 3 простых шага
Подготовка к первой синхронизации
Перед началом работы установите две батарейки типа 【AAA】, соблюдая полярность. Убедитесь: между пультом и приёмником внутреннего блока нет препятствий, расстояние — не более 8 метров для надёжного сигнала.
Проверка базовых функций
Нажмите кнопку 【ON/OFF】 — если индикатор передачи мигнул, а кондиционер издал короткий звуковой сигнал, всё работает. Не сработало? Проверьте батарейки и повторите попытку. Всё логично.
Совместимость с моделями AUX: полный список серий
Поддерживаемые серии кондиционеров
Пульт 【YKR-P/002E】 совместим с широким спектром оборудования 【AUX】. Ниже — основные группы для быстрой проверки:
| Серия | Совместимые модели |
|---|---|
| LK Standart ON/OFF | ASW-H07A4/LK-700R1, AS-H07A4/LK-700R1 ASW-H09A4/LK-700R1, AS-H09A4/LK-700R1 ASW-H12A4/LK-700R1, AS-H12A4/LK-700R1 ASW-H18A4/LK-700R1, AS-H18A4/LK-700R1 ASW-H24A4/LK-700R1, AS-H24A4/LK-700R1 |
| LK Inverter | ASW-H09A4/LK-700R1DI, AS-H09A4/LK-700R1DI ASW-H12A4/LK-700R1DI, AS-H12A4/LK-700R1DI ASW-H18A4/LK-700R1DI, AS-H18A4/LK-700R1DI ASW-H24A4/LK-700R1DI, AS-H24A4/LK-700R1DI |
| LV Inverter | ASW-H09A4/LV-600R1DI, ASW-H12A4/LV-600R1DI ASW-H09A4/LV-700R1DI, ASW-H12A4/LV-700R1DI ASW-H09A4/LV-800R1DI, ASW-H12A4/LV-800R1DI AS-H09A4/LV-R1DI, AS-H12A4/LV-R1DI |
| LA Inverter | ASW-H09A4/LA-600R1DI, ASW-H12A4/LA-600R1DI ASW-H09A4/LA-800R1DI, ASW-H12A4/LA-800R1DI AS-H09A4/LA-R1DI, AS-H12A4/LA-R1DI |
Не нашли свою модель? Сверьтесь с расширенной базой совместимости на сайте производителя. Имеет смысл, правда?
Технические характеристики для точного подбора
Основные параметры устройства
| Параметр | Значение |
|---|---|
| Модель | YKR-P/002E |
| Питание | 2 × AAA (щелочные) |
| Дальность действия | До 8 м (угол 45°) |
| Диапазон регулировки температуры | 16–32 °С |
| Таймер | 0,5–24 часа |
| Рабочая температура | Стандартные комнатные условия |
Компактный размер и низкое энергопотребление делают пульт надёжным помощником на годы. ЖК-экран с понятной индикацией позволяет быстро ориентироваться в настройках.
Меры безопасности при повседневном использовании
Правила эксплуатации для долгой службы
- ✔️ Направляйте пульт строго на приёмник кондиционера, без препятствий
- ✔️ Избегайте падений, ударов и попадания жидкостей внутрь корпуса
- ✔️ Не оставляйте устройство под прямыми солнечными лучами или рядом с обогревателями
- ✔️ Держите пульт на расстоянии не менее 1 м от ТВ и радиоаппаратуры
- ✔️ Не используйте острые предметы для нажатия кнопок
Есть важный нюанс. Если пульт не реагирует — выньте батарейки на 30 секунд, затем вставьте заново. Это сбрасывает временные ошибки. Впрочем, такое требуется редко.
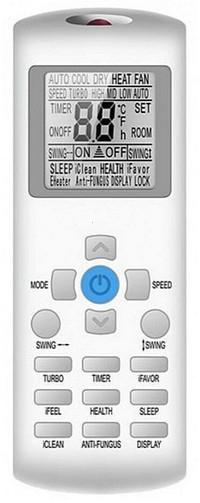
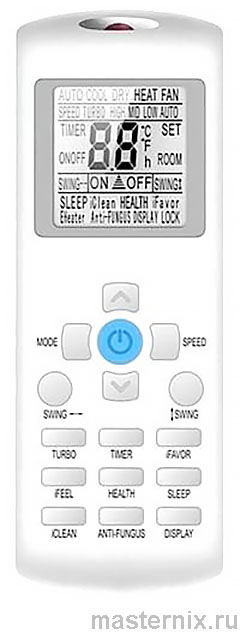
Обзор кнопок и функций: что за что отвечает
Базовые кнопки управления
→ 【ON/OFF】: включение/выключение кондиционера с сохранением предыдущих настроек.
→ 【MODE】: циклическое переключение режимов — 【AUTO】 → 【COOL】 → 【DRY】 → 【HEAT】 → 【FAN】.
→ 【SPEED】: выбор скорости вентилятора — 【AUTO】, 【LOW】, 【MID】, 【HIGH】.
→ 【TEMP▲】 / 【TEMP▼】: увеличение/уменьшение целевой температуры на 1 °С.
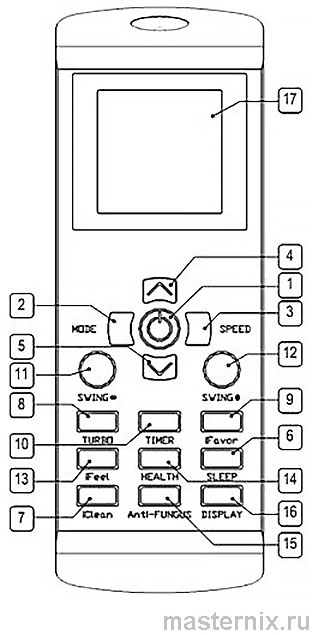
(!) Обратите внимание: в моделях только с функцией охлаждения режим 【HEAT】 отсутствует. В режиме 【FAN】 температура не регулируется.
Специальные функции комфорта
→ 【SWING 1】: качание вертикальных жалюзи (горизонтальное направление потока).
→ 【SWING 2】: качание горизонтальной жалюзи (вертикальное направление).
→ 【iFEEL】: регулировка по датчику температуры в пульте — комфорт там, где вы.
→ 【DISPLAY】: включение/выключение подсветки дисплея на внутреннем блоке.
Есть нюанс. Не регулируйте положение жалюзи вручную — это может привести к поломке механизма. Доверьтесь электронике.
Управление режимами: охлаждение, обогрев, осушение
Переключение между режимами работы
Кнопка 【MODE】 циклически переключает режимы. В автоматическом режиме 【AUTO】 кондиционер сам выбирает охлаждение или обогрев, поддерживая комфортную температуру 23±2 °С.
В режиме 【COOL】 или 【HEAT】 устройство поддерживает заданную температуру с точностью ±1 °С. Если разница между заданной и текущей температурой менее 1 °С — компрессор не включится. Это нормально, система экономит ресурс.
Регулировка температуры и воздушного потока
→ Установите желаемую температуру кнопками 【TEMP▲】 / 【TEMP▼】 в диапазоне 16–32 °С.
→ Выберите скорость вентилятора кнопкой 【SPEED】.
→ Настройте направление воздушного потока кнопками 【SWING 1】 / 【SWING 2】.
Скажу прямо: не стоит устанавливать экстремальные значения. Комфортный диапазон — 21–28 °С. Это и экономично, и полезно для здоровья.
Ночной режим и энергосбережение без потери комфорта
Активация режима 【SLEEP】
Нажмите кнопку 【SLEEP】 для перехода в энергосберегающий режим. Дисплей внутреннего блока отключается, вентилятор работает на низкой скорости.
- ✔️ В режиме охлаждения: температура повышается на 1 °С после первого часа, ещё на 1 °С после второго
- ✔️ В режиме обогрева: температура понижается на 1 °С после первого часа, ещё на 1 °С после второго
- ✔️ Любое нажатие кнопки или выключение кондиционера отменяет 【SLEEP】
Это удобно: вы спите комфортно, а счёт за электроэнергию не растёт.
Как работает автоматическая корректировка температуры
Алгоритм учитывает естественное снижение метаболизма во время сна. Не нужно вручную менять настройки — система делает это за вас. Практика показывает: такой подход улучшает качество сна.
Таймер включения и выключения: настройка по расписанию
Настройка таймера включения
→ При выключенном пульте нажмите 【TIMER】: отобразится 【TIMER ON】 и время.
→ Кнопками 【TEMP▲】 / 【TEMP▼】 установите время (шаг 0,5 ч до 10 ч, затем 1 ч).
→ Повторно нажмите 【TIMER】 для активации.
→ Диапазон: 0,5–24 часа от текущего момента.
Настройка таймера выключения
Аналогично, но при включённом пульте используйте 【TIMER OFF】. Можно задать оба таймера одновременно — система выполнит включение и выключение по расписанию.
(!) Важно: в режиме 【SLEEP】 функция таймера не активируется. Это ограничение алгоритма энергосбережения.
Специальные функции: очистка, ионизация, защита от плесени
Функция 【iCLEAN】 для самоочистки
Нажмите 【iCLEAN】 при выключенном кондиционере — запустится 35-минутный цикл удаления влаги с испарителя. Это предотвращает рост бактерий и появление плесени. На дисплее отобразится 【CL】.
Режимы 【HEALTH】 и 【Anti-FUNGUS】
→ 【HEALTH】: активация ионизации воздуха для улучшения качества атмосферы в помещении.
→ 【Anti-FUNGUS】: после выключения кондиционера вентилятор работает ещё 3 минуты на низкой скорости, продувая внутренний блок. Это защищает от плесени и неприятных запахов.
Есть важный момент. Во время выполнения 【Anti-FUNGUS】 не рекомендуется повторно включать кондиционер — дождитесь завершения цикла.
Дополнительные функции комфорта
→ 【TURBO】: интенсивный режим для быстрого достижения заданной температуры (максимальная скорость вентилятора).
→ 【iFAVORIT】: запоминание любимых настроек. Установите параметры, зажмите кнопку 3 секунды — профиль сохранён.
→ 【iFEEL】: кондиционер ориентируется на температуру в месте нахождения пульта, а не на датчик внутреннего блока.
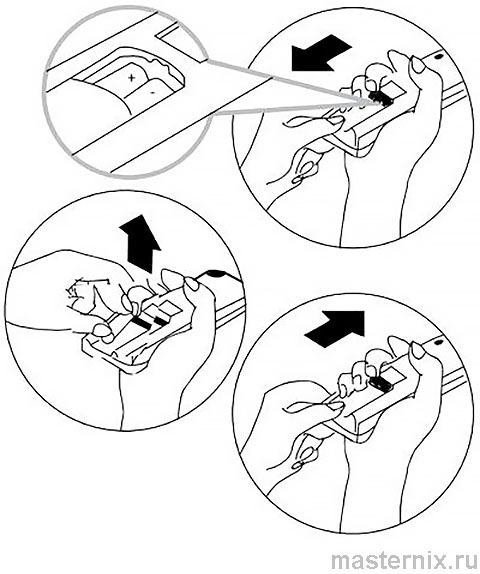
Установка батареек: пошаговая инструкция
Пошаговая замена элементов питания
→ Сдвиньте крышку батарейного отсека на задней панели.
→ Вставьте две батарейки 【AAA】, соблюдая полярность 【+】 и 【−】.
→ Закройте крышку до фиксации.
→ На ЖК-дисплее появится индикация — пульт готов к работе.
(!) Критически важно:
✖️ Используйте только новые щелочные батарейки типа 【AAA】.
✖️ Не смешивайте старые и новые элементы, разные типы или бренды.
✖️ Если пульт не используется более месяца — извлеките батарейки, чтобы избежать утечки электролита.
Решение проблем: если пульт не реагирует
Диагностика типичных сбоев
Пульт не управляет кондиционером? Не спешите расстраиваться. Чаще всего проблема решается просто:
→ Проверьте батарейки: возможно, они сели или установлены неправильно.
→ Убедитесь, что между пультом и приёмником нет препятствий (мебель, шторы, люди).
→ Попробуйте подойти ближе: для тестов — не более 2–3 метров.
→ Избегайте прямых солнечных лучей на приёмник внутреннего блока — это может нарушить работу.
→ Держите пульт вдали от источников электромагнитных помех (бытовая техника, роутеры).
Аварийное управление без пульта
Если пульт потерян или неисправен, используйте аварийный переключатель на внутреннем блоке:
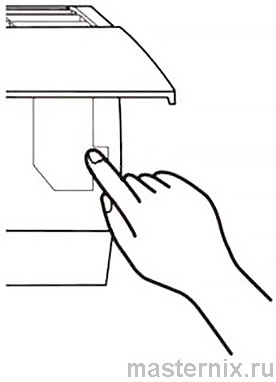
→ Кратковременно нажмите кнопку аварийного управления — кондиционер включится в режим 【AUTO】.
→ Аккуратно закройте переднюю панель.
→ Для выключения повторно нажмите ту же кнопку.
(!) Не держите кнопку нажатой долго — это может вызвать сбой в работе системы.


