User Manual for the Ballu BPAC-07 / BPAC-09 / BPAC-12 Remote Control
Руководство / инструкция
Ballu BPAC-07 / BPAC-09 / BPAC-12 Mobile Air Conditioners. Operating Instructions
GYKQ 36 Air Conditioner Remote Control Compatibility
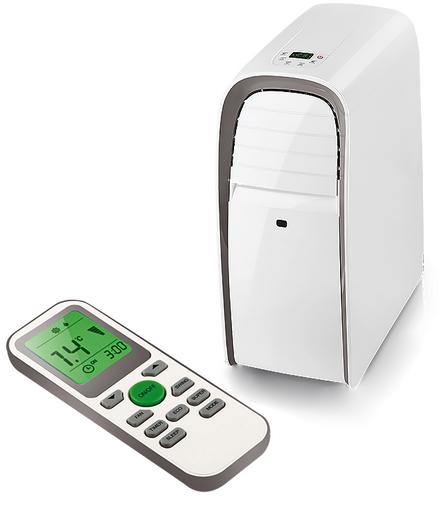
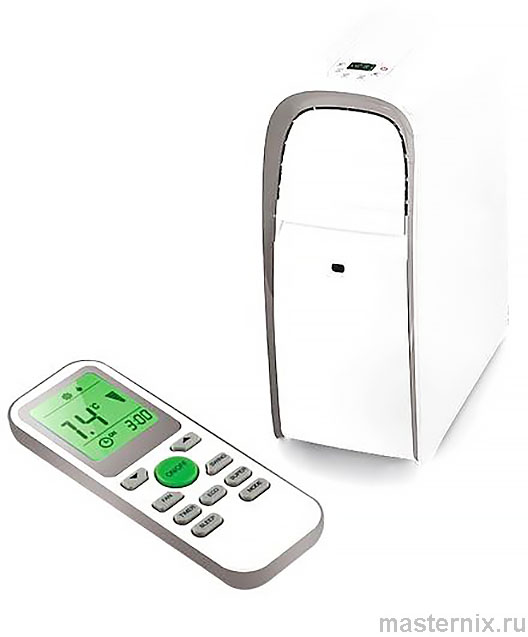
Floor-standing Mobile Air Conditioners
Ballu BPAC-07 CE / BPAC-07 CM
Ballu BPAC-09 CE / BPAC-09 CM
Ballu BPAC-12 CE / BPAC-12 CM
.
Precautions
1. If the power cord is damaged, it must be replaced by the manufacturer, an authorized service center, or another qualified specialist to avoid serious injury.
2. The air conditioner must be installed in accordance with the existing local regulations and rules for the operation of electrical networks.
3. After installation, the power plug of the air conditioner must remain accessible.
4. Replace defective remote control batteries.
5. The manufacturer reserves the right to make changes to the design, configuration, or manufacturing technology of the product without prior notice to the customer in order to improve its properties.
6. The text and numerical designations in the manual may contain typographical errors.
7. If, after reading the manual, you still have questions about the operation of the appliance, contact the seller or an authorized service center for clarification.
8. The product has a label indicating its technical specifications and other useful information.
Safety Instructions
WARNING!!
➠ To avoid damage to the appliance and voiding your warranty, place the air conditioner in a vertical position for at least 2 hours before operation.
➠ Do not connect the air conditioner to a faulty outlet. Do not use adapters or extension cords.
➠ Do not install the air conditioner in the following locations:
- near sources of open flame;
- where splashes of water or oil can reach the unit;
- in direct sunlight;
- near bathrooms, showers, or swimming pools;
- in greenhouses.
➠ To ensure reliable compressor operation, do not tilt the air conditioner.
➠ Before cleaning the air conditioner, unplug it from the power outlet.
➠ Do not place heating appliances near the outlet.
➠ To avoid overheating, do not cover the air conditioner while it is operating.
➠ Do not operate the air conditioner with a damaged power cord. If the cord needs to be replaced, contact a service center.
WARNING!!
➠ Read this manual carefully before installing and operating the air conditioner. If you have questions, contact the official dealer of the manufacturer.
➠ Use the appliance only for its intended purpose as described in this manual.
➠ Do not store gasoline or other flammable liquids near the air conditioner—this is very dangerous!
➠ The air conditioner does not supply fresh air! Ventilate the room more often, especially if fuel-burning appliances are used in the room, as they reduce the oxygen level in the air.
CAUTION!
➠ Do not connect or disconnect the air conditioner from the power supply by pulling the plug from the socket; use the ON/OFF button.
➠ Do not insert foreign objects into the air intake grilles of the air conditioner. This is dangerous, as the fan rotates at high speed.
➠ Do not allow children to play with the air conditioner.
➠ Do not excessively cool or heat the air in the room if children or disabled persons are present.
Purpose
The appliance is intended for cooling, dehumidifying, and ventilating air in household premises.
..
Air Conditioner Design
Models BPAC-07 CE_17Y, BPAC-09 CE_17Y, BPAC-12 CE_17Y / BPAC-07 CM, BPAC-09 CM, BPAC-12 CM
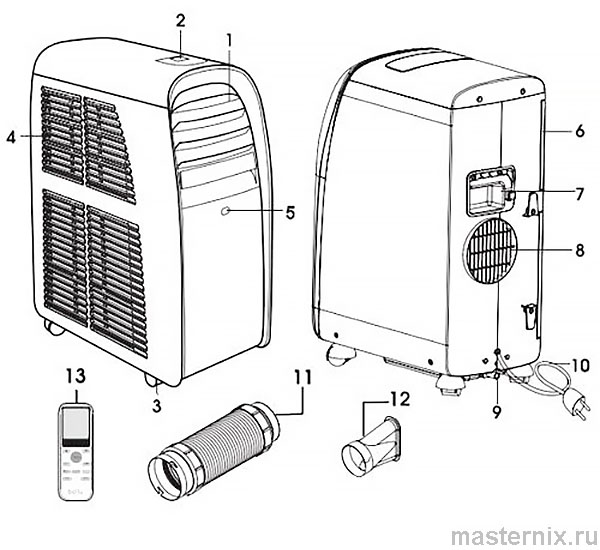
1. Air outlet grille
2. Control panel
3. Casters
4. Air intake grille
5. Remote control signal receiver*
6. Air filter
7. Handle for moving
8. Exhaust air outlet in cooling mode
9. Permanent condensate drain outlet
10. Power cord
11. Air exhaust hose
12. Air exhaust hose adapter
13. Remote control*
* Only for models with electronic control
** The actual configuration of the mobile air conditioner may differ from the one stated.
*** In dehumidification mode, when the humidity level is high, condensate (water) may accumulate inside the unit. To avoid having to periodically remove condensate through the drain hole, a hose (not included) can be connected to the permanent condensate drain tube. The condensate (water) will then drain continuously into the drainage system.
Technical Specifications
| Model | BPAC-07 CE_17Y | BPAC-09 CE_17Y | BPAC-12 CE_17Y | BPAC-07 CM | BPAC-09 CM | BPAC-12 CM |
| Cooling capacity, BTU (W) | 7,000 | 9,000 | 11,000 | 7,000 | 9,000 | 11,000 |
| Heating capacity, BTU (W)* | – | – | – | – | – | – |
| Power supply, V ~ Hz | 220-240V/50Hz/1Ph | |||||
| Rated power (cooling/heating), W | 785 | 950 | 1250 | 785 | 950 | 1250 |
| Refrigerant type | R410A | R410A | R410A | R410A | R410A | R410A |
| Rated current (cooling/heating), A | 3.4 | 4.1 | 5.5 | 3.4 | 4.1 | 5.5 |
| Protection class | IPX0 | IPX0 | IPX0 | IPX0 | IPX0 | IPX0 |
| Electrical protection class | Class I | |||||
| Energy efficiency class (cooling) | A/- | |||||
| Energy efficiency class (heating) | – | – | – | – | – | – |
| Noise level, dB(A) | 45-51 | 45-51 | 45-51 | 45-51 | 45-51 | 45-51 |
| Airflow, m?/h | 330 | 330 | 330 | 330 | 330 | 330 |
| Recommended room area, m?** | up to 18 | up to 26 | up to 30 | up to 15 | up to 20 | up to 25 |
| Dimensions (W?H?D), mm | 283?700?506 | 283?700?506 | 283?700?506 | 270?695?480 | 270?695?480 | 270?695?480 |
| Package dimensions (W?H?D), mm | 560?865?330 | 560?865?330 | 560?865?330 | 540?865?335 | 540?865?335 | 540?865?335 |
| Net weight, kg | 25 | 26 | 28 | 25 | 26 | 28 |
| Gross weight, kg | 29 | 30 | 32 | 28 | 29 | 32 |
Air Conditioner Operation
Control Panel – Models with Electronic Control BPAC-07 CE, BPAC-09 CE, BPAC-12 CE
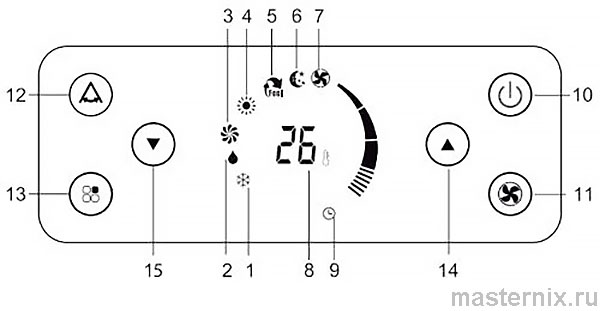
1. Cooling mode indicator
2. Dehumidification mode indicator
3. Ventilation mode indicator
4. Heating mode indicator*
5. Automatic mode indicator
6. SLEEP mode indicator
7. Fan speed indicator
8. Air temperature indicator – displays the current and user-set room air temperature
9. Timer indicator
10. Power button – turns the unit on and off
11. “FAN” fan speed selection button
12. “SWING” horizontal louver operation indicator
13. “MODE” operation mode selection button
14. Temperature increase button (▲)
15. Temperature decrease button (▼)
*Only for models with heating
Control Panel – Models with Electronic Control BPAC-07 CE_17Y, BPAC-09 CE_17Y, BPAC-12 CE_17Y
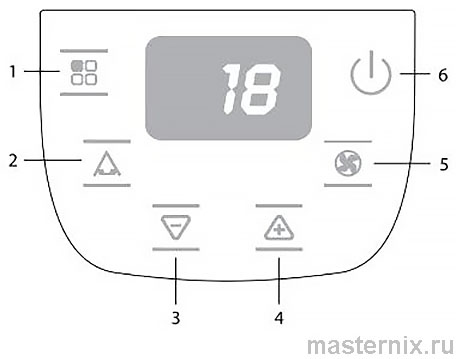
1. “MODE” operation mode selection button
2. “SWING” mode selection button
3. Temperature decrease button
4. Temperature increase button
5. FAN fan speed selection button
6. Fan ON/OFF button
* Only for models with heating function.
** The indicated area is approximate. The value may vary depending on actual operating conditions.
Control Panel – Models with Mechanical Control BPAC-07 CM, BPAC-09 CM, BPAC-12 CM
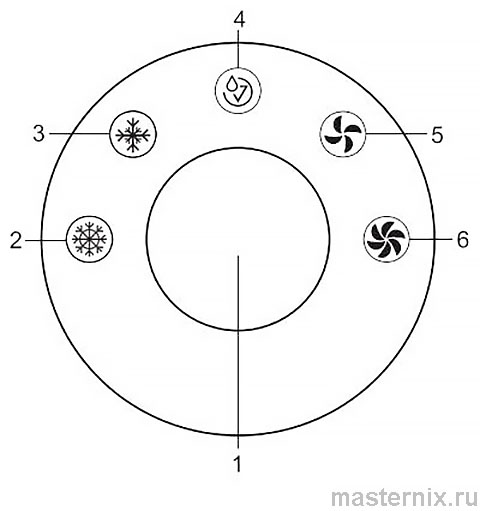
1. Control system ON joystick
2. High cooling mode
3. Moderate cooling mode
4. Fault indicator
5. Moderate ventilation mode
6. High ventilation mode
The One Touch intelligent control system allows operation of all appliance functions using a single joystick.
To start the appliance, press the joystick and select the required mode.
Symbol [2] indicates that the appliance will operate in cooling mode at high fan speed.
Symbol [3] indicates that the appliance will operate in cooling mode at moderate fan speed.
Symbol [5] indicates that the appliance will operate at moderate fan speed.
Symbol [6] indicates that the appliance will operate at high fan speed.
Never disconnect the air conditioner from the power supply while it is operating. Press the intelligent control joystick and wait 2–3 minutes. Then disconnect the appliance from the mains. This is necessary for the self-diagnosis system to complete its inspection cycle.
Symbol [4] indicates that:
- the condensate tank is full. Empty the tank following the instructions at the end of this manual.
- the air conditioner's self-diagnosis system has detected a malfunction. Disconnect the appliance from the mains and contact the nearest service center.
Remote Control Technical Specifications
Model: For air conditioners with electronic control
Rated voltage: 3.0 V
Minimum operating voltage: 2.0 V
Maximum distance to the signal receiver: 8 m (up to 11 m at 3 V)
Remote Control Functions
1. Possible mode selections: COOLING, DEHUMIDIFICATION, VENTILATION, and AUTOMATIC.
2. Additional modes and functions: TIMER (timer for turning the air conditioner on/off), FAN (airflow speed selection), CLOCK (clock setting), SWING (louver oscillation), SLEEP (night mode operation).
3. Setting the room air temperature in the range of 16°C to 31°C.
4. Display of operating modes on the liquid crystal display.
Button Description
Note:
The remote control automatically displays all symbols during power-on, and only according to the current operation for the remaining time.
The image shown refers to the standard remote control, with all functional buttons displayed. They may differ slightly from the buttons on your remote control depending on the model.
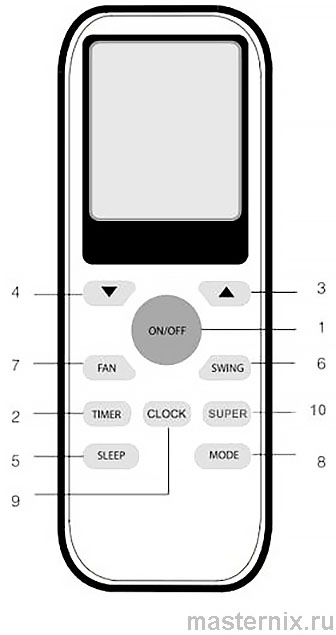
1. ON/OFF button.
Press to turn the air conditioner on; press again to turn it off.
2. TIMER button.
This button is used to set the ON timer and OFF timer.
3, 4. TEMPERATURE SETTING buttons ▲ / ▼
▲ Used to increase the temperature or to increase the set ON/OFF time for the timer. To raise the temperature, press the ▲ button. Holding the button for more than 2 seconds will rapidly increase the temperature until the button is released.
▼ Used to decrease the temperature. Holding the button for more than 2 seconds will rapidly decrease the temperature until the button is released.
5. SLEEP mode button.
Used to set or cancel night mode operation. This mode can be used as an energy-saving mode. The sleep mode operates only in AUTOMATIC (AUTO), COOLING (COOL), or HEATING (HEAT) modes.
❗👉➨ Note: Do not press other buttons while in this mode, as doing so will cancel it.
6. SWING button.
Press to activate automatic louver operation (oscillation up and down). Press again to disable automatic louver operation.
7. FAN speed button.
Use this button to change the indoor unit fan modes; each press changes the fan mode in the following order:
LOW – MEDIUM – HIGH
8. MODE button.
Each press of this button changes the operating mode of the air conditioner in the following sequence:
COOL – DRY – FAN
9. CLOCK button.
Sets the time. When pressed, the time display will start flashing.
10. SUPER mode button.
Pressing the SUPER button will enable/disable TURBO mode. Changing modes or adjusting fan speed will automatically disable TURBO mode.
❗👉➨ ABOUT THE SUPER FUNCTION
When this function is activated, the fan will operate at maximum speed to heat or cool the room as quickly as possible to reach the previously set temperature.
❗👉➨ Attention:
➠ The illustration shows and describes all the functions of this remote control (RC) and air conditioner. In units not equipped with all modes, unavailable functions will not operate.
➠ The set operating mode is retained after the unit is turned off. Upon the next pressing of the ON/OFF button, the mode will remain the same.
➠ In cooling-only models, the heating mode is replaced by the ventilation function.
➠ In TURBO mode, temperature changes occur faster and the adjustment range is wider. If you feel the room is too cold or too hot, turn off TURBO mode.
➠ The remote control may differ slightly from the one shown, but this does not affect its operation or use.
Remote Control Indicator
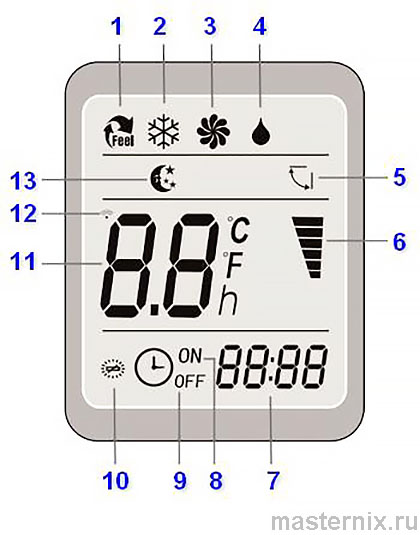
1. iFEEL mode icon.
Indicates when the iFEEL mode is active for temperature measurement using the remote control sensor.
2. COOL mode icon.
Indicates when cooling mode is active.
3. FAN mode icon.
Indicates when ventilation mode is active (without cooling).
4. DRY mode icon.
Indicates when dehumidification mode is active.
5. SWING ⇅ icon.
Indicates when SWING mode (louver oscillation) is active.
6. Indoor unit fan speed indicator.
Shows the fan operation mode:
LOW – MEDIUM – HIGH
7. Digital clock or timer indicator.
The clock display appears only when the timers are off. In timer mode, shows values from 00:00 to 23:50. When the auto-timer function (AUTO-ON/OFF) is enabled, the display shows the ON and OFF timer values. To view the current time, press the (CLOCK) button.
8. ON timer indicator.
Indicates when the ON timer is active.
9. OFF timer indicator.
Indicates when the OFF timer is active.
10. Low battery indicator.
Indicates when the remote control batteries need to be replaced.
11. Set temperature digital indicator.
Shows the temperature set by the user (in all modes except FAN). The value can range from 17°C to 30°C.
12. IR signal transmission indicator.
Appears when the remote control sends a command to the indoor unit.
13. SLEEP mode icon.
Indicates when the SLEEP mode is active.
❗👉➨ NOTE: Full display indication on the remote control is shown in the illustration for example purposes only.
.
Replacing Batteries
The remote control uses two LR03 alkaline batteries. Slide off the lower cover of the remote control and insert the batteries, observing the indicated polarity.
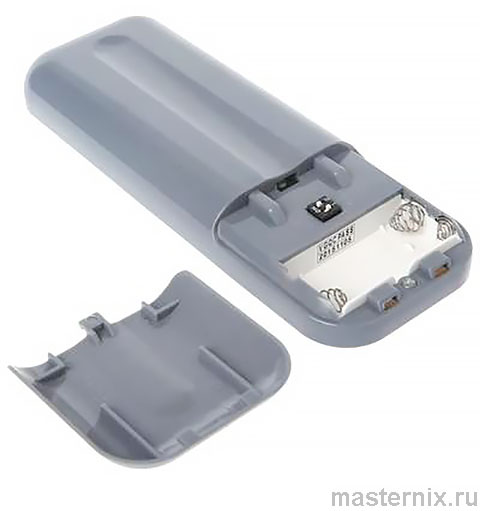
Replace the cover. After replacing the batteries, set the clock on the remote control.
Clock Setting
Before the first use of the air conditioner, set the remote control clock. The clock display on the remote control shows the time even when the air conditioner is turned off.
1. After installing or replacing the batteries, the clock display will flash and show 0:00.
2. Use the ▲ and ▼ temperature adjustment buttons to set the clock time. Each press changes the value by 1 minute. The time changes as quickly as you press the button. Holding the button will change the value in 10-minute increments. When the correct time is set, press the (CLOCK) button, or simply release the buttons; the clock will then be set.
3. To adjust the set time on the remote control, press and hold the (CLOCK) button for approximately 3 seconds until the time display starts flashing. Set the desired time following steps 1 and 2 of the “Clock Setting” section.
❗👉➨ NOTE:
Before setting the auto-timer function (AUTO-ON/OFF), make sure the clock is set. The clock can be adjusted while the auto-timer is active.
❗👉➨ WARNING!!
Static electricity or an electric field may cause the remote control clock to reset.
..
Turning On the Air Conditioner
1. Use the (MODE) button to select the desired mode.
2. Use the ▲ and ▼ buttons to select the desired temperature.
3. Press the (ON/OFF) button to turn on the air conditioner.
Turning Off the Air Conditioner
1. Press the (ON/OFF) button to turn off the air conditioner.
2. If the automatic mode (AUTO) is not comfortable for you, select another mode. In AUTO mode, fan speed adjustment is not available; speed is set automatically.
Operation in Cooling/Heating/Ventilation Modes
Turning On the Air Conditioner
1. Use the (MODE) button to select COOL, HEAT, or FAN mode.
2. Use the ▲ and ▼ buttons to select the desired temperature.
3. Use the (FAN) button to set the indoor unit fan speed. Each press changes the fan speed in the following order:
LOW – MEDIUM – HIGH
4. Press the (ON/OFF) button to turn on the air conditioner.
Turning Off the Air Conditioner
1. Press the (ON/OFF) button to turn off the air conditioner.
2. In FAN mode, temperature adjustment is not available.
Dehumidification Mode
Turning On the Air Conditioner
1. Use the (MODE) button to select the DRY mode.
2. Use the ▲ and ▼ buttons to select the desired temperature.
3. Press the (ON/OFF) button to turn on the air conditioner.
Turning Off the Air Conditioner
1. Press the (ON/OFF) button to turn off the air conditioner.
2. In DRY mode, fan speed adjustment is not available; the speed is set automatically.
Using the Timer
1. Press the (TIMER) button to select the ON timer or OFF timer. The selected mode will flash on the remote control display as the clock value.
2. Use the ▲ and ▼ buttons to set the timer value. Each press changes the value by 1 minute. The time changes as quickly as you press the button. Holding the button will change the value in 10-minute increments.
3. When the desired time is set, press the (CLOCK) button or release all buttons; the timer setting will be saved.
4. To cancel the timer, press the CANCEL button. To change the timer settings, follow steps 1, 2, and 3 of the “Using the Timer” section.
❗👉➨ NOTE: In timer mode, the remote control periodically transmits signals to the indoor unit. Ensure the remote control is positioned with no obstacles blocking the signal. The operating time with timer settings is limited to 24 hours.
Example of Timer Settings
ON Timer
This function is used to turn on the air conditioner at a set time, for example, before you return home.
❗👉➨ Attention: Timer functions are activated within three seconds after the remote control sends the signal. Do not press any buttons for three seconds after sending timer-related commands.
Example: Set the ON time to 06:00:
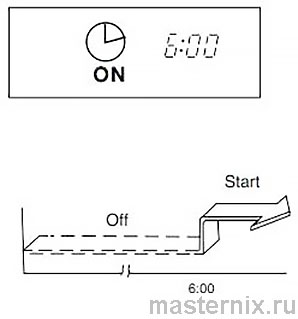
1. Press the (TIMER) button. The ON timer indicator on the remote control will flash (if 06:00 is set, this time will flash), and after 3 seconds the timer mode will be activated.
2. Set or adjust the desired time according to steps 1, 2, 3, and 4 of the “Timer Setting” section.
3. After 3 seconds, the new or set timer time will be activated.
OFF Timer
This function is used to turn off the air conditioner at a set time, for example, before you go to bed.
❗👉➨ Attention: Timer functions are activated within three seconds after the remote control sends the signal. Do not press any buttons for three seconds after sending timer-related commands.
Example: Set the OFF time to 23:00:
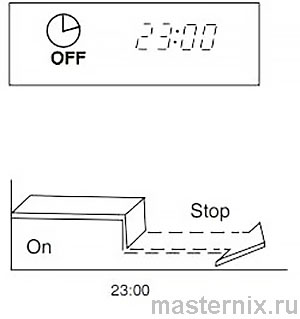
1. Press the (TIMER) button. The OFF timer indicator on the remote control will flash (if 23:00 is set, this time will flash), and after 3 seconds the timer mode will be activated.
2. Set or adjust the desired time according to steps 1, 2, 3, and 4 of the “Timer Setting” section.
3. After 3 seconds, the new or set timer time will be activated.
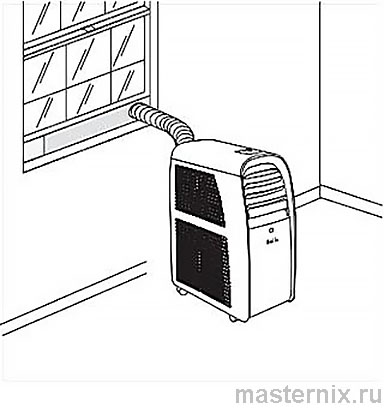
Air Conditioner Installation
1. Select a suitable location for installing the air conditioner with convenient access to an electrical outlet.
2. Install the exhaust hose in a window or a special opening.
❗👉➨ NOTE:
Step 2 is required only if the air conditioner will operate in COOL mode.
3. Plug the power cord into a grounded power outlet with parameters 220–240 V ~ 50 Hz.
4. Turn on the air conditioner by pressing the “ON/OFF” (or “Power”) button.
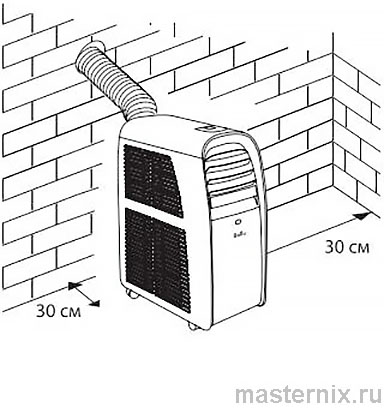
❗👉➨ WARNING!!
For installation, choose a flat and spacious location. Ensure unobstructed airflow to the unit. The distance from the air conditioner to walls or other objects must be at least 30 cm. Do not use the air conditioner in rooms with high humidity (laundries, bathrooms, etc.). Ensure easy access to the power outlet. Electrical installation of the air conditioner must be carried out in accordance with the Electrical Installation Code and local regulations.
Exhaust Hose Installation (Cooling Mode Only)
❗👉➨ WARNING!!
During cooling and dehumidification, warm air is expelled through the air duct.
1. Attach one end of the hose to the exhaust air outlet and secure the left side first, then the right side of the fitting. Press the fitting to ensure the hose is securely attached.
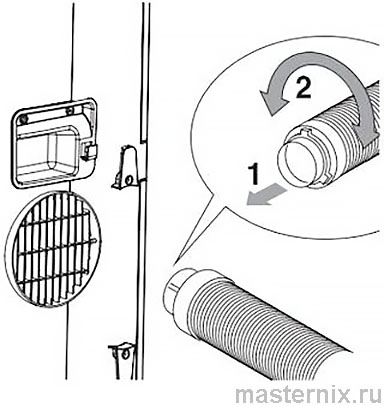
2. Place the other end of the hose into the nearest window or a special opening for warm air exhaust.
❗👉➨ WARNING!!
Avoid excessive bending of the hose.
Related articles:
Air Conditioners: Main Functions and Modes
Ballu Air Conditioner Error Codes
GYKQ 36 Air Conditioner Remote Control Compatibility


