
User manual for the universal remote control for Centek air conditioners YKR-T/121E (YKR-T/011E)
Руководство / инструкция

Меры безопасности для долгой службы пульта
Базовые правила эксплуатации
Начните с простого: пульт — не игрушка. Дети любят нажимать кнопки, но электроника этого не прощает. Храните устройство вне досягаемости малышей. Направляйте излучатель строго на внутренний блок: максимальная дальность — 8 метров по прямой, с отклонением до 45° в стороны. Препятствия на пути сигнала? Связь ухудшится.
Держите пульт подальше от телевизоров и радио — минимум метр. Это исключит помехи. Удары, влага, прямые солнечные лучи, жара: всё это враги электроники. Берегите устройство, и оно прослужит годы.
Чего делать категорически нельзя
Острые предметы для нажатия кнопок? Забудьте. Мембраны легко повредить. Бензин, растворители, химические салфетки при очистке? Тоже нет. Достаточно мягкой сухой ткани.
Пульт «заглючил»? Выньте батарейки, подождите полминуты, вставьте обратно. Часто помогает. Не сработало — замените элементы питания. При долгом перерыве в использовании обязательно извлекайте батарейки: окисление контактов никому не нужно.
Расшифровка индикаторов дисплея
Полная карта символов на экране
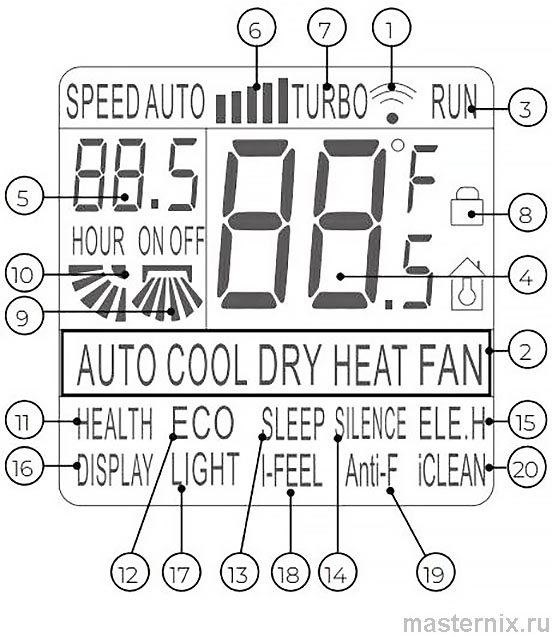
Разберёмся с тем, что вы видите на дисплее. Индикатор передачи сигнала появляется при отправке команды. 【RUN】 показывает, включён ли кондиционер. Цифровой дисплей отображает заданную температуру (16-32°С) или время таймера (0,5-24 часа).
Индикаторы скорости вентилятора, режимов 【TURBO】, 【SLEEP】, 【HEALTH】 — всё это подсказки, которые помогают ориентироваться в настройках. Обратите внимание: некоторые функции, отмеченные звёздочкой (*), в данной серии пультов не используются. Это нормально, не ищите несуществующие кнопки.
Режимы работы: как выбрать оптимальный
Переключение между AUTO, COOL, HEAT, DRY, FAN
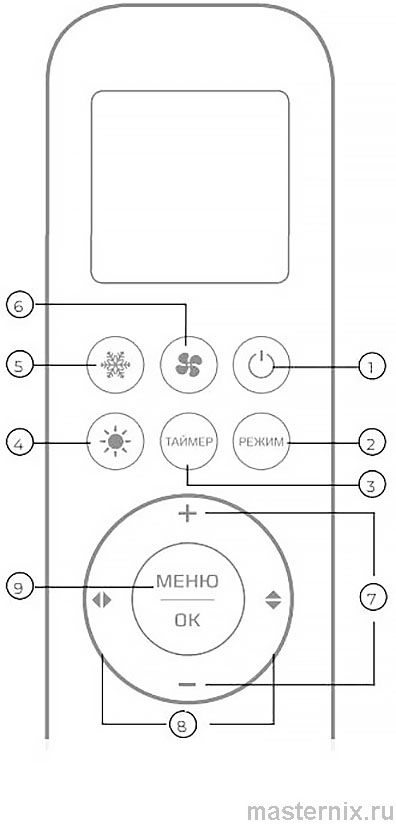
Кнопка 【РЕЖИМ】 циклически переключает варианты: 【AUTO】 → 【COOL】 → 【DRY】 → 【HEAT】 → 【FAN】. При первом включении по умолчанию активируется 【AUTO】.
Автоматический режим 【AUTO】
Система сама решает, греть или охлаждать, ориентируясь на температуру в комнате. Целевое значение не отображается и не регулируется — комфортные 23±2°С поддерживаются автоматически. Скорость вентилятора задаётся кнопкой  : низкая, средняя, высокая, 【ТУРБО】 или авто.
Охлаждение 【COOL】 и обогрев 【HEAT】
Выберите режим кнопкой 【РЕЖИМ】 или напрямую через  /
/  . Кнопками [+] и [—] установите температуру от 16 до 32°С. Скорость обдува регулируется отдельно.
Важный момент: если ваш кондиционер работает только на холод, режим 【HEAT】 в нём физически отсутствует. Это не поломка.
Осушение 【DRY】 и вентиляция 【FAN】
В режиме 【DRY】 температура регулируется, но скорость вентилятора фиксирована — система сама подбирает оптимальный обдув для удаления влаги. 【FAN】 запускает только вентилятор без контроля температуры: полезно для циркуляции воздуха без изменения микроклимата.
Запомните: кондиционер не подаёт свежий воздух с улицы. Он работает с тем, что уже в помещении.
Точная регулировка температуры и обдува
Настройка целевых параметров
Кнопки [+] и [—] меняют температуру с шагом 1°С в диапазоне 16-32°С. Значение отображается на дисплее пульта и на панели внутреннего блока.
Скорость вентилятора переключается кнопкой : 【Низкая】 → 【Средняя】 → 【Высокая】 → 【ТУРБО】 → 【Автоматическая】. В авто-режиме система сама подбирает интенсивность обдува в зависимости от разницы между заданной и текущей температурой.
Нюанс: в режиме 【DRY】 ручная регулировка скорости недоступна. Система работает по собственному алгоритму.
Таймер: программирование включения и выключения
Как настроить отложенный старт и остановку
Нажмите 【ТАЙМЕР】 — индикатор 【ON/OFF】 начнёт мигать. Кнопками [+] / [—] установите время от 0,5 до 24 часов (шаг 0,5 часа до 10 часов, далее — 1 час). Подтвердите настройку повторным нажатием 【ТАЙМЕР】.
【TIMER ON】 работает только при выключенном кондиционере, 【TIMER OFF】 — при включённом. Если не подтвердить настройку за 10 секунд, система выйдет из режима программирования. Отменить установку можно повторным нажатием кнопки.
Практический совет: настройте включение за 30 минут до возвращения домой — придёте в уже прохладную или прогретую комнату.
Полезные функции: очистка, ионизация, сон
Доступ через меню 【МЕНЮ】 и 【OK】
Вход в расширенные настройки: нажмите 【МЕНЮ】, стрелками выберите функцию, подтвердите 【OK】. Отключение — аналогично.
Самоочистка 【iCLEAN】 и защита от плесени 【ANTI-F】
【iCLEAN】 запускает трёхэтапный цикл: охлаждение (накопление конденсата), нагрев (стерилизация), вентиляция (просушка). На дисплее внутреннего блока отображается код 【CL】. Длительность — около 35 минут.
【ANTI-F】 работает после выключения: вентилятор продолжает крутиться 3 минуты на низкой скорости, просушивая теплообменник. Активируется только после режимов охлаждения или осушения. Не перезапускайте кондиционер во время этого цикла.
Комфорт сна 【SLEEP】 и тихий режим 【SILENCE】
【SLEEP】 отключает подсветку внутреннего блока и плавно корректирует температуру: при охлаждении повышает на 1°С через 1 и 2 часа, при обогреве — понижает. Через 10 часов система возвращается к обычному режиму.
【SILENCE】 переводит вентилятор и компрессор на минимальные обороты. Для отключения нажмите кнопку регулировки скорости.
Ионизация 【HEALTH】, экономия 【ECO】, датчик 【I-FEEL】
【HEALTH】 включает встроенный ионизатор. 【ECO】 активирует энергосберегающий алгоритм. 【I-FEEL】 переключает контроль температуры на датчик в пульте: система ориентируется на микроклимат там, где вы находитесь.
Для работы 【I-FEEL】 обеспечьте прямую видимость между пультом и блоком (до 8 м) и не закрывайте вентиляционное отверстие на задней панели пульта.
Управление потоком воздуха без ошибок
Настройка жалюзи: вертикаль и горизонталь
Кнопки 【L/R SWING】 и 【U/D SWING】 управляют качанием вертикальных и горизонтальных жалюзи. Повторное нажатие фиксирует положение.
Лайфхак: удержание 【U/D SWING】 3 секунды переключает режим с качания на пошаговую настройку (5 позиций + возврат к качанию). Для отмены — снова удерживайте 3 секунды.
Критически важно: не поворачивайте жалюзи вручную. Механизм может выйти из строя. При длительной работе на охлаждение не направляйте поток вниз — избежите конденсата и луж на полу.
Замена батареек: пошаговая инструкция
Быстрая замена без ошибок
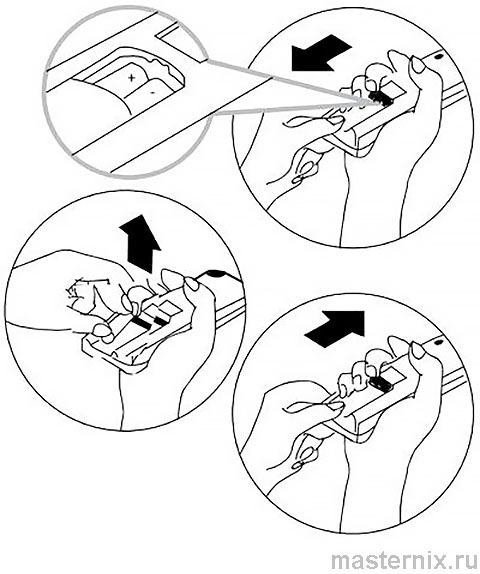
1. Сдвиньте крышку на задней панели. 2. Вставьте две новые щелочные батарейки типа ААА, соблюдая полярность. 3. Закройте отсек до щелчка.
Меняйте элементы, если дисплей тускнеет, кнопки реагируют с задержкой или пульт перестал управлять кондиционером. Не смешивайте старые и новые батарейки. При хранении более месяца извлекайте питание — окисление контактов выведет пульт из строя.
Аварийное управление при потере пульта
Включение кондиционера без дистанционного управления
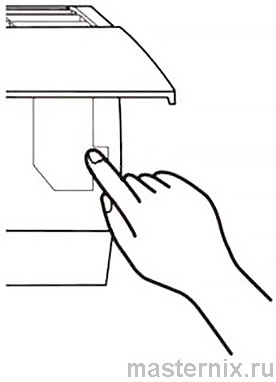
Нашли на внутреннем блоке маленькую кнопку? Это аварийный переключатель. Кратковременное нажатие включает кондиционер в режим 【AUTO】, повторное — выключает.
Важно: не удерживайте кнопку долго, это может вызвать сбой электроники. После включения аккуратно закройте переднюю панель блока. Используйте этот метод только в экстренных случаях.
Встроенные защитные функции системы
Как кондиционер защищает себя и вас
Тёплый пуск: вентилятор не запустится на высокой скорости, пока теплообменник не прогреется — никаких сквозняков холодным воздухом.
Температурная компенсация: система учитывает расслоение воздуха по высоте и поддерживает комфорт именно на уровне пользователя.
Автоперезапуск: при скачке напряжения кондиционер сохранит настройки и продолжит работу после восстановления питания.
Запоминание положения жалюзи: после выключения и включения заслонки вернутся в ранее заданную позицию.
【Smart Defrost】: умное оттаивание наружного блока в режиме нагрева — система сама запускает цикл разморозки при обмерзании.
Самодиагностика: микроконтроллер отслеживает неисправности и останавливает систему при угрозе поломки, отображая код ошибки на дисплее.
Фильтр высокой плотности (ячейки 0,54×0,54 мм) задерживает мелкую пыль. Покрытие 【Blue Fin】 на теплообменнике защищает от коррозии и продлевает срок службы.
Опция низкотемпературного комплекта позволяет работать на охлаждение при уличной температуре до –30...–40°С — актуально для серверных и зимнего проветривания.
| Совместимые модели кондиционеров Centek |
|---|
| Centek CT-65U10, CT-65U13, CT-65U18, CT-65U24 |
| Centek CT-65E07+, CT-65E09, CT-65E12, CT-65E18, CT-65E24 |
| Centek CT-65Z10, CT-65Z13, CT-65Z18, CT-65Z24 |


