Руководство пользователя пульта дистанционного управления Chigo ZH JT-03/JT-01
Руководство / инструкция
Совместимые модели сплит-систем Chigo
Данный пульт дистанционного управления разработан для настенных сплит-систем Chigo. Проверьте, подходит ли он к вашей модели:
Chigo CS/CU-21H3A-V84
Chigo CS/CU-21H3A-V124
Chigo CS/CU-25H3A-V84
Chigo CS/CU-25H3A-V124
Chigo CS/CU-32H3A-V84
Chigo CS/CU-32H3A-V124
Chigo CS/CU-51H3A-V84
Chigo CS/CU-61H3A-V84
Chigo CS/CU-51H3A-P124
Chigo CS/CU-61H3A-P124
Правила безопасной эксплуатации
Перед первым включением внимательно изучите эти рекомендации. Они помогут избежать поломок и продлят срок службы пульта.
Основные требования
- Установите батарейки, соблюдая полярность («+» и «-»). Ошибка может вывести устройство из строя
- Направляйте пульт строго на приёмник сигнала кондиционера. Убедитесь, что между ними нет препятствий
- Максимальная дистанция работы — 8 метров. Больше не нужно, проверено
- Берегите от падений и ударов. Механические повреждения — частая причина неисправностей
- Исключите попадание влаги. Жидкость внутри корпуса = новый пульт
- Не оставляйте под прямыми солнечными лучами или рядом с источниками тепла
Если пульт перестал работать
Выньте батарейки на 30 секунд, затем вставьте обратно. Не помогло? Замените элементы питания на новые.
Важный момент: никогда не смешивайте старые и новые батарейки, а также элементы разных типов. Это вызывает сбои в работе.
При длительном перерыве в использовании извлеките батарейки. Вытекший электролит способен безвозвратно испортить устройство.
Дополнительные предупреждения
Устройство не предназначено для использования детьми без присмотра взрослых. Маленькие дети должны находиться под наблюдением и не играть с пультом.
Особенности универсального пульта
Этот пульт оснащён всеми возможными функциями. Но ваша модель кондиционера может не поддерживать некоторые из них. Соответствующие кнопки просто не будут реагировать на нажатия — это нормально.
В режиме охлаждения кнопки НАГРЕВА и ELE.H остаются неактивными.
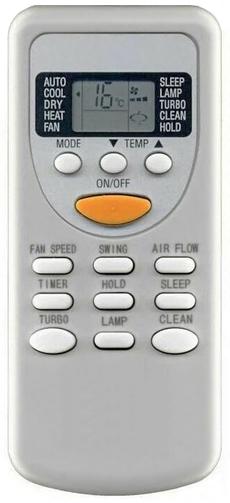
Расположение и назначение кнопок
На дисплее отображаются только активные символы в соответствии с выбранным режимом работы.
Представленная схема показывает все функциональные кнопки. На вашем пульте их может быть меньше — зависит от конкретной модели кондиционера.
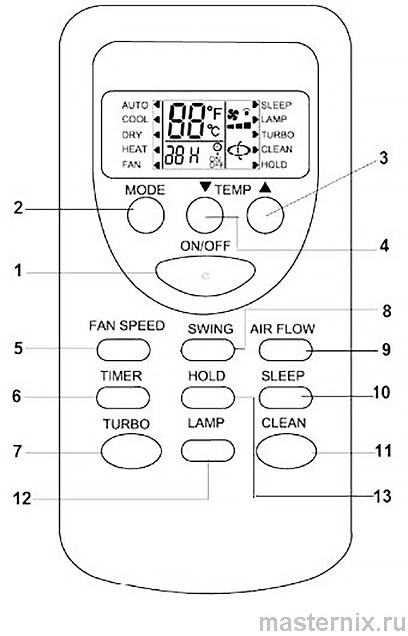
Основные кнопки управления
- ON/OFF — включение и выключение кондиционера
- MODE — выбор режима работы (охлаждение, нагрев, осушение и т.д.)
- ▲ — повышение температуры на 1 градус
- ▼ — понижение температуры на 1 градус
- FAN SPEED — регулировка скорости воздушного потока (авто/низкая/средняя/высокая)
- TIMER — установка таймера включения/выключения
- TURBO — режим интенсивной работы вентилятора
- SWING — управление вертикальными жалюзи (вверх-вниз)
- AIR FLOW — выбор направления потока по горизонтали (влево/вправо/фиксировано)
- SLEEP — активация ночного экономичного режима
- CLEAN — запуск функции самоочистки (доступна не во всех моделях)
- LAMP — включение/выключение подсветки дисплея (доступна не во всех моделях)
- HOLD — блокировка кнопок от случайных нажатий
Важные нюансы
Выбранный режим работы сохраняется в памяти даже после выключения. При следующем включении кондиционер продолжит работу в тех же настройках.
В моделях, работающих только на охлаждение, режим НАГРЕВА автоматически заменяется функцией ВЕНТИЛЯЦИИ.
Режим TURBO ускоряет изменение температуры. Если в комнате слишком холодно или жарко — отмените этот режим после достижения комфорта.
Расшифровка символов дисплея
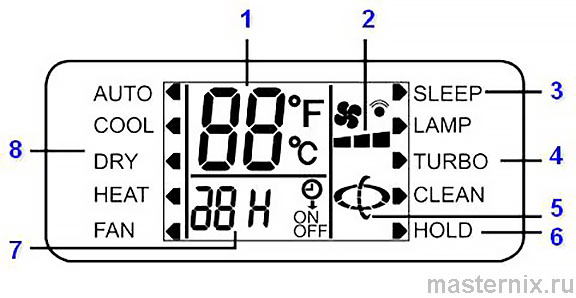
Разберёмся, что означают индикаторы на экране:
- Температура — показывает установленное значение
- Скорость вентилятора — текущая интенсивность потока
- Иконка SLEEP — активирован ночной режим
- Иконка TURBO — включён режим максимальной мощности
- Индикатор SWING — текущее положение жалюзи
- Замок — кнопки заблокированы
- Время — оставшееся время до срабатывания таймера
- Режимы работы:
- AUTO — автоматический режим
- COOL — охлаждение
- DRY — осушение
- HEAT — нагрев
- FAN — вентиляция
Основные режимы работы кондиционера
Включение и выключение
Нажмите кнопку ON/OFF для запуска или остановки кондиционера. При выключении сбрасываются настройки таймера и ночного режима.
Регулировка скорости вентилятора
Кнопка FAN SPEED переключает скорости по кругу:
Низкая → Средняя → Высокая → Авто → (повтор цикла)
Обратите внимание: в режиме ВЕНТИЛЯЦИИ автоматическая скорость недоступна.
Выбор режима работы
Кнопка MODE циклически переключает режимы:
АВТО → ОХЛАЖДЕНИЕ → ОСУШЕНИЕ → НАГРЕВ → ВЕНТИЛЯЦИЯ → (повтор)
Важно: режим НАГРЕВА отсутствует в кондиционерах, работающих только на охлаждение.
Автоматический режим
Кондиционер сам поддерживает комфортную температуру. Вот как его активировать:
- Нажмите MODE, выберите АВТО
- Кнопкой FAN SPEED установите желаемую скорость (НИЗК/СРЕД/ВЫС/АВТО)
- Нажмите ON/OFF для запуска
- Для остановки нажмите ON/OFF повторно
В режиме вентиляции настройка температуры не работает.
Режимы охлаждения и нагрева
Эти режимы дают полный контроль над климатом:
- Нажмите MODE, выберите ОХЛАЖДЕНИЕ или НАГРЕВ
- Кнопками ▲ или ▼ установите температуру от 16°C до 32°C (от 60°F до 90°F)
- Кнопкой FAN SPEED выберите скорость потока
- Нажмите ON/OFF для старта
- Повторное нажатие ON/OFF остановит работу
Помните: в моделях только с охлаждением функция нагрева недоступна.
Режим вентиляции
Кондиционер работает как обычный вентилятор:
- Нажмите MODE, выберите ВЕНТИЛЯЦИЯ
- Кнопкой FAN SPEED установите скорость (НИЗК/СРЕД/ВЫСОК)
- Нажмите ON/OFF для включения
- Повторное нажатие выключит устройство
Температура в этом режиме не регулируется.
Режим осушения
Убирает лишнюю влагу из воздуха:
- Нажмите MODE, выберите ОСУШЕНИЕ
- Кнопками ▲ или ▼ задайте температуру (16-32°C)
- Кнопкой FAN SPEED выберите скорость
- Нажмите ON/OFF для запуска
- Повторное нажатие остановит процесс
Интенсивный режим и направление потока
Функция TURBO
Нужно быстро охладить или нагреть помещение? Используйте TURBO:
Нажмите кнопку TURBO в режимах ОХЛАЖДЕНИЯ или НАГРЕВА. Вентилятор заработает на максимальной скорости. Для возврата к обычной работе нажмите TURBO повторно.
Вертикальное направление (SWING ↑↓)
Нажмите кнопку SWING для автоматического движения жалюзи вверх-вниз. Повторное нажатие зафиксирует их в текущем положении.
Горизонтальное направление (SWING ←→)
Эта кнопка управляет потоком влево-вправо. Нажмите ещё раз для фиксации.
Программирование таймера
Автоматическое выключение
Хотите, чтобы кондиционер выключился через определённое время?
- Во время работы нажмите кнопку TIMER
- Каждое нажатие увеличивает время на 1 час (от 1 до 24 часов)
- После 24 часов следующее нажатие отменяет таймер и сбрасывает счётчик на 1
- На дисплее появится обратный отсчёт до выключения
Автоматическое включение
Кондиционер включится сам, когда вы вернётесь домой:
- При выключенном кондиционере (режим standby) нажмите TIMER
- Установите время до включения (1-24 часа, шаг 1 час)
- После 24 часов таймер сбросится
- На экране отобразится время до запуска
Для отмены установленного таймера нажмите TIMER ещё раз.
Важно: при активированном таймере включения большинство кнопок блокируется (кроме SLEEP и отображения).
Экономичный ночной режим
Функция SLEEP снижает шум и экономит электроэнергию во время сна.
Как это работает:
- В режиме охлаждения температура плавно повышается на 2°C
- В режиме нагрева температура постепенно снижается на 5°C
- Через 2 часа скорость вентилятора уменьшается
Нажмите SLEEP для активации. Режим доступен только в режимах ОХЛАЖДЕНИЯ, НАГРЕВА и АВТО. В режиме ВЕНТИЛЯЦИИ функция не работает.
Функция самоочистки
LAMP — подсветка дисплея
Кнопка LAMP включает или выключает подсветку. Удобно, когда яркий дисплей мешает спать ночью.
CLEAN — очистка и сушка
Эта функция удаляет пыль и влагу из внутреннего блока:
Нажмите CLEAN при выключенном кондиционере. На дисплее появится индикатор режима осушения. Процесс занимает около 30 минут.
Если нужно остановить очистку досрочно — нажмите CLEAN повторно.
Регулярное использование функции повышает эффективность охлаждения и нагрева.
Замена элементов питания
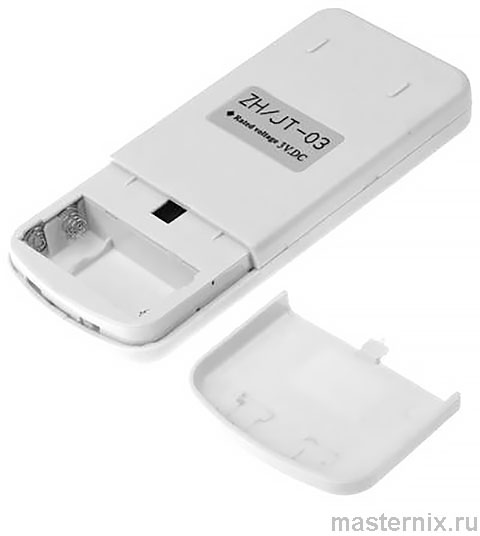
Батарейки служат в среднем полгода при регулярном использовании.
Пошаговая инструкция
- Сдвиньте крышку отсека питания
- Извлеките старые батарейки
- Вставьте новые, соблюдая полярность (+ и -)
- Закройте крышку
Критически важные правила
- Никогда не используйте старые и новые батарейки вместе
- Не смешивайте элементы разных типов (щелочные с солевыми, например)
- При длительном простое извлекайте батарейки — вытекший электролит разрушит контакты
- Замените элементы, если пульт не реагирует или дисплей стал тусклым
Соблюдение этих простых правил обеспечит стабильную работу пульта на долгие годы.


