User manual for the Lessar LZ-KDP remote control
Руководство / инструкция
Эргономика и простота управления
Дизайн, который экономит время
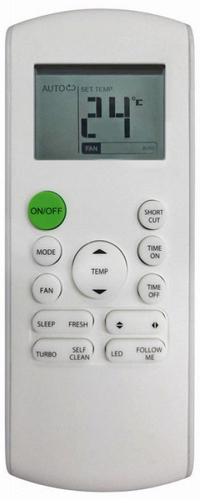
Lessar не стал усложнять то, что должно быть простым. Пульт Intellect — это тот случай, когда форма следует за функцией. Кнопки расположены так, что пальцы сами находят нужную. Желтая подсветка ночью? Практично. Не нужно включать свет, чтобы изменить температуру.
Крепление на стену — мелочь, которая меняет всё. Пульт всегда на месте, не теряется, не падает. Вы наверняка сталкивались с ситуацией, когда пульт «исчезает» в самый неподходящий момент. Здесь такой проблемы нет.
Совместимость с моделями кондиционеров
Какие кондиционеры работают с этим пультом
Пульт LZ-KDP (он же RG57B/BGE) универсален. Вот основные совместимые модели:
| Серия | Модели |
|---|---|
| KEA2 | LS/LU-H07KEA2, LS/LU-H09KEA2, LS/LU-H12KEA2, LS/LU-H18KEA2, LS/LU-H24KEA2 |
| KFA2 | LS/LU-H07KFA2, LS/LU-H09KFA2, LS/LU-H12KFA2, LS/LU-H18KFA2, LS/LU-H24KFA2, LS/LU-H28KFA2 |
| HE-KFA2 | LS/LU-HE09KFA2, LS/LU-HE12KFA2, LS/LU-HE18KFA2 |
| KB2 (ion) | LS/LU-H07KB2, LS/LU-H09KB2, LS/LU-H12KB2, LS/LU-H18KB2, LS/LU-H24KB2, LS/LU-H28KB2 |
| HE-KCA2 | LS/LU-HE09KCA2, LS/LU-HE12KCA2 |
| 2H-KCY2 (ion) | LS/LU-2H18KСY2, LS/LU-2H21KСY2 |
Есть нюансы. Если ваша модель не в списке — проверьте маркировку RG57B/BGE. Часто пульт подходит, даже если номер отличается. Это серьёзно упрощает поиск замены.
Технические параметры
Производитель: LESSAR
Модель: LZ-KDP
Тип: универсальный пульт ДУ
Дисплей: LCD с четкой индикацией
Дальность: до 8 метров при прямой видимости
Питание: 3.0 В (2 батарейки LR03)
Рабочий диапазон: от -5°С до +60°С
Диапазон температур впечатляет. Не каждый пульт выдержит такие перепады. Этот — выдержит. Что логично для климатической техники.
Правила безопасного использования
Что продлит жизнь вашему пульту
Перед первым использованием: вставьте батарейки, соблюдая полярность. Кажется, очевидно? Да. Но большинство проблем начинаются именно здесь.
- ✔️ Направляйте пульт на приемник без препятствий, дистанция — до 8 метров
- ✔️ Берегите от падений, влаги, прямых солнечных лучей
- ✔️ При сбоях: выньте батарейки на 30 секунд, вставьте заново
- ✔️ Не смешивайте старые и новые элементы питания
- ✔️ При длительном хранении — извлеките батарейки во избежание утечки
Дети? Присматривайте. Пульт — не игрушка, хоть и выглядит безобидно. Впрочем, не всегда.
Ограничения функционала
Универсальность — это плюс. Но: некоторые кнопки могут не работать на вашем кондиционере. Это нормально. Например, функции SILENCE или FOLLOW ME доступны не на всех моделях. Не баг, а особенность.
Полная расшифровка кнопок пульта
Визуальная навигация по интерфейсу
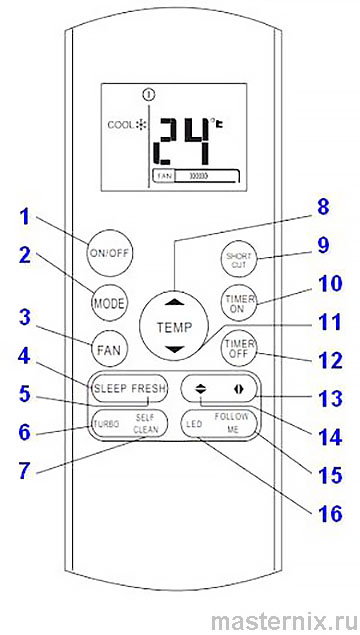
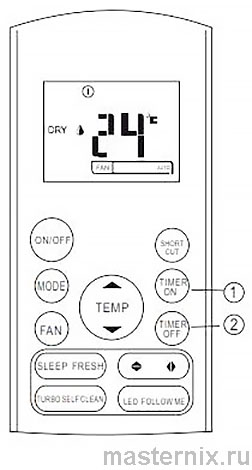
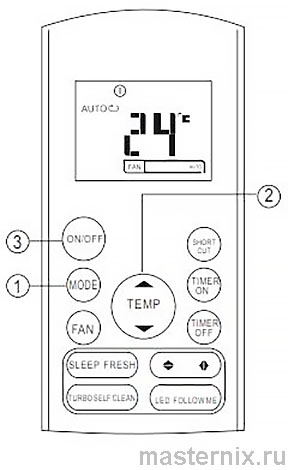
Нумерация для быстрого ориентира:
- 【ON/OFF】 Включение/Отключение
- 【MODE】 Изменение режимов работы
- 【FAN】 Изменение скорости вентилятора
- 【SLEEP】 Включение/отключение ночного режима
- 【FRESH】 Активация ионизатора / плазмы
- 【TURBO】 Включение/отключение режима максимальной мощности
- 【SELF CLEAN】 Активация режима самоочистки
- 【TEMP ▲】 Повышение значения температуры
- 【SHORT CUT】 Возврат к предыдущим настройкам
- 【TIMER ON】 Настройка таймера на включение
- 【TEMP ▼】 Понижение значения температуры
- 【TIMER OFF】 Настройка таймера на выключение
- 【SWING V】 Изменение положения вертикальных жалюзи
- 【SWING H】 Изменение положения горизонтальных жалюзи
- 【FOLLOW ME】 Включение/отключение функции «Следуй за мной»
- 【LED】 Включение/отключение подсветки дисплея внутреннего блока
Обратите внимание: на вашем пульте некоторые кнопки могут отсутствовать — зависит от модели кондиционера. Это не дефект.
Важные предупреждения по функциям
Установленный рабочий режим сохраняется после выключения. При следующем включении кондиционер продолжит работу в том же режиме. Удобно, правда?
В режиме Турбо температура меняется быстрее. Если стало слишком холодно или жарко — просто отключите режим. Всё.
Что означают символы на экране
Расшифровка индикации
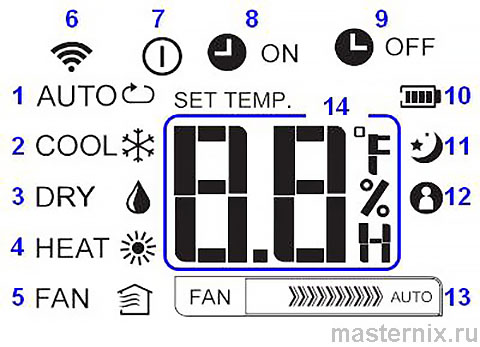
Что показывает дисплей:
- ★ AUTO — автоматический режим
- ★ COOL — охлаждение
- ★ DRY — осушение
- ★ HEAT — обогрев
- ★ FAN — вентиляция
- ★ Индикатор передачи сигнала
- ★ Индикатор работы кондиционера
- ★ TIMER ON — настройка включения по таймеру
- ★ TIMER OFF — настройка выключения по таймеру
- ★ Индикатор разряда батареек
- ★ SLEEP — ночной режим
- ★ FOLLOW ME — функция отслеживания температуры по пульту
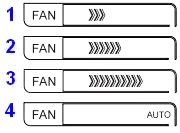
- ★ Скорость вентилятора (полоски или AUTO)
- ★ Текущая температура / настройки таймера
Всё отображается автоматически. Никаких лишних телодвижений. Это серьёзно экономит время.
Базовые режимы: охлаждение, обогрев, вентиляция
Быстрый старт работы
Нажали 【ON/OFF】 — кондиционер включился. Еще раз — выключился. Просто. При выключении сбрасываются настройки таймера и спящего режима. Имейте в виду.
Кнопка 【MODE】 переключает циклы: АВТО → ОХЛАЖДЕНИЕ → СУШКА → НАГРЕВ → ВЕНТИЛИРОВАНИЕ → (повтор). Удобно, правда?

Важно: если ваш кондиционер только охлаждает, режим НАГРЕВА не активируется. Система просто пропустит этот шаг.
Настройка температуры и скорости
Кнопки ▲▼ меняют температуру в диапазоне 16–32°С. В режимах АВТО и ВЕНТИЛЯЦИИ температура не настраивается — кнопки просто не сработают. Это нормально.
【FAN】 переключает скорость: Низкий → Средний → Высокий → Авто. В режиме ВЕНТИЛЯЦИИ авто-скорость недоступна — выбирайте вручную.
Управление воздушным потоком
Кнопки 【SWING】 меняют положение жалюзи. Короткое нажатие — сдвиг на одну позицию (всего 6). Долгое нажатие (2–3 сек) — автоматическое качание. Повторное нажатие — остановка в текущем положении.
Важный нюанс: не все внутренние блоки имеют электропривод вертикальных жалюзи. В этом случае настройка возможна только вручную. Проверьте свою модель.
Турбо, Спящий режим и умные функции
Быстрое достижение комфорта
【TURBO】 — ваш спаситель, когда в комнате слишком жарко или холодно. Кондиционер выходит на максимум. Почувствовали комфорт? Нажмите еще раз для отмены. Всё.
【SLEEP】 экономит энергию ночью. Доступен в режимах Охлаждения, Обогрева, Авто. Как работает: система запоминает температуру, держит её 2 часа, затем плавно меняет на 1°С. Еще через 2 часа — снова коррекция. Через 7 часов — автоматическое выключение.
Дополнительные интеллектуальные функции
【FOLLOW ME】 — интересная фишка. Кондиционер начинает ориентироваться на температуру там, где находится пульт. Удобно, если вы сидите далеко от внутреннего блока. Но: функция доступна только на серии LuxAir Inverter.
【FRESH】 включает ионизатор или плазменный фильтр. Повторное нажатие — отключение. Проще некуда.
【SELF CLEAN】 запускает самоочистку испарителя. Вентилятор работает некоторое время, удаляя остатки влаги. Важно: фильтры это не чистит — их нужно мыть отдельно.
【LED】 отключает подсветку дисплея внутреннего блока. Для тех, кто не любит свет в спальне. Гениально просто.
【SHORT CUT】 возвращает предыдущие настройки. Забыли, что выставляли? Одна кнопка — и всё как было.
Таймер: пошаговая настройка включения и выключения
Гибкое планирование работы
【TIMER ON】 / 【TIMER OFF】 — ваше расписание климата. Нажали — вошли в режим настройки. Каждое нажатие меняет время на 0,5 часа. Зажали — время меняется быстрее. Не нажимаете 5 секунд — настройки сохраняются автоматически.
Отмена — повторное нажатие на ту же кнопку. Быстро, без лишних меню.
Примеры сценариев
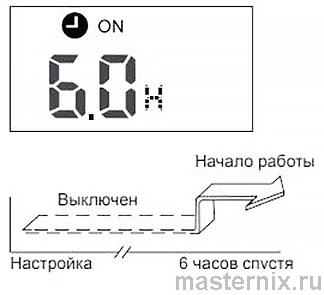
Включение к 6:00 утра (если сейчас полночь):
- Нажмите 【TIMER ON】
- Повторяйте нажатия, пока на дисплее не появится 6.0
- Подождите несколько секунд — индикатор времени сменится на температуру, сверху загорится TIMER ON
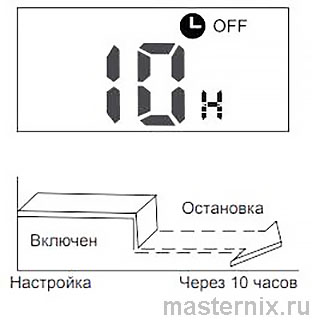
Выключение через 10 часов: Аналогично, но с 【TIMER OFF】 и значением 10.0.
Комбинированные сценарии
Хотите, чтобы кондиционер выключился в 22:00 и включился в 6:00?
- Настройте 【TIMER OFF】 на 2.0 (через 2 часа)
- Подождите сохранения
- Нажмите 【TIMER ON】, выставите 10.0 (еще через 10 часов)
- Подтвердите ожиданием
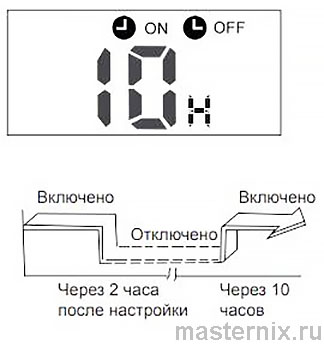
Важно: интервалы менее 15 минут могут обрабатываться некорректно. Ставьте с запасом. Это серьёзно.
Замена элементов питания без ошибок
Пошаговая инструкция за 30 секунд
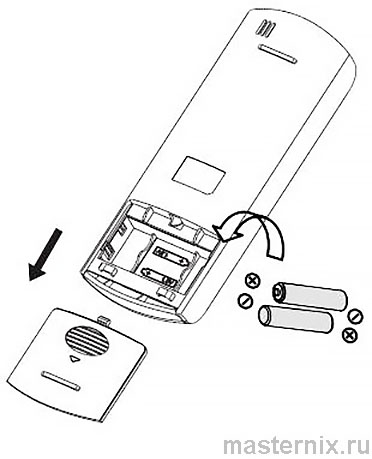
- Сдвиньте крышку отсека
- Извлеките старые батарейки
- Вставьте новые LR03, соблюдая полярность (+/-)
- Закройте крышку
Критично: не смешивайте старые и новые элементы. Не используйте разные типы. Иначе — сбои, тусклый дисплей, потеря сигнала.
Если пульт «завис»: выньте батарейки, подождите 30 секунд, вставьте снова. Помогает в 9 из 10 случаев. Практика показывает.
Настройка часов и автоматические сценарии
Точное время — основа таймеров
После установки батареек дисплей покажет 00:00. Настраиваем:
- Кнопками ▲▼ выставите текущее время (шаг 1 мин, зажатие — 10 мин)
- Нажмите и удерживайте 【CLOCK】 5 секунд — время сохранится
Перенастройка: удерживайте 【CLOCK】 3 секунды до начала мигания, повторите шаги.
Важно: часы должны быть настроены перед использованием таймеров. Иначе сработают не вовремя.
Автоматический режим: умный климат
В режиме AUTO кондиционер сам подбирает параметры. Вы задаете желаемую температуру — система решает, охлаждать или греть.
- 【MODE】 → выберите AUTO
- 【TEMP】 → задайте комфортное значение
- 【ON/OFF】 → старт
Не нравится? В любой момент переключите режим кнопкой 【MODE】. Гибкость — это про Intellect.
Решение частых проблем и ручной запуск
Быстрые ответы на типичные вопросы
Пульт не реагирует? Проверьте:
- Батарейки: полярность, заряд, отсутствие утечки
- Дистанцию: не более 8 метров, прямая видимость
- Препятствия: мебель, стены, металлические предметы
- Перезагрузку: вынуть батарейки на 30 секунд
Дисплей тусклый? Скорее всего, батарейки садятся. Замените.
Время сбилось? Статическое электричество или разряд. Перенастройте часы.
Кнопки не работают? Возможно, активирована блокировка. Проверьте.
Ручной запуск без пульта
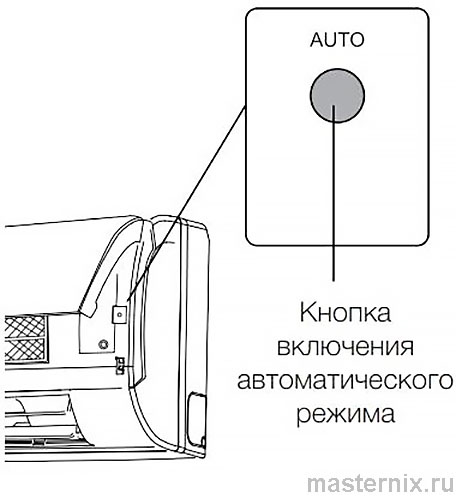
Пульт потерян? Не беда. На внутреннем блоке есть кнопка 【AUTO】:
- → Одно нажатие: запуск в авто-режиме (система сама подберет настройки)
- → Два нажатия: включение в режиме охлаждения, +24°С
- → Третье нажатие: выключение
Ограничение: вручную нельзя выбрать режим, температуру или скорость вентилятора. Но для экстренного случая — более чем достаточно.
И последнее: если ничего не помогает — сброс. Но помните: все настройки вернутся к заводским. Используйте как крайнюю меру.


