
User manual for the wireless remote control of the QuattroClima QA-RWF air conditioner
Руководство / инструкция
Назначение и совместимость модели
Вы выбрали беспроводной пульт управления — отличное решение для комфорта. Скажу прямо: устройство превращает обычное управление климатом в интеллектуальный процесс. Инфракрасная технология обеспечивает надёжную связь с бытовыми и промышленными системами.
Пульт позволяет регулировать температуру, программировать недельный таймер и управлять воздушным потоком. Это не просто удобство — это реальная экономия энергии за счёт точного контроля работы кондиционера.
Совместимые модели оборудования
Пульт работает с двумя сериями инверторных сплит-систем:
- ★ Серия MILANO (2015): QV/QN-MI09WA, MI12WA, MI18WA, MI24WA.
- ★ Серия ARIA (2015): QV/QN-A07WC, A09WC, A12WC, A18WC, A24WC.
Есть нюанс: если ваша модель не поддерживает какую-либо функцию, нажатие соответствующей кнопки не даст эффекта — система продолжит работу в текущем режиме. Это штатная ситуация.
Меры предосторожности при эксплуатации
Безопасность — основа долгой службы устройства. Несколько простых правил защитят и пульт, и вас.
Что категорически запрещено
- ✖️ Допускать попадание влаги на корпус — риск короткого замыкания и поражения током.
- ✖️ Нажимать кнопки острыми предметами — можно повредить мембрану или дисплей.
- ✖️ Самостоятельно проводить диагностику — доверьте это квалифицированным специалистам.
Практика показывает: большинство проблем возникает именно из-за нарушения этих трёх пунктов. Не усложняйте себе жизнь.

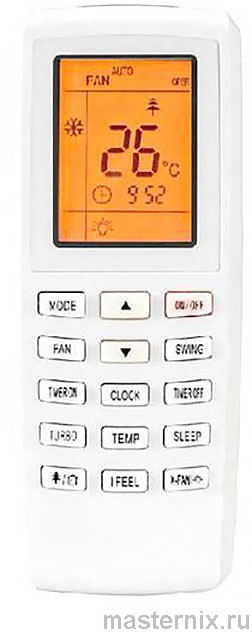
Расположение и функции кнопок
Интерфейс пульта спроектирован интуитивно. Основные действия выполняются быстро, без лишних манипуляций.
Основные элементы управления
- 【ON/OFF】 — включение и выключение системы.
- 【▲】 — увеличение температуры или времени.
- 【MODE】 — циклическое переключение режимов работы.
- 【SWING】 — управление положением воздушных заслонок.
- 【▼】 — уменьшение параметров.
- 【FAN】 — выбор скорости вентилятора.
- 【TIMER OFF】 и 【TIMER ON】 — настройка таймера выключения/включения.
- 【CLOCK】 — установка текущего времени.
- 【SLEEP】 — активация ночного режима.
- 【TEMP】 — переключение отображения температуры.
- 【TURBO】 — режим ускоренного охлаждения или нагрева.
- 【X-FAN】 — функция просушки испарителя.
- 【WiFi】 — управление беспроводным модулем (опция).
- 【◐】 / 【☀】 — выбор отображаемой температуры.
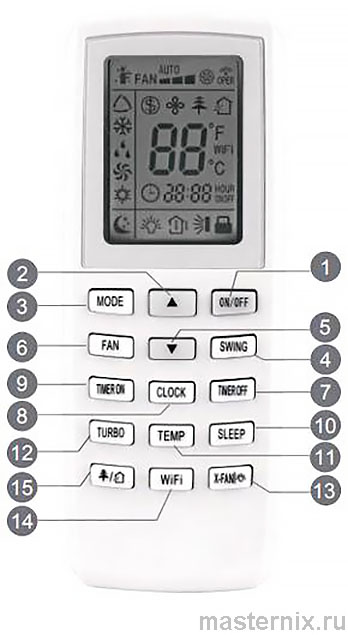
Возможно, сначала список покажется объёмным. Но поверьте: через пару дней использования пальцы сами запомнят расположение клавиш.
Расшифровка индикации дисплея
Экран пульта информирует о текущем состоянии системы. Понимание значков упрощает управление.
Индикаторы режимов и функций
На дисплее могут отображаться:
- ✔️ Значок 【I FEEL】 — активна функция измерения температуры рядом с пультом.
- ✔️ Символ нагрева — система работает на обогрев.
- ✔️ Иконки режимов: 【AUTO】, 【COOL】, 【DRY】, 【FAN】, 【HEAT】.
- ✔️ Часы и индикатор таймера — отображение времени и запланированных событий.
- ✔️ 【SLEEP】 — ночной режим включён.
- ✔️ Подсветка дисплея внутреннего блока.
- ✔️ Скорость вентилятора: от минимальной до максимальной.
- ✔️ 【TURBO】, 【X-FAN】, 【HEALTH】 — специальные функции.
- ✔️ Значок блокировки — клавиатура защищена от случайных нажатий.
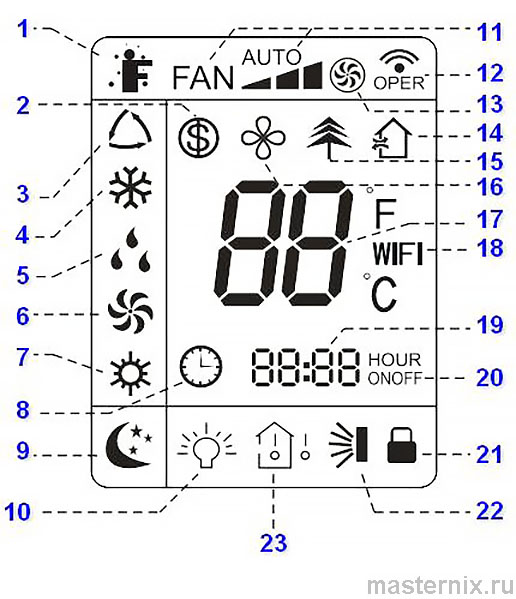
Обратите внимание: если на пульте отображается  или отсутствует индикация, внутренний блок покажет заданную температуру. При выборе
  — отобразится температура в помещении.
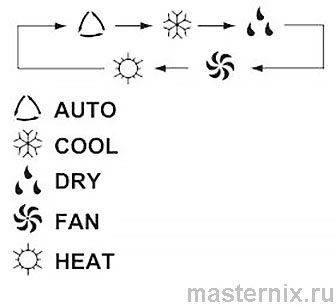
Режимы работы и настройка параметров
Кнопка 【MODE】 переключает циклы: 【AUTO】 → 【COOL】 → 【DRY】 → 【FAN】 → 【HEAT】. Не все модели поддерживают нагрев — сверьтесь с документацией вашего кондиционера.
Управление скоростью вентилятора
Нажатие 【FAN】 меняет скорость: 【AUTO】 → низкая → средняя → высокая → снова 【AUTO】.
| Режим | Особенности работы вентилятора |
|---|---|
| 【AUTO】 | Скорость подбирается автоматически по температуре |
| 【DRY】 | Всегда низкая скорость для эффективного осушения |
| 【X-FAN】 | Продолжает работу после выключения для просушки |
Функция 【X-FAN】: зачем она нужна
Удерживайте 【FAN】 две секунды в режимах 【COOL】 или 【DRY】 — включится просушка испарителя. Это предотвращает появление плесени и неприятных запахов. После выключения кондиционера вентилятор проработает ещё пару минут на минимуме.
Важный момент: если функция активна, а вы хотите остановить вентилятор сразу — удерживайте 【FAN】 две секунды после нажатия 【ON/OFF】.
Таймер и специальные функции
Таймер — мощный инструмент автоматизации. Настройте включение к вашему приходу домой или выключение на ночь.
Настройка времени и таймера
Для установки часов нажмите 【CLOCK】, значок часов начнёт мигать. Используйте 【▲】/【▼】 для корректировки. Подтвердите нажатием 【CLOCK】.
Для таймера включения: нажмите 【TIMER ON】, настройте время кнопками 【▲】/【▼】, подтвердите 【TIMER ON】. Аналогично для 【TIMER OFF】.
Ночной режим 【SLEEP】
Нажмите 【SLEEP】 в режимах 【COOL】 или 【HEAT】 — подсветка внутреннего блока отключится, чтобы не мешать сну. Повторное нажатие вернёт подсветку. В режимах 【FAN】 и 【AUTO】 функция неактивна.
Секреты комбинаций кнопок
Некоторые функции скрыты в комбинациях — это не баг, а фича.
Блокировка клавиатуры
Удерживайте 【▲】 и 【▼】 три секунды — появится значок замка  . Теперь случайные нажатия не страшны. Для разблокировки повторите комбинацию.
Переключение °C / °F
При выключенном кондиционере нажмите одновременно 【MODE】 + 【▼】 — единицы измерения температуры изменятся.
Функции энергосбережения
В режиме 【HEAT】 комбинация 【TEMP】 + 【CLOCK】 включает обогрев до 8 °C (защита от промерзания). В режиме 【COOL】 та же комбинация активирует эконом-режим 【SE】 — система сама подберёт оптимальную температуру.
Функция 【I FEEL】
【▲】 + 【MODE】 — пульт начинает измерять температуру рядом с вами и корректирует работу кондиционера. Размещайте пульт ближе к себе, но в зоне видимости приёмника внутреннего блока.
Пошаговый алгоритм использования
Запустите систему правильно — и она прослужит дольше.
- → Подайте питание на кондиционер.
- → Нажмите 【ON/OFF】 для включения.
- → Выберите режим через 【MODE】: 【AUTO】, 【COOL】, 【DRY】, 【FAN】 или 【HEAT】.
- → Установите температуру кнопками 【▲】/【▼】 (в 【AUTO】 температура фиксируется).
- → Настройте скорость вентилятора через 【FAN】.
- → Отрегулируйте направление потока кнопкой 【SWING】.
Получается, всё просто. Главное — не спешить при первой настройке.
Замена элементов питания
Севшие батарейки — частая причина «неработающего» пульта. Меняйте их вовремя.
Пошаговая инструкция
- → Сдвиньте крышку отсека на задней панели в направлении стрелки.
- → Извлеките старые элементы AAA 1,5 В.
- → Вставьте новые, соблюдая полярность (+/-).
- → Закройте крышку до щелчка.
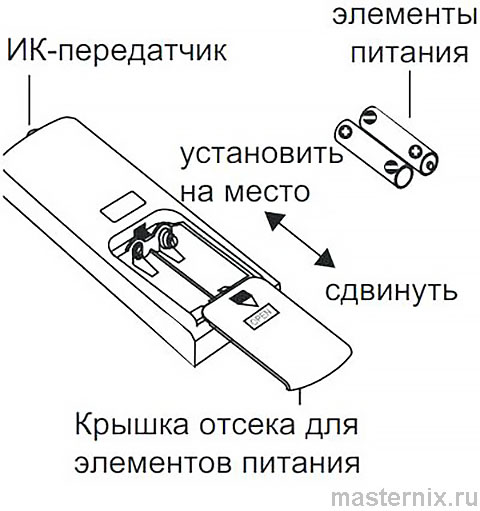
Если дисплей стал тусклым или не реагирует — скорее всего, дело в питании. Не откладывайте замену.
Рекомендации по эксплуатации
- ★ Наводите пульт на приёмник внутреннего блока, без препятствий.
- ★ Максимальная дальность — 8 метров, при наличии помех (люминесцентные лампы, беспроводные устройства) — сократите расстояние.
- ★ При длительном простое извлекайте батарейки.
- ★ Используйте элементы того же типа, что и оригинальные.
Хранение, утилизация и гарантия
Правильное обращение продлевает жизнь устройству.
Условия хранения и транспортировки
Храните пульт в упаковке, на стеллажах, без попадания влаги. Не ставьте тяжёлые предметы на коробку. Транспортировка — любым крытым транспортом, с соблюдением манипуляционных знаков.
Утилизация и экологическая безопасность
 Изделие маркировано символом раздельного сбора. Не выбрасывайте пульт и батарейки с бытовым мусором. Сдавайте в специализированные пункты приёма для переработки. Это защищает окружающую среду и здоровье людей.
Гарантийные обязательства
Срок службы — 5 лет с даты производства при соблюдении инструкции. Производитель: GREE ELECTRIC APPLIANCES, INC. OF ZHUHAI, Китай. Дата выпуска указана на шильдике пульта.
Оборудование соответствует техническому регламенту ТР ТС 020/2011 «Электромагнитная совместимость технических средств». При эксплуатации согласно инструкции претензии по совместимости не принимаются.


