User manual for the universal remote control for Royal Clima air conditioners, models YKR-T/121E (YKR-T/011E)
Руководство / инструкция

Royal Clima YKR-T/121E (YKR-T/011E) Split System Remote Control. Operating Instructions
Compatibility of YKR-T/121E (YKR-T/011E) Air Conditioner Remote Control
Mobile Air Conditioners, CELEBRITY Series (2022) R410A
Royal Clima RM-CB27HH-E
Royal Clima RM-CB36HH-E
Inverter Split Systems, SPARTA DC EU Inverter Series (2022) R32
Royal Clima RCI-SAX24HN
Royal Clima RCI-SAX30HN
Royal Clima RCI-SAX35HN
Inverter Split Systems, RENAISSANCE DC EU Inverter Series (2022) R32
Royal Clima RCI-RNX24HN
Royal Clima RCI-RNX30HN
Royal Clima RCI-RNX35HN
Conventional Split Systems, RENAISSANCE Series (2022) R410A
Royal Clima RC-RNX24HN
Royal Clima RC-RNX28HN
Royal Clima RC-RNX35HN
Royal Clima RC-RNX55HN
Semi-Industrial Split Systems, Cassette-Type Indoor Units, COMPETENZA Series (2022) R410A
Royal Clima CO-4C 12HNX / CO-E 12HNX
Royal Clima CO-4C 18HNX / CO-E 18HNX
Royal Clima CO-4C 24HNX / CO-E 24HNX
Royal Clima CO-4C 36HNX / CO-E 36HNX
Royal Clima CO-4C 48HNX / CO-E 48HNX
Royal Clima CO-4C 60HNX / CO-E 60HNX
Semi-Industrial Split Systems, Duct-Type Indoor Units, COMPETENZA Series (2022) R410A
Royal Clima CO-D 18HNX / CO-E 18HNX
Royal Clima CO-D 24HNX / CO-E 24HNX
Royal Clima CO-D 36HNX / CO-E 36HNX
Royal Clima CO-D 48HNX / CO-E 48HNX
Royal Clima CO-D 60HNX / CO-E 60HNX
Semi-Industrial Split Systems, Floor-Ceiling Type Indoor Units, COMPETENZA Series (2022) R410A
Royal Clima CO-F 18HNX / CO-E 18HNX
Royal Clima CO-F 24HNX / CO-E 24HNX
Royal Clima CO-F 36HNX / CO-E 36HNX
Royal Clima CO-F 48HNX / CO-E 48HNX
Royal Clima CO-F 60HNX / CO-E 60HNX
High-Pressure Semi-Industrial Split Systems, Duct-Type Indoor Units, COMPETENZA Series (2022) R410A
Royal Clima CO-D 76HNHP / CO-E 76HNHP
Royal Clima CO-D 96HNHP / CO-E 96HNHP
Inverter Semi-Industrial Split Systems, Cassette-Type Indoor Units, COMPETENZA FULL DC EU Inverter Series (2022) R32
Royal Clima CO-4C 12HNI / CO-E 12HNI
Royal Clima CO-4C 18HNXI / CO-E 18HNI
Royal Clima CO-4C 24HNI / CO-E 24HNI
Royal Clima CO-4C 36HNI / CO-E 36HNI
Royal Clima CO-4C 48HNI / CO-E 48HNI
Royal Clima CO-4C 60HNI / CO-E 60HNI
Inverter Semi-Industrial Split Systems, Duct-Type Indoor Units, COMPETENZA FULL DC EU Inverter Series (2022) R32
Royal Clima CO-D 18HNI / CO-E 12HNI
Royal Clima CO-D 24HNI / CO-E 24HNI
Royal Clima CO-D 36HNI / CO-E 36HNI
Royal Clima CO-D 48HNI / CO-E 48HNI
Royal Clima CO-D 60HNI / CO-E 60HNI
Inverter Semi-Industrial Split Systems, Floor-Ceiling Type Indoor Units, COMPETENZA FULL DC EU Inverter Series (2022) R32
Royal Clima CO-F 18HNFI / CO-E 12HNI
Royal Clima CO-F 24HNFI / CO-E 24HNI
Royal Clima CO-F 36HNFI / CO-E 36HNI
Royal Clima CO-F 48HNFI / CO-E 48HNI
Royal Clima CO-F 60HNFI / CO-E 60HNI
.
General Notes
Before operating, please carefully read this manual, which contains important information for the correct and safe operation of the device. Keep this manual for future reference.
The manufacturer is not liable in cases where the device is used for purposes other than those intended, if the rules and conditions specified in this manual are not followed, or if unqualified repair attempts are made.
Split-type air conditioning systems (hereinafter referred to as split systems) must be installed only by qualified professionals.
❗👉➨ Do not attempt to install the unit yourself. Improper installation may result in incorrect operation or damage to the device.
Safety Precautions
➠ The remote control is not a toy. Do not allow children to play with it and do not use it for play yourself.
➠ When using the remote control, point the signal transmitter towards the indoor unit of the air conditioner when pressing buttons. The indoor unit will confirm receipt of the signal sent from the remote control with a short beep.
➠ Signals can be received at a distance of up to 8 meters in a straight line from the indoor unit at an angle of 45° to the left and right. There should be no objects obstructing the signal path between the remote and the unit.
➠ The remote control should be located at least 1 meter away from television and radio equipment.
➠ Do not drop the remote control or subject it to strong impacts. Do not expose the remote control to direct sunlight, do not place it near heat sources, ensure it does not come into contact with water, and do not leave it in places with high humidity.
➠ Do not use sharp objects to press buttons, as this may damage the remote control. Do not clean the remote control with gasoline, solvents, chemically treated wipes, or similar products.
➠ If the remote control does not operate correctly, remove the batteries, wait 30 seconds, and reinsert them. If operation is not restored, replace the batteries.
❗👉➨ Remove the batteries from the remote control if it will not be used for an extended period.
..
Royal Clima YKR-T/121E Remote Control Display Panel
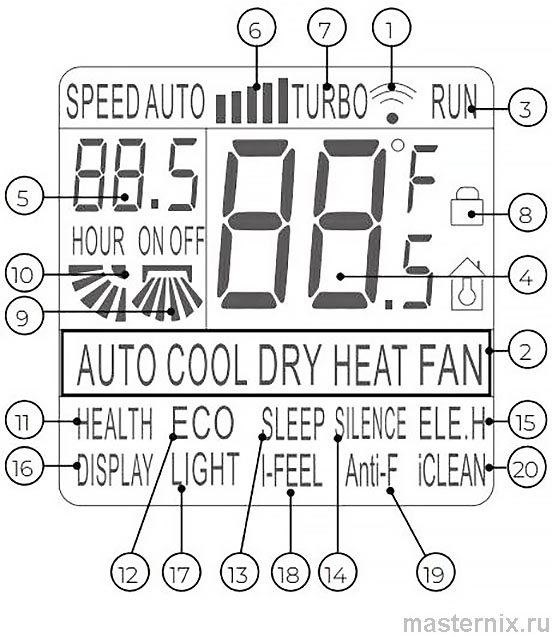
1. This indicator appears when the remote control is transmitting a command to the indoor unit.
2. Operating mode indicator.
3. ON/OFF status indicator “RUN”. Indicates whether the air conditioner is on or off via the remote control.
4. Digital indicator of the set temperature. Displays the user-selected temperature (in all modes except “FAN”). The value can be from 16 to 32 °C. When displaying the room temperature, the “ROOM” indicator is also shown.
5. Digital timer indicator “ON/OFF”. Displays values from 0.5 to 24 in timer mode.
6. Indoor unit fan speed indicator.
7. Indicator of the active “TURBO” mode.
8. Child lock activation indicator.
9. Automatic vertical louver operation indicator (internal).
10. Automatic horizontal louver operation indicator (external).
11. Ionization function indicator “HEALTH”*.
12. Energy-saving mode indicator “ECO”*.
13. “SLEEP” mode indicator. Note: The “SLEEP” function is not available in “FAN” and “AUTO” modes.
14. Quiet fan operation indicator “SILENCE”*.
15. Intensive heating mode indicator “ELE.H”*.
16. Display backlight operation indicator.
17. “LIGHT” function activation indicator*.
18. “I-FEEL” function operation indicator.
19. Self-cleaning function indicator “Anti-F”.
20. Self-cleaning function indicator “iCLEAN”.
* Not used in this series.
Designation of Remote Control Elements and Their Functions
The illustration represents a standard remote control, showing all functional buttons. These may differ slightly from the buttons on your remote control (depending on the model).
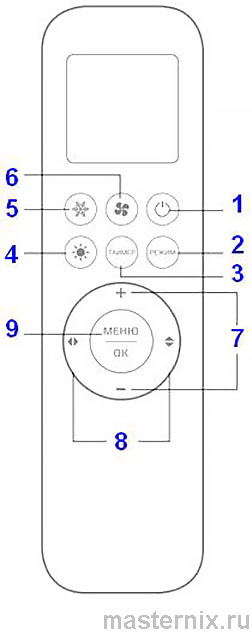
❗👉➨ Attention Depending on the model of your air conditioner, some remote control buttons may not have functions.
1. ON/OFF Button  Power Button
➠ Press this button to turn the device on or off.
➠ Press  to reset existing timer and sleep mode settings.
2. MODE Button
Each press of the button changes the operating mode of the air conditioner in the following sequence:
... → AUTO (Automatic) → Cool (Cooling) → Dry (Dehumidification) → Heat (Heating) → Fan (Ventilation) → ...

“AUTO” Mode
In automatic mode, the air conditioner selects cooling or heating depending on the room temperature, providing comfort for the user. The target temperature is not displayed on the remote control and cannot be adjusted.
➠ Press the “MODE” button and select the “AUTO” automatic mode.
➠ Press  to select fan speed: “Low – Medium – High – TURBO – Automatic”.
❗👉➨ Note: In “AUTO” mode, the temperature cannot be adjusted.
When first turned on, the unit defaults to AUTO (automatic operation mode).
“COOL” Mode (COOL)
➠ Press the “MODE” button and select “COOL” mode.
➠ Use the [+] or [—] buttons to set the desired temperature between +16 and +32 °C; the digits on the display change when the buttons are pressed.
➠ Press  to select fan speed: “Low – Medium – High – TURBO – Automatic”.
“HEAT” Mode (HEAT)
➠ Press the “MODE” button and select “HEAT” mode.
➠ Use the [+] or [—] buttons to set the desired temperature between +16 and +32 °C; the digits on the display change when the buttons are pressed.
➠ Press  to select fan speed: “Low – Medium – High – TURBO – Automatic”.
❗👉➨ Air conditioners designed for cooling only do not have the heating mode.
“DRY” Mode (DRY)
➠ Press the “MODE” button and select the “DRY” dehumidification mode.
➠ Use the [+] or [—] buttons to set the desired temperature between +16 and +32 °C; the digits on the display change when the buttons are pressed.
❗👉➨ Note: In “DRY” mode, fan speed cannot be adjusted.
Ventilation Mode (FAN)
In ventilation mode, only the indoor unit fan operates. In this mode, the air conditioner does not maintain room temperature. The target temperature is not displayed on the remote control and cannot be adjusted.
➠ Press the “MODE” button and select the “FAN” ventilation mode.
➠ Press  to select fan speed: “Low – Medium – High – TURBO – Automatic”.
❗👉➨ Note: In “FAN” mode, the temperature cannot be adjusted.
❗👉➨ Attention The air conditioner does not supply fresh air.
3. TIMER Button
➠ Press the “TIMER” button once; the “ON/OFF” indicator on the display will start flashing. Use the [+] or [—] buttons to set the desired time for the device to turn on/off, with an adjustment interval of 0.5 hours, within a range from 0.5 to 24 hours.
➠ Press the “TIMER” button again to confirm the setting; the “ON/OFF” indication will stop flashing.
➠ If the TIMER button is not pressed for more than 10 seconds after “ON/OFF” starts flashing, the timer setting will be completed automatically.
➠ Pressing the “TIMER” button again will cancel the setting.
➠ The power-on timer can only be set when the device is turned off.
4.  HEAT Button
To activate the “HEAT” mode, press the  button.
5.  COOL Button
To activate the “COOL” mode, press the  button.
6.  Fan Speed Adjustment Button
Press the  button to select the fan speed: “Low – Medium – High – TURBO – Automatic”.
❗👉➨ Note: Automatic speed, as well as fan speed adjustment, are not available in dehumidification mode.
7. [+] and [—] Buttons
Use the [+] or [—] buttons to set the desired temperature between +16 and +32 °C; the digits on the display change when the buttons are pressed.
8. [L/R SWING] and [U/D SWING] Buttons
➠ Press the [L/R SWING] button to activate vertical louver swing.
➠ Press the [U/D SWING] button to activate horizontal louver swing. Pressing again will lock the horizontal louvers in their current position.
❗👉➨ Note: Holding the [U/D SWING] button for 3 seconds switches the function from horizontal louver swing activation to positional adjustment (5 positions + swing function). To cancel this function, hold the [U/D SWING] button for 3 seconds.
9. MENU and OK Buttons
Press the “MENU” button to enter the function selection mode (iFEEL / HEALTH / ECO / SLEEP / SILENCE / DISPLAY / LIGHT / ANTI-F / iCLEAN). Then press ^Ў > to select the desired function. After selecting the function, press the “OK” button to confirm.
To deactivate a function, select it again and press the “OK” button.
❗👉➨ Note: Some functions (for example, ANTI-F and iCLEAN) can only be activated when the device is turned off.
Remote Control Functions
“ANTI-F” Function
This function prevents the formation of mold and fungi on the indoor unit heat exchanger. After turning off the air conditioner via the remote control, the indoor unit will automatically continue operating in ventilation mode for 3 minutes to dry the heat exchanger.
❗👉➨ Note: The “ANTI-F” function is activated only after operating in cooling or dehumidification mode. It is not recommended to restart the air conditioner until the “ANTI-F” cycle is completed.
“iCLEAN” Function
This function initiates an automatic self-cleaning program of the indoor unit using freezing and condensation. The program helps maintain the cleanliness of the heat exchanger by removing accumulated dust and dirt, and consists of 3 stages:
➠ Operation in cooling mode for up to 15 minutes (accumulation of condensate and/or formation of frost/ice);
➠ Operation in heating mode for up to 10 minutes (defrosting accumulated frost/ice, drying residual condensate, and sterilizing the heat exchanger);
➠ Operation in ventilation mode for up to 10 minutes (final drying of the heat exchanger and equalizing the indoor unit temperature).
❗👉➨ Note: When this function is running, the indoor unit display will show the code “CL”.
“HEALTH” Function
This function turns the built-in air ionizer on or off.
“ECO” Function
This function enables or disables the energy-saving mode of the air conditioner.
“SLEEP” Function
This function activates the comfort sleep mode. In this mode, the indoor unit display turns off, and the temperature setting changes automatically according to a preset pattern.
➠ In cooling mode — increases the temperature setting by 1 °C after 1 hour, and by another 1 °C after 2 hours from activation. The setting then remains unchanged. The air conditioner stops operating in comfort sleep mode after 10 hours and returns to normal operation.
➠ In heating mode — decreases the temperature setting by 1 °C after 1 hour, and by another 1 °C after 2 hours from activation. The setting then remains unchanged. The air conditioner stops operating in comfort sleep mode after 10 hours and returns to normal operation.
❗👉➨ Note: In “SLEEP” mode, the fan speed is not adjusted automatically — set it manually if needed.
“SILENCE” Function
This function enables quiet operation mode, in which the air conditioner operates with the minimum fan and compressor speed. Pressing the  button will deactivate the “SILENCE” function.
“DISPLAY” Function
This function enables or disables the indoor unit display.
“LIGHT” Function*
This function enables illumination level tracking in the room for automatic on/off control of the indoor unit display.
“I-FEEL” Function
This function enables room temperature tracking via the temperature sensor in the remote control, ensuring maximum comfort in the user’s location (remote control position).
❗👉➨ Note:
➠ This function requires periodic transmission of information from the remote control to the indoor unit. Ensure there is direct visibility and a distance of no more than 8 m between them.
➠ Do not cover the air exchange vent on the back of the remote control during operation, as this may reduce temperature measurement accuracy.
➠ The current room temperature is displayed on the remote control when this function is active.
“ELE.H” Function
This function turns the additional electric heater on or off, if installed in the air conditioner.
❗👉➨ Note: The “ELE.H” function is automatically activated when switching the air conditioner to heating mode.
Child Lock Function
Press the  button and the “MODE” button simultaneously, holding for 3 seconds to activate or deactivate the remote control button lock. When locked, the corresponding icon will appear on the remote control display.
.
Operating Procedure
1. After connecting the air conditioner to the power supply, press the ON/OFF button to turn it on.
2. Use the MODE button to select cooling (COOL) or heating (HEAT) mode.
3. Press the TEMP button.
4. Use the [+] or [—] buttons to set the target temperature between 16 and 30 °C.
In AUTO mode, the temperature is set automatically and cannot be adjusted from the remote.
5. Use the FAN button to select the desired fan speed:
AUTO FAN (automatic), LOW (low speed), MID (medium speed), HIGH (high speed).
6. Use buttons (11) SWING 1 and (12) SWING 2 to adjust the louver swing mode. To enable SLEEP, TIMER, TURBO, or LIGHT functions, press the corresponding buttons.
Airflow Direction Adjustment
1. Horizontal airflow direction (right–left) and vertical airflow direction (up–down) are adjusted using the remote control.
2. When starting the air conditioner, do not set the horizontal louvers too far upward or downward, as this may reduce cooling or heating efficiency.
3. To avoid control system malfunctions, do not manually adjust horizontal or vertical louvers. If louver operation is disrupted, turn off the air conditioner, unplug it, wait a few minutes, then plug it in again and turn it on.
4. To prevent condensation from forming on vertical louvers and dripping onto the floor during extended operation in cooling or dehumidification modes, do not direct the airflow downward.
5. Upon restarting the air conditioner, the horizontal louvers may remain stationary for about 10 seconds.
6. When turning on the air conditioner for the first time, noise may be heard as the horizontal louvers rotate. This is normal and should be ignored.
7. Carefully read this manual and strictly follow the instructions to avoid serious air conditioner malfunctions, injuries, or property damage.
..
Replacing the Remote Control Batteries
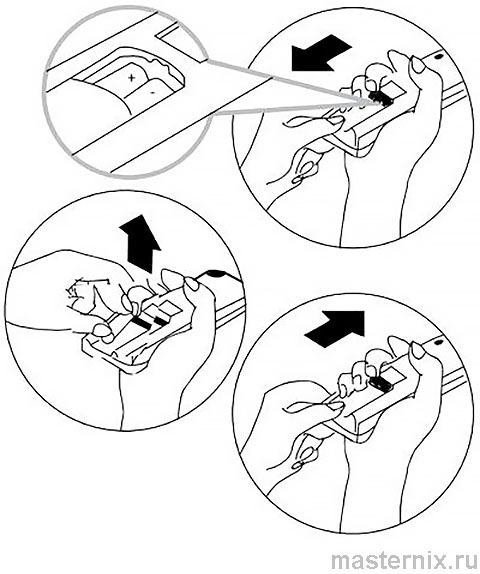
1. Slide off the cover on the back of the remote control.
2. Insert two AAA alkaline batteries, ensuring they are installed according to the indicated polarity.
❗👉➨ NOTE
➠ Replace the batteries if the LCD display on the remote control does not light up or if the remote control cannot be used to adjust the air conditioner settings.
➠ Use new AAA-type batteries.
➠ If the remote control will not be used for more than one month, remove the batteries.
Emergency Switch
➠ In the event of loss or malfunction of the wireless remote control, the air conditioner can be turned on/off using the emergency switch.
Operating the Air Conditioner Without the Remote Control
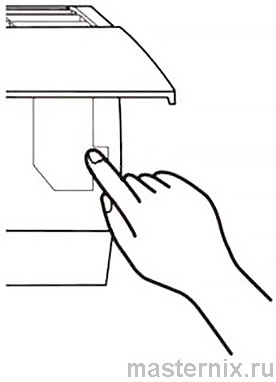
If the remote control is lost or defective, follow these steps:
➠ To turn on the air conditioner, briefly press the emergency control button. The air conditioner will start in automatic mode.
➠ Gently close and secure the front panel of the indoor unit.
➠ To turn off the air conditioner, briefly press the emergency control button again.
❗👉➨ NOTE
Do not hold the button down for an extended period, as this may cause the air conditioner to malfunction.
