User manual for the universal air conditioner remote control models YT1F, YT1FF, YB1FA, YB1FA1, YB1FA2, YBOF, YB1FA, YB1F2, YB1F2F, YBOF2
Руководство / инструкция

YB1FA Split System Remote Control. Operating Instructions
YB1FA Air Conditioner Remote Control Compatibility
The YB1FA remote control is compatible with:
Electrolux Column Air Conditioners
Electrolux EACF-24G/N3
Electrolux EACF-36G/N3
Electrolux EACF-48G/N3
Electrolux EACF-60G/N3
Precautions
➠ The universal wireless infrared remote control YB1FA (YT1F, YT1FF, YB1FA, YB1FA1, YB1FA2, YBOF, YB1FA, YB1F2, YB1F2F, YBOF2) is used to operate the air conditioner.
➠ When operating, the distance between the remote control and the signal receiver on the indoor unit should not exceed 10 m. There should be no objects obstructing the signal path between the remote control and the unit.
➠ The remote control should be kept at least 1 m away from television and radio equipment.
➠ Do not allow any liquids to come into contact with the remote control. Avoid exposing it to direct sunlight or high temperatures.
➠ Do not drop or throw the remote control.
.
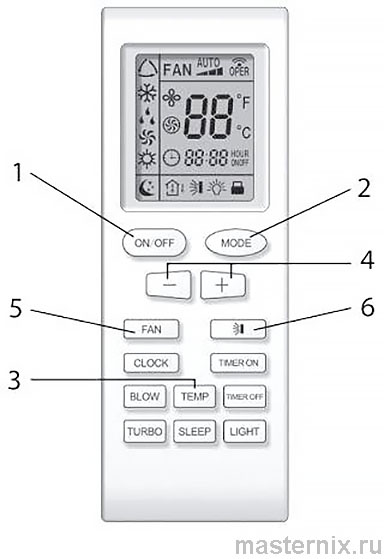
Designation of Remote Control Elements and Their Functions
This remote control is universal and is used to operate various unit models. Some functions may be unavailable. If you press a button for an unavailable function, the unit will continue operating without changing parameters.
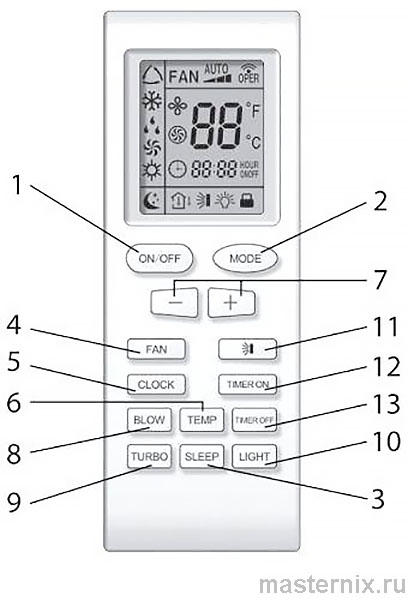
1. ON/OFF (Power)
Press the button to turn the air conditioner on or off.
In standby mode, the remote control displays the room temperature.
2. MODE (Operating Mode)
Allows you to select the operating mode. Each press of the button cycles through the following sequence:
AUTO (Automatic), Cool, Dry (Dehumidification), Heat, Fan
The corresponding mode indicators appear on the remote control display:
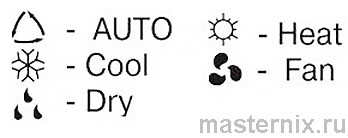
❗👉➨ In cooling-only air conditioners, the heating mode is not available.
3. SLEEP
Pressing this button alternately enables and disables the Sleep function. The symbol " " appears on the display.
This function can be activated in cooling or heating mode.
In FAN and AUTO modes, the Sleep function is unavailable.
The Sleep mode is disabled when the air conditioner is turned off.
..
4. FAN (Fan Speed)
This button is used to set the fan speed in the following sequence:
Auto – Low – Medium – High
The corresponding fan speed indicator is shown on the display:
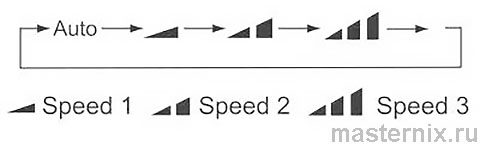
In Auto mode, the fan speed is set automatically depending on the difference between the set temperature and the ambient temperature. In BLOW mode, the fan automatically operates at low speed.
5. CLOCK
Press this button to set the clock. The " " symbol will start flashing on the display.
While the "" symbol is flashing, within 5 seconds you must start setting the time using the adjustment buttons. The time will change by one unit every 0.5 seconds.
After setting the time, press the CLOCK button again to confirm. The flashing will stop. The "" symbol appears on the display after power is supplied. The clock display shows either the current time or the timer value, depending on the settings.
6. TEMP (Temperature)
Button for switching temperature display mode (available on certain models):
 – set temperature,
  – indoor temperature,
  – outdoor temperature.
To switch from Celsius (°C) to Fahrenheit (°F), while the remote control is in OFF mode, press the “-” and MODE buttons simultaneously.
7. “+” and “–” Buttons
Pressing the “+” or “–” button respectively increases or decreases the set indoor temperature.
Holding either button for 2 seconds will rapidly change the temperature value.
The temperature is displayed in degrees Celsius ("C) or Fahrenheit ("F).
Switching between Celsius and Fahrenheit scales is done by simultaneously pressing the “+” and “–” buttons in OFF mode.
These buttons are also used to adjust the time in CLOCK and TIMER modes.
8. BLOW (Self-Cleaning)
Pressing the BLOW button in COOL or DRY mode enables or disables the self-cleaning function, and the " " symbol appears on the display. Pressing the button again disables the function and the "" symbol disappears.
In AUTO, FAN, and HEAT modes, the function cannot be activated.
9. TURBO
Pressing the button enables TURBO mode. In COOL or HEAT mode, the fan operates at a higher speed than in other speed settings. The " " symbol appears on the display.
If the fan speed mode is changed, TURBO mode is automatically disabled.
10. LIGHT (Backlight)
Pressing the button turns on the backlight of the indoor unit panel. Pressing it again turns off the backlight.
11. Swing Mode and Louver Angle
Each press of the button changes the louver swing angle and mode in the following sequence:
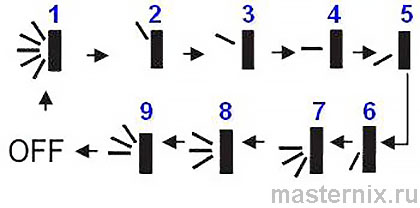
In positions "9", "8", "7", the swing angle for each airflow direction is identical regardless of the airflow direction.
Swing mode "1" covers the full airflow range.
Pressing and holding the button for 2 seconds causes the louvers to start swinging; releasing the button fixes them in the selected position.
In swing mode, pressing the button for more than 2 seconds fixes the louvers at the desired swing angle.
12. TIMER ON
Pressing the TIMER ON button activates the function for turning on the air conditioner at a preset time. The timer indication area is activated on the display and the "HOUR ON" symbol starts flashing. Use the "+" and "–" buttons to set the timer time.
Each press of the "+" or "–" button increases or decreases the time by 1 minute. Holding a button for 2 seconds causes the minutes to change rapidly.
After setting the timer, within 5 seconds while the timer indication is flashing, press TIMER ON again to confirm. To cancel the "TIMER ON" mode, press TIMER ON again.
13. TIMER OFF
Pressing this button activates the function for turning off the air conditioner at a preset time. The procedure for setting the time is identical to TIMER ON mode.
Air Conditioner Operation
Operating Sequence in Different Modes
➠ In cooling or heating mode, the air conditioner maintains the set temperature with an accuracy of ±1°C.
➠ If the set temperature in cooling mode is more than 1°C lower than the ambient temperature, the air conditioner will not start.
➠ If the set temperature in heating mode is more than 1°C higher than the ambient temperature, the air conditioner will not start.
➠ In AUTO mode, the temperature cannot be manually adjusted. The air conditioner automatically maintains a comfortable temperature of 23±2°C. At 20°C, the air conditioner automatically switches to heating mode; at 26°C, it switches to cooling mode.
➠ In DRY mode, the air conditioner maintains the set temperature with an accuracy of ±2°C. If the indoor temperature exceeds the set temperature by more than 2°C when the unit is turned on, it will operate in cooling mode.
➠ When the temperature drops more than 2°C below the set value, the compressor and outdoor unit fan stop, and the indoor unit fan runs at low speed.
➠ In Sleep mode during cooling, the set temperature automatically increases by 1°C after the first hour and by another 1°C after the second hour, then remains unchanged.
➠ In Sleep mode during heating, the set temperature automatically decreases by 1°C after the first hour and by another 1°C after the second hour, then remains unchanged.
❗👉➨ In Sleep mode, the TIMER function is unavailable.
Additional Functions
BLOW (Self-Cleaning) Function
The BLOW function removes moisture from the evaporator surface and internal cavities of the unit. This prevents the development of bacteria inside the unit.
When the self-cleaning function is enabled, after turning off the air conditioner with the ON/OFF button from COOL or DRY mode, the indoor unit fan continues to run at low speed for 10 minutes. The fan operation in BLOW mode can be stopped manually by pressing the BLOW button.
If the function is disabled, the indoor unit fan will not operate after turning off the air conditioner from COOL or DRY mode.
AUTO Mode
In AUTO mode, the air conditioner automatically switches between cooling and heating depend .
Control Procedure
1. After connecting the air conditioner to the power supply, press the ON/OFF button to turn it on.
2. Use the MODE button to select COOL (cooling) or HEAT (heating) mode.
3. Press the TEMP button.
4. Use the "+" and "–" buttons to set the desired temperature between 16°C and 30°C.
In AUTO mode, the temperature is set automatically and cannot be adjusted from the remote control.
5. Use the FAN button to select the desired fan speed:
AUTO FAN (automatic), LOW – low speed, MID – medium speed, HIGH – high speed.
6. Use button [6] to set the louver swing mode. To enable the SLEEP, TIMER, TURBO, or LIGHT functions, press the corresponding buttons.
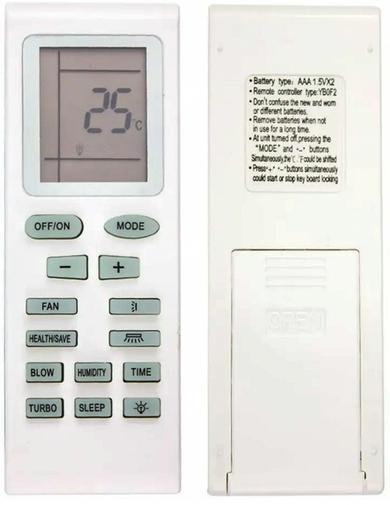
Replacing the Remote Control Batteries
➠ The air conditioner remote control uses two AAA 1.5V batteries.
➠ To replace the batteries, slide the remote control cover in the direction of the arrow, remove the batteries, and install new ones.
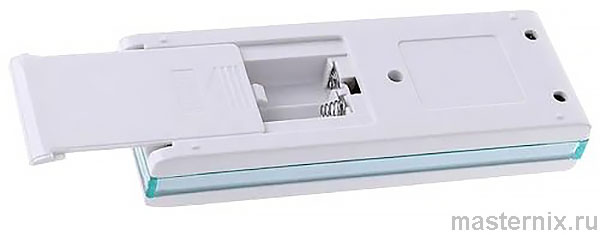
➠ Install the cover back in place.
➠ Do not use an old battery together with a new one, or batteries of different types. The battery service life should not exceed one year.
➠ If the remote control will not be used for a long period, remove the batteries.
..
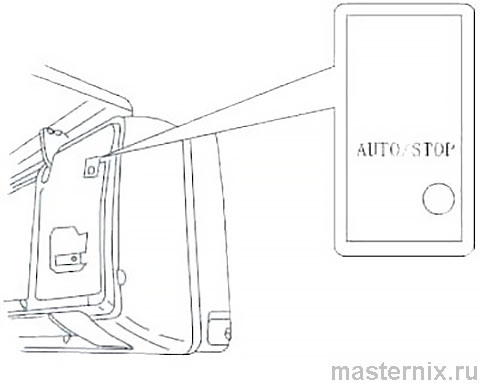
Emergency Switch
➠ In the event of loss or malfunction of the wireless remote control, the air conditioner can be turned on or off using the emergency switch.
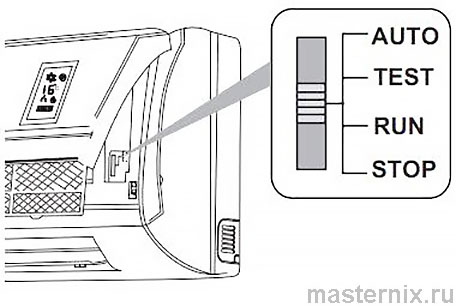
➠ In models up to 5 kW, when operating with the remote control, the switch should be in the "RUN" position. In case of remote control loss, set it to "AUTO". The "TEST" mode is not recommended for user operation; it is used after installation to check the air conditioner’s performance.
➠ In 5 kW and 6 kW models, pressing the switch button will turn the air conditioner on in automatic mode. Depending on the indoor temperature, the unit will cool, heat, or operate in fan mode. If the air conditioner is running, pressing the button will stop it.

