User manual for Rovex ZH JT-03/JT-01 remote control
Руководство / инструкция
Быстрый старт: как управлять кондиционером
Интуитивное управление без лишних сложностей
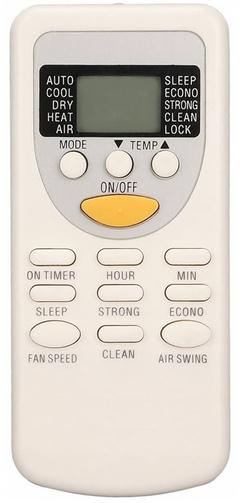
Rovex не стала усложнять то, что должно быть простым. Пульт ZH JT 03 — это тот случай, когда форма следует за функцией. Кнопки расположены логично, пальцы сами находят нужную. Хотите изменить температуру? Две клавиши ▲▼ рядом с дисплеем. Нужен таймер? Отдельная кнопка 【TIMER】.
Скажу прямо: даже если вы впервые держите этот пульт в руках, через минуту разберётесь. Это не преувеличение. Практика показывает.
Совместимость с моделями кондиционеров
Какие кондиционеры работают с этим пультом
Пульт ZH JT 03 разработан для настенных сплит-систем Rovex. Вот основные совместимые серии:
| Серия | Модели |
|---|---|
| RS-ST1 (on/off) | RS-07 ST1, RS-09 ST1, RS-12 ST1, RS-18 ST1, RS-24 ST1, RS-30 ST1, RS-36 ST1 |
| RS-BS1 (бизнес-класс) | RS-09 BS1, RS-12 BS1 |
Есть нюанс. Если ваша модель не в списке — проверьте маркировку ZH JT 03 на корпусе пульта. Часто совместимость шире, чем указано в документации. Это серьёзно упрощает поиск замены.
Правила безопасной эксплуатации
Что продлит жизнь вашему пульту
Перед первым использованием: вставьте батарейки, соблюдая полярность. Кажется, очевидно? Да. Но большинство проблем начинаются именно здесь.
- ✔️ Направляйте пульт на приёмник без препятствий, дистанция — до 8 метров
- ✔️ Берегите от падений, влаги, прямых солнечных лучей
- ✔️ При сбоях: выньте батарейки на 30 секунд, вставьте заново
- ✔️ Не смешивайте старые и новые элементы питания
- ✔️ При длительном хранении — извлеките батарейки во избежание утечки
Дети? Присматривайте. Пульт — не игрушка, хоть и выглядит безобидно. Впрочем, не всегда.
Ограничения функционала
Универсальность — это плюс. Но: некоторые кнопки могут не работать на вашем кондиционере. Например, функции 【CLEAN】 или 【LAMP】 доступны не на всех моделях. Не баг, а особенность.
Кнопки пульта: полное руководство
Основная панель: быстрый доступ
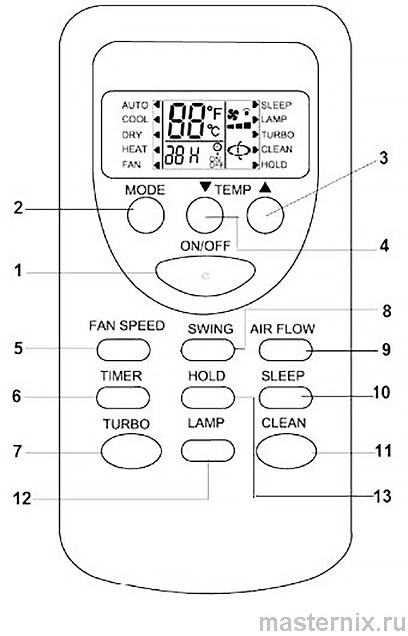
Ключевые элементы управления:
- 【ON/OFF】 Включение/выключение кондиционера
- 【MODE】 Выбор режима: АВТО → ОХЛАЖДЕНИЕ → СУШКА → ОБОГРЕВ → ВЕНТИЛЯЦИЯ
- 【TEMP ▲】 Повышение температуры на 1°С
- 【TEMP ▼】 Понижение температуры на 1°С
- 【FAN SPEED】 Скорость потока: АВТО → НИЗКАЯ → СРЕДНЯЯ → ВЫСОКАЯ
- 【TIMER】 Установка таймера включения/выключения
- 【TURBO】 Режим интенсивной работы
- 【SWING ↑↓】 Регулировка потока по вертикали
- 【AIR FLOW】 Направление потока: влево/вправо
- 【SLEEP】 Ночной энергосберегающий режим
- 【CLEAN】 Функция самоочистки (не на всех моделях)
- 【LAMP】 Подсветка дисплея (не на всех моделях)
- 【HOLD】 Блокировка кнопок
Обратите внимание: на вашем пульте некоторые кнопки могут отсутствовать — зависит от модели кондиционера. Это не дефект.
Важные предупреждения по функциям
Установленный рабочий режим сохраняется после выключения. При следующем включении кондиционер продолжит работу в том же режиме. Удобно, правда?
В режиме Турбо температура меняется быстрее. Если стало слишком холодно или жарко — просто отключите режим. Всё.
Индикаторы дисплея: расшифровка символов
Что показывает экран пульта
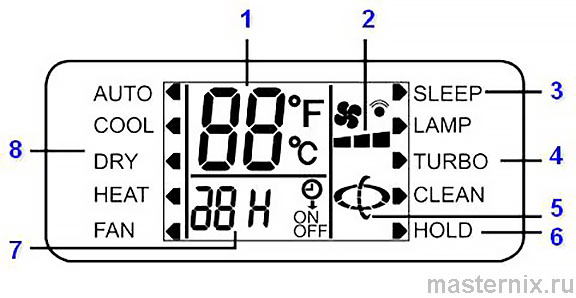
Расшифровка индикации:
- ★ Цифры температуры: установленное значение
- ★ Индикатор скорости вентилятора: текущий режим потока
- ★ Луна: активирован режим 【SLEEP】
- ★ Турбо-иконка: включён режим максимальной мощности
- ★ SWING: настройки качания жалюзи
- ★ Замок: кнопки заблокированы функцией 【HOLD】
- ★ Таймер: отсчёт до включения/выключения
- ★ Режимы: AUTO, COOL, DRY, HEAT, FAN
Всё отображается автоматически. Никаких лишних телодвижений. Это экономит время.
Основные режимы: охлаждение, обогрев, вентиляция
Быстрый старт работы
Нажали 【ON/OFF】 — кондиционер включился. Ещё раз — выключился. Просто. При выключении сохраняются последние настройки режима.
Кнопка 【MODE】 переключает циклы. Удобно, правда?
Настройка температуры и скорости
Кнопки ▲▼ меняют температуру в диапазоне 16–32°С. В режимах АВТО и ВЕНТИЛЯЦИИ температура не настраивается — кнопки просто не сработают. Это нормально.
【FAN SPEED】 переключает скорость. В режиме СУШКА скорость устанавливается автоматически — выбрать вручную нельзя.
Управление воздушным потоком
【SWING ↑↓】 запускает автоматическое качание жалюзи вверх-вниз. Повторное нажатие — фиксация в текущем положении. 【AIR FLOW】 меняет направление потока влево-вправо.
Важный нюанс: при запуске не поворачивайте жалюзи слишком сильно. Это снижает эффективность охлаждения или обогрева. Есть нюансы.
Умные функции: Турбо, Сон, самоочистка
Быстрое достижение комфорта
【TURBO】 — ваш спаситель, когда в комнате слишком жарко или холодно. Кондиционер выходит на максимум. Почувствовали комфорт? Нажмите ещё раз для отмены. Всё.
【SLEEP】 экономит энергию ночью. Доступен в режимах Охлаждения, Обогрева, Авто. Система плавно корректирует температуру: в режиме охлаждения повышает на 2°С, в режиме обогрева понижает на 5°С. Через два часа скорость вентилятора снижается.
Дополнительные интеллектуальные функции
【CLEAN】 запускает самоочистку при выключенном кондиционере. Система удаляет пыль и сушит испаритель, повышая эффективность работы. Функция работает около 30 минут. Повторное нажатие отменяет процесс.
【LAMP】 включает/выключает подсветку дисплея. Для тех, кто не любит свет в спальне. Гениально просто.
【HOLD】 блокирует все кнопки. Дети, кошки, случайные касания — не страшны. Разблокировка — повторное нажатие.
Таймер: программирование включения и выключения
Гибкое планирование работы
【TIMER】 = ваше расписание климата. Нажали — выбрали режим. Выставили время (1–24 часа, шаг 1 час). Готово.
Отмена — повторное нажатие на 【TIMER】. Быстро, без лишних меню.
Примеры сценариев
Выключение через 3 часа:
- Во время работы нажмите 【TIMER】
- Нажимайте кнопку, пока не появится значение 3
- На дисплее начнётся обратный отсчёт
Включение через 5 часов:
- При выключенном кондиционере нажмите 【TIMER】
- Выставьте значение 5
- Подтвердите — таймер активирован
Важно: при активном таймере некоторые кнопки блокируются. Это защита от случайных изменений.
Замена батареек и решение типичных проблем
Пошаговая инструкция за 30 секунд
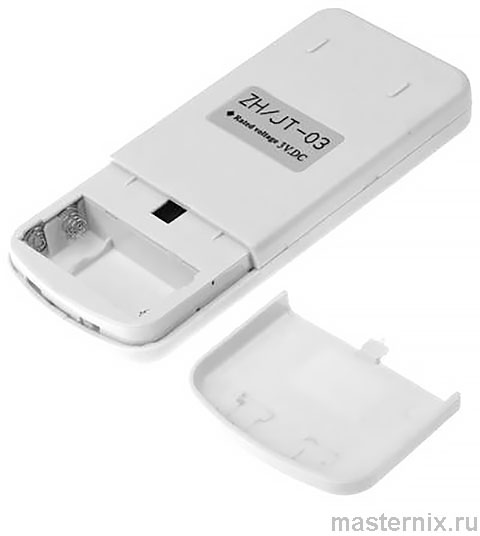
- Сдвиньте крышку отсека
- Извлеките старые батарейки
- Вставьте новые, соблюдая полярность (+/-)
- Закройте крышку
Критично: не смешивайте старые и новые элементы. Не используйте разные типы. Иначе — сбои, тусклый дисплей, потеря сигнала.
Если пульт «завис»: выньте батарейки, подождите 30 секунд, вставьте снова. Помогает в 9 из 10 случаев. Практика показывает.
Частые проблемы и решения
Пульт не реагирует? Проверьте:
- Батарейки: полярность, заряд, отсутствие утечки
- Дистанцию: не более 8 метров, прямая видимость
- Препятствия: мебель, стены, металлические предметы
- Перезагрузку: вынуть батарейки на 30 секунд
Дисплей тусклый? Скорее всего, батарейки садятся. Замените.
Кнопки не работают? Возможно, активирована 【HOLD】. Разблокируйте.
И последнее: если ничего не помогает — проверьте совместимость пульта с вашей моделью кондиционера. Иногда проблема не в пульте, а в различиях протоколов.


