User manual for the remote control for Daewoo DSB series split systems
Руководство / инструкция
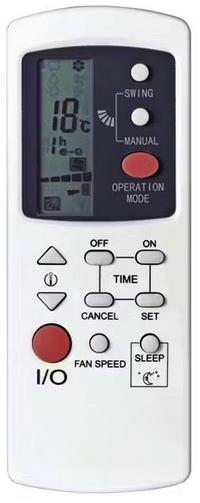
Daewoo DSB Split System Remote Control. Operating Instructions
Compatibility of the Daewoo DSB Remote Control
The remote control is suitable for:
Daewoo DSB Series Air Conditioners
Models:
DSB-075LH/PH/IH DSB-078LH
DSB-095LH/PH/IH DSB-098LH
DSB-125LH/PH/IH DSB-128LH
DSB-185LH/PH/IH DSB-188LH
DSB-245LH/PH/IH DSB-248LH
DSB-285LH DSB-288LH
DSB-0714LH DSB-076LH/PH
DSB-0914LH DSB-096LH/PH
DSB-1214LH DSB-126LH/PH
DSB-1814LH DSB-186LH/PH
DSB-2414LH
DSB-2814LH
Precautionary Measures
❗👉➨ Remove the batteries from the remote control if it will not be used for an extended period.
❗👉➨ Attention The manufacturer reserves the right to make changes to the design, configuration, or manufacturing technology of the remote control without prior notice to the customer.
➠ When using the remote control, point its signal transmitter at the indoor unit of the air conditioner when pressing the buttons. The indoor unit will confirm signal reception with a short sound signal.
➠ Signals can be received at a distance of up to 8 meters in a straight line from the indoor unit at an angle of 45° to the left and right. There should be no obstacles between the remote control and the unit for the signal to pass.
➠ The remote control should be kept at least 1 meter away from television and radio equipment.
➠ The remote control is not a toy. Do not allow children to play with it, and do not play with it yourself.
➠ Do not drop the remote control or subject it to strong impacts. Protect it from direct sunlight, heat sources, water ingress, and high humidity.
➠ Do not use sharp objects to press the buttons to avoid damaging the remote control. Do not wipe the remote with gasoline, solvent, chemically treated wipes, etc.
➠ If the remote control does not function properly, remove the batteries, wait 30 seconds, and then reinsert them. If functionality is not restored, replace the batteries.
.
Description of the Control Buttons for Daewoo DSB
The provided image shows a standard model of the remote control, displaying all the main functional buttons. Depending on the model of your air conditioner, the actual arrangement and labeling of the buttons on the remote control may differ slightly.
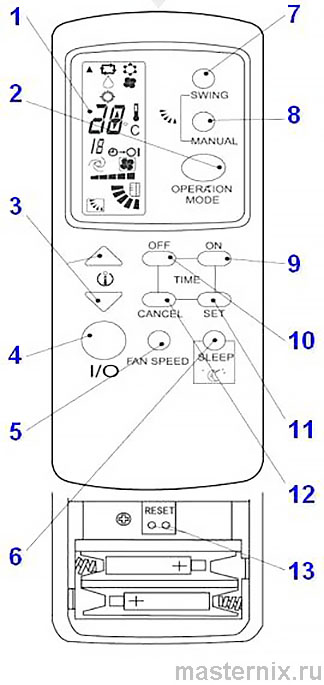
1. Operating Display
Displays the current mode and settings.
2. Operating Mode
[ AUTO ] – Automatic mode
[ COOL ] – Cooling mode
[ DRY ] – Dehumidification mode
[ FAN ] – Ventilation mode
[ HEAT ] – Heating mode
3. Temperature Adjustment
A single press changes the temperature by 1°C. Temperature adjustment range: 16–31°C.
4. ON/OFF
Turns the unit on or off.
\
5. FAN SPEED
Selects the fan speed of the indoor unit.
Repeatedly pressing the button changes the fan speed in the following order:
Low – Medium – High – Automatic.
6. SLEEP
Used during sleep time. Pressing the button enables or disables this function. It operates only in Cooling, Dehumidification, and Heating modes.
7. SWING
Mode for changing the direction of the airflow. Pressing the button enables or disables this function.
8. MANUAL
Manual adjustment of the airflow direction.
Repeatedly pressing the button changes the louver position by a fixed angle.

9. ON TIMER
This button is used to activate the Timer ON function.
10. OFF TIMER
This button is used to activate the Timer OFF function.
11. SET TIMER SETTING
Saves the specified values.
12. CANCEL TIMER SETTING
Clears the specified values.
\
13. REMOTE CONTROL RESET
Reset your remote control by connecting these two points with a metal object if it does not respond to button presses.
❗👉➨ NOTES:
- The Heating mode is available only in systems equipped with this function.
- The effective operating distance of the remote control is 6 meters in a straight line, provided there are no obstacles.
- If the remote control will not be used for a long time, remove the batteries.
- In this illustration, all functions are shown simultaneously on the display for clarity. In some models, certain functions shown on the display may not be available.
- Do not subject the batteries to mechanical or thermal impact, as this may cause the remote control to malfunction.
OPERATING MODES
Automatic ON/OFF Timer Function (Preset Time)
A. To set the automatic shutdown of the operating air conditioner using the timer, press the OFF button on the wireless remote control. The  → ◯ icon will start flashing on the display.
To set the automatic start of the air conditioner that is turned off, press the ON button on the remote control. The → I icon will start flashing on the display.
B. Each press of the ON or OFF button on the remote control increases the ON or OFF time by 1 hour (maximum value – 12 hours). This information will be displayed on the screen.
C. To confirm the set ON/OFF time, press the SET button. The icon on the remote control will stop flashing.
Canceling the Preset Automatic ON/OFF Timer
To cancel the preset automatic ON/OFF time, press the CANCEL button on the remote control. The → ◯ or → I icon will disappear from the remote control display.
❗👉➨ NOTES:
- If there were power interruptions in the electrical network, the automatic ON/OFF time will not be saved and must be set again.
- Once the automatic ON/OFF time is set and confirmed by pressing the SET button, it can only be changed by canceling it with the CANCEL button and setting it again.
- If, after setting and confirming the automatic ON/OFF time with the SET button, the SET button is pressed again, the countdown will start over.
..
Operating Modes — Parameter Adjustment
AUTOMATIC Mode — AUTO
In this mode, the air conditioner automatically maintains a comfortable room temperature. After switching on, depending on the indoor temperature, the air conditioner will operate in one of the following modes (see table):
| Room Temperature (RT) | Air Conditioner Mode |
| RT ‹ 20°C | Heating (for air conditioners without heating function — Dehumidification mode) |
| 20°C ‹ RT ‹ 24°C | Ventilation RT › 24 °C Cooling |
Cooling Mode
Press the MANUAL SWING or SWING button to change the vertical airflow angle or to switch to swing mode.
Fan speed is adjusted by pressing the FAN SPEED button on the remote control.
Temperature is adjusted using the temperature control buttons on the remote control in the range from 16 to 31°C.
Dehumidification Mode — DRY
In this mode, the air conditioner automatically sets the room temperature. The temperature value is not shown on the display. It is not possible to adjust the temperature or fan speed in this mode.
Fan Mode — FAN
In this mode, the outdoor unit does not operate.
The airflow modes and direction can be changed using the MANUAL SWING and SWING buttons.
Fan speed can be adjusted using the FAN SPEED button.
Heating Mode — HEAT
The airflow direction can be adjusted using the MANUAL SWING and SWING buttons.
Fan speed is adjusted using the FAN SPEED button.
Temperature is adjusted using the temperature control buttons on the remote control in the range from 16 to 31°C.
Sleep Mode — SLEEP
Sleep Mode during Cooling and Dehumidification works as follows:
1. The fan operates at the lowest speed.
2. After 1 hour of operation, the maintained temperature increases by 1°C. After another hour, the temperature increases by 1°C again: in total, the temperature increases by 2°C and is maintained at this level.
Sleep Mode during Heating
1. The fan operates at the lowest speed.
2. After 1 hour of operation, the maintained temperature decreases by 2°C. After another hour, the temperature decreases by 2°C again: in total, the temperature decreases by 4°C and is maintained at this level.
\
Battery Installation / Replacement
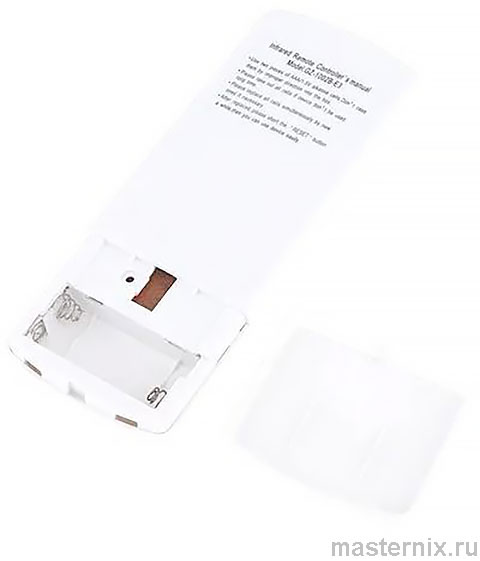
➠ Remove the battery compartment cover by sliding it in the direction indicated by the arrow.
➠ Insert new batteries, ensuring that the (+) and (-) poles are correctly aligned.
➠ Close the battery compartment by sliding the cover back into place.
❗👉➨ NOTE:
➠ If there is no indication on the LCD display or it is not possible to change the air conditioner settings using the remote control, it is recommended to replace the batteries.
➠ Use only new alkaline LR03 (AAA) batteries with a nominal voltage of 1.5 V.
➠ Do not use rechargeable batteries.
➠ Dispose of used batteries in accordance with environmental regulations and the legislation of the country of operation.
➠ If the remote control will not be used for more than one month, remove the batteries to prevent leakage and damage to the device.
Liquid Crystal Display (LCD) of the Indoor Unit
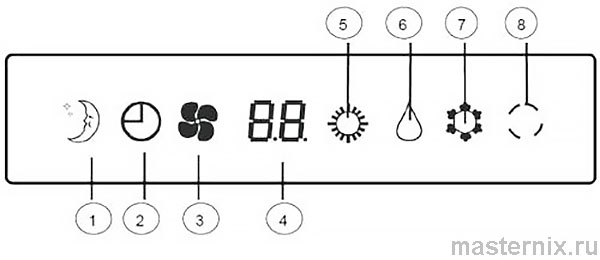
1. Sleep mode indicator
2. Automatic ON/OFF timer mode indicator
3. Fan mode indicator
4.1. In normal mode, shows the indoor temperature
4.2. During temperature adjustment in Cooling or Heating mode, the set temperature flashes; after 10 seconds, the display returns to showing the indoor temperature.
4.3. During timer setting, shows the set time; after 10 seconds, the display returns to showing the indoor temperature.
4.5. If a system malfunction occurs, the LCD displays an error code.
5. Heating mode indicator
6. Dehumidification mode indicator
7. Cooling mode indicator
8. Remote control signal receiver
Error Codes (Displayed on the LCD)
| No. | Code | Fault | Cause | Description and Troubleshooting |
| 1 | A0 | No power supply | Phases are reversed or one phase is missing | Identify the cause and repair the wiring. |
| 2 | C0 | Control circuit fault | Control circuit wire not connected | Securely connect the control circuit wires. |
| 3 | C1 | Data transmission error between indoor and outdoor units | Data signal waveform issue | Contact the nearest service center. |
| 4 | E1 | Room temperature sensor malfunction | Room temperature sensor is defective | Disconnect power, check the sensor connection, replace the defective sensor. |
| 5 | E2 | Indoor unit heat exchanger temperature sensor fault | Sensor is defective | Disconnect power, check the sensor connection, replace the defective sensor. |
| 6 | E4 | Outdoor unit heat exchanger temperature sensor fault | Sensor is defective | Disconnect power, check the sensor connection, replace the defective sensor. |
| 7 | H1 | Outdoor unit malfunction | Outdoor unit malfunction | Identify the cause of the malfunction using the outdoor unit display signals. |
| 8 | H2 | Overload protection activation — high compressor pressure | Excessively high outdoor temperature; blocked air intake; clogged air filter | Identify and eliminate the cause. |
| 9 | H3 | Overload protection activation — low compressor pressure | Excessively low outdoor temperature; significant refrigerant leak; pressure drop at compressor inlet | Identify and eliminate the cause. |
| 10 | P1 | Indoor unit anti-freeze protection activated | Indoor unit heat exchanger freezing | Wait, auto recovery |
| 11 | P2 | Indoor unit overheating protection activated | Indoor unit overheating | Wait, auto recovery |
| 12 | P3 | Cooling mode — outdoor unit overheating protection activated | Protection triggered | Wait, auto recovery |
| 13 | FF | System did not start | Protection triggered | Switch the system off and on. |
| 14 | P6 | Outdoor air too cold in heating mode | Protection triggered | Wait, auto recovery |
| 15 | P7 | Outdoor unit heat exchanger icing in heating mode | Protection triggered | Wait, auto recovery |
| 16 | PS | Crankcase heater operation indicator | Compressor protection activated | Wait, auto recovery |
| 17 | CF | Dirty filter indicator | Filter contamination | Disconnect power and clean the filters. |
\
NOTE
If the system is additionally equipped with a wall-mounted (wired) control unit, this unit may receive signals from the wireless remote control, and the following errors may be displayed on the control unit display:
| No. | Fault | Light Indication |
| 1 | Power supply voltage failure | Sequence of 1 flash with a 3-second delay |
| 2 | Outdoor unit heat exchanger temperature sensor fault | Sequence of 4 flashes with a 3-second delay |
| 3 | Compressor overload protection activated | Sequence of 5 flashes with a 3-second delay |
| 4 | Compressor overload protection — high pressure | Sequence of 6 flashes with a 3-second delay |
| 5 | Compressor overload protection — low pressure | Sequence of 7 flashes with a 3-second delay |
| 6 | Outdoor unit compressor protection activated | Sequence of 8 flashes with a 3-second delay |
EMERGENCY MODE
If the control unit indicates a fault, the indoor unit of the air conditioner is equipped with an emergency shutdown button. Pressing this button switches the air conditioner as follows:
AUTO mode → COOLING mode → STOP
❗👉➨ NOTE:
If the control unit is switched on, the emergency shutdown button is disabled. To operate the button, the control unit must be removed, and the air conditioner must be switched off and on again.
Related articles:
Compatibility of the Daewoo DSB remote control with air conditioners
Air conditioners: main functions and modes
TIMER function in air conditioners
TIMER
SLEEP Night mode
TURBO intensive mode in household air conditioners
SWING function
Automatic mode — AUTO


