User guide for the universal remote control for air conditioners R51M/(C)E, R51M/BG(C)E, RG51M2/(C)E,RG51A/(C)E, RG51M3/(C)E
Руководство / инструкция
Потеряли пульт от сплит-системы 【Dantex】 или он перестал работать? Универсальный пульт 【R51M/E】 решает проблему быстро и без лишних затрат. ЖК-дисплей, часы, таймер, несколько режимов работы — всё, что нужно для комфортного управления климатом в доме или офисе.
Практика показывает: настройка занимает буквально минуту. Инфракрасный сигнал уверенно работает на расстоянии до 8–11 метров, а интуитивная раскладка кнопок позволяет разобраться без инструкции. Впрочем, мы всё равно расскажем о ключевых функциях — на всякий случай.
Быстрая настройка пульта за 3 шага
Подготовка к первой синхронизации
Перед началом работы установите две батарейки типа 【AAA】 (LR03), соблюдая полярность. Убедитесь: между пультом и приёмником внутреннего блока нет препятствий, расстояние — не более 8 метров для надёжного сигнала.
Проверка базовых функций
Нажмите кнопку 【ON/OFF】 — если индикатор передачи мигнул, а кондиционер отреагировал, всё работает. Не сработало? Проверьте батарейки и повторите попытку. Всё просто.
Совместимость с системами Dantex: полный список
Поддерживаемые серии кондиционеров
Пульт 【R51M/E】 совместим с широким спектром оборудования 【Dantex】. Ниже — основные группы для быстрой проверки:
| Тип оборудования | Совместимые модели |
|---|---|
| Полупромышленные инверторные мульти-сплит (настенные) | RK-M07CC, RK-M09CC, RK-M12CC |
| Мобильные кондиционеры серии "N" | RK-09PNM-R, RK-12PNM-R |
| Мультизональные системы MVS (канальные, высокое статическое давление) | RK-MD71T1, RK-MD80T1, RK-MD90T1, RK-MD112T1, RK-MD140T1, RK-MD280T1-С |
| Мультизональные системы MVS (настенные) | RK-MD22G-Y, RK-MD28G-Y, RK-MD36G-Y, RK-MD45G-Y, RK-MD56G-Y, RK-MD71G-Y |
| Фанкойлы кассетные (1-поточные) | DF-300Q1-B, DF-400Q1-B, DF-600Q1-B |
| Фанкойлы кассетные (4-поточные) | DF-300QA, DF-400QA, DF-450QA, DF-500QA, DF-600QB, DF-750QB, DF-850QB, DF-950QB, DF-1200QB, DF-1500QB |
| Фанкойлы настенные | DF-250G, DF-300G, DF-400G, DF-500G, DF-600G |
| Кондиционеры колонного типа (большой производительности) | DU-76FAHR, DU-96FAHR |
Не нашли свою модель? Попробуйте автоматический поиск кода или сверьтесь с расширенной базой совместимости на сайте производителя. Имеет смысл, правда?
Технические характеристики для точного подбора
Основные параметры устройства
| Параметр | Значение |
|---|---|
| Модели | R51 E; R51M/BG(C)E; RG51M2/(C)E; RG51A/(C)E; RG51M3/(C)E |
| Питание | 3,0 В (2 × LR03 AAA) |
| Мин. напряжение сигнала | 2,0 В |
| Дальность передачи | 8 м (до 11 м при 3,0 В) |
| Рабочая температура | −5…+60 °С |
| Диапазон регулировки температуры | 17–30 °С |
| Таймер | До 24 часов |
Компактный корпус и низкое энергопотребление делают пульт надёжным помощником на годы. ЖК-экран с подсветкой (в моделях с индексом 【/BG】) удобен даже в темноте.
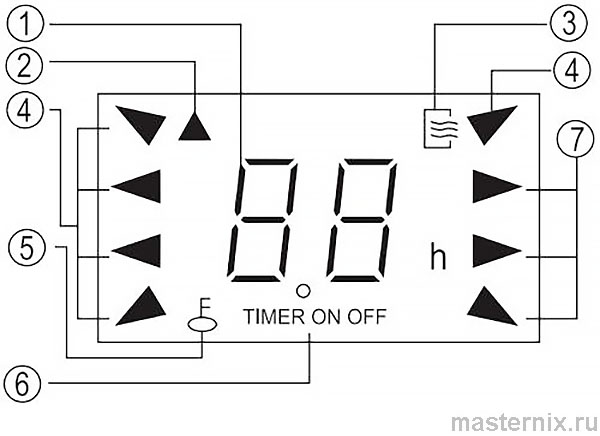
Особенности модификаций: что важно знать
Различия между версиями пульта
Не все кнопки доступны в каждой модификации. Сверьтесь с таблицей:
- ★ 【RG51M2/(C)E】: отсутствуют кнопки 14 и 15
- ★ 【RG51M3/(C)E】: отсутствуют кнопки 7, 14 и 15
- ★ 【R51M/(C)E】 и 【R51M/BG(C)E】: отсутствует кнопка 15
Есть нюанс. Если нажали кнопку, а функция не сработала — возможно, ваша модель кондиционера её не поддерживает. Это нормально, блок продолжит работу без изменений.
Управление режимами: пошаговое руководство
Переключение между режимами работы
Кнопка 【MODE】 циклически переключает режимы:
→ 【AUTO】 (автоматический) → 【COOL】 (охлаждение) → 【DRY】 (осушение) → 【HEAT】 (обогрев) → 【FAN】 (вентилятор)
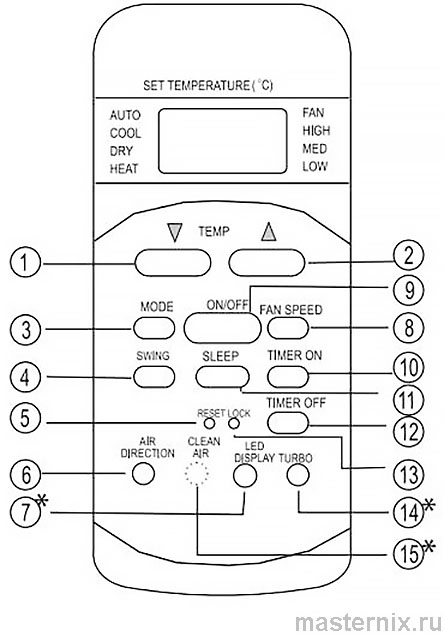
(!) Обратите внимание: модели только с функцией охлаждения не поддерживают режим 【HEAT】.
Регулировка температуры и воздушного потока
→ 【TEMP▲】 / 【TEMP▼】: увеличение/уменьшение заданной температуры в диапазоне 17–30 °С.
→ 【FAN SPEED】: переключение скоростей вентилятора — 【AUTO】, 【LOW】, 【MED】, 【HIGH】.
→ 【SWING】: включение/выключение автоматического поворота жалюзи.
→ 【AIR DIRECTION】: ручная настройка угла горизонтальных заслонок (удержание >2 сек. активирует автоповорот).
Работа с таймером: включение и выключение по расписанию
Настройка таймера включения
→ Нажмите 【TIMER ON】: на дисплее появится 【TIMER ON】 и последнее сохранённое время.
→ Каждое нажатие увеличивает время на 30 минут (после 10:00 — на 60 минут).
→ Для отмены установите значение 【0.00】.
Настройка таймера выключения
Аналогично, но используйте кнопку 【TIMER OFF】. Можно задать оба таймера одновременно — на дисплее отобразится 【TIMER ON-OFF】.
(!) Важно: заданное время отсчитывается от текущего момента, а не от полуночи. Это серьёзно упрощает планирование.
Спящий режим и энергосбережение без потери комфорта
Активация режима 【SLEEP】
Нажмите кнопку 【SLEEP】 для перехода в энергосберегающий режим. Кондиционер автоматически корректирует температуру для комфортного сна, снижая энергопотребление.
- ✔️ Доступен в режимах 【COOL】, 【HEAT】, 【AUTO】
- ✔️ Любое другое нажатие отключает 【SLEEP】
- ✔️ Повторное нажатие 【SLEEP】 также отменяет режим
Дополнительные функции комфорта
→ 【TURBO】 (кнопка 14): усиленное охлаждение в жару (только для поддерживающих моделей).
→ 【CLEAN AIR】 (кнопка 15): активация ионизатора или плазменного фильтра (на некоторых модификациях).
→ 【LED DISPLAY】: включение/выключение цифрового дисплея на внутреннем блоке.
Установка батареек: пошаговая инструкция
Пошаговая замена элементов питания
→ Сдвиньте заднюю крышку отсека для батареек.
→ Вставьте две батарейки 【AAA】 (LR03), соблюдая полярность 【+】 и 【−】.
→ Закройте крышку до фиксации.
→ На ЖК-дисплее появятся часы — пульт готов к работе.
(!) Критически важно:
✖️ Не смешивайте старые и новые батарейки, разные типы или бренды.
✖️ Если пульт не используется несколько недель — извлеките элементы питания, чтобы избежать утечки электролита.
✖️ Средний срок службы батареек — около 6 месяцев при нормальном использовании.
Решение проблем: если пульт не реагирует
Диагностика типичных сбоев
Пульт не управляет кондиционером? Не спешите расстраиваться. Чаще всего проблема решается просто:
→ Проверьте батарейки: возможно, они сели или установлены неправильно.
→ Убедитесь, что между пультом и приёмником нет препятствий (мебель, шторы, люди).
→ Попробуйте подойти ближе: для тестов — не более 2–3 метров.
→ Избегайте прямых солнечных лучей на приёмник внутреннего блока — это может нарушить работу.
→ Держите пульт вдали от источников электромагнитных помех (бытовая техника, роутеры).
Если ничего не помогает — нажмите скрытую кнопку 【RESET】 для сброса настроек. Впрочем, такое требуется редко.