User manual for the Lessar LZ-KBP remote control
Руководство / инструкция
Как управлять климатом одной кнопкой
Эргономика, которая работает на вас
Удобство — это не просто слово в описании. Система Intellect от Lessar создана так, чтобы вы забыли о сложностях. Логика расположения кнопок продумана до мелочей: даже ребенок разберется, как изменить температуру. Желтая подсветка ночью? Гениально. Не нужно искать выключатель, тянуться к стене — всё под рукой.
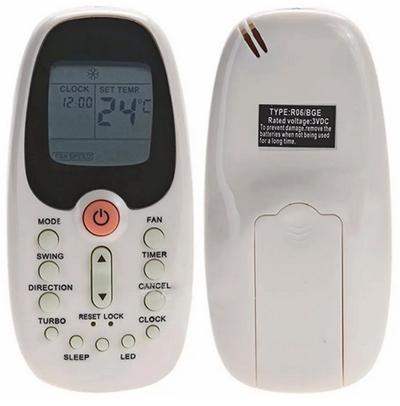
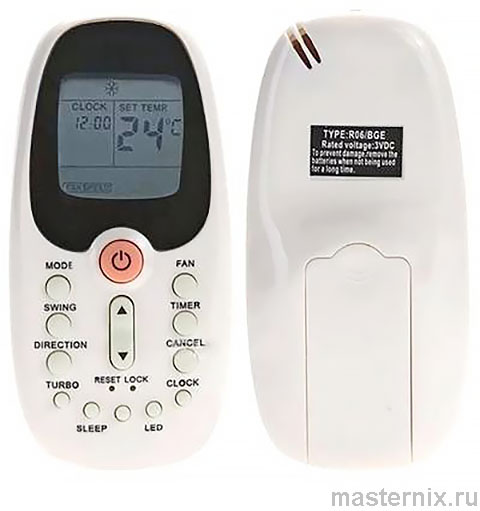
Крепление на стену — практичное решение. Пульт всегда на виду, не потеряется между подушками. Скажу прямо: это та мелочь, которая экономит нервы каждый день.
Технические параметры и совместимость
Характеристики, которые стоит запомнить
Производитель: LESSAR
Модель: LZ-KBP
Тип: универсальный пульт ДУ
Дисплей: LCD с четкой индикацией
Кнопки: 16 функциональных клавиш
Дальность: до 8 метров при прямой видимости
Питание: 3.0 В (2 батарейки LR03)
Рабочий диапазон: от -5°С до +60°С
Знакомо? Не все пульты выдерживают такие перепады. Этот — да. Что логично для климатической техники.
Совместимость с моделями кондиционеров
Пульт работает с широким спектром устройств Lessar. Вот основные серии:
| Серия | Модели |
|---|---|
| KEA2 | LS/LU-H07KEA2, LS/LU-H09KEA2, LS/LU-H12KEA2, LS/LU-H18KEA2, LS/LU-H24KEA2 |
| KFA2 | LS/LU-H07KFA2, LS/LU-H09KFA2, LS/LU-H12KFA2, LS/LU-H18KFA2, LS/LU-H24KFA2, LS/LU-H28KFA2 |
| HE-KFA2 | LS/LU-HE09KFA2, LS/LU-HE12KFA2, LS/LU-HE18KFA2 |
| KB2 (ion) | LS/LU-H07KB2, LS/LU-H09KB2, LS/LU-H12KB2, LS/LU-H18KB2, LS/LU-H24KB2, LS/LU-H28KB2 |
| HE-KCA2 | LS/LU-HE09KCA2, LS/LU-HE12KCA2 |
| 2H-KCY2 (ion) | LS/LU-2H18KСY2, LS/LU-2H21KСY2 |
Важный нюанс: если ваша модель не в списке — проверьте маркировку R06/BGE. Часто пульт подходит, даже если номер отличается.
Безопасная эксплуатация без сюрпризов
Правила, которые продлят жизнь пульту
Перед первым использованием: вставьте батарейки, соблюдая полярность. Кажется, просто? Да. Но 80% проблем начинаются именно здесь.
- ✔️ Направляйте пульт на приемник без препятствий, дистанция — до 8 метров
- ✔️ Берегите от падений, влаги, прямых солнечных лучей
- ✔️ При сбоях: выньте батарейки на 30 секунд, вставьте заново
- ✔️ Не смешивайте старые и новые элементы питания
- ✔️ При длительном хранении — извлеките батарейки во избежание утечки
Дети? Присматривайте. Пульт — не игрушка, хоть и выглядит безобидно.
Ограничения функционала
Универсальность — это плюс. Но: некоторые кнопки могут не работать на вашем кондиционере. Это нормально. Например, в режиме охлаждения кнопки НАГРЕВА и ELE.H просто игнорируются. Не баг, а фича.
Расшифровка кнопок и символов
Визуальная навигация по интерфейсу
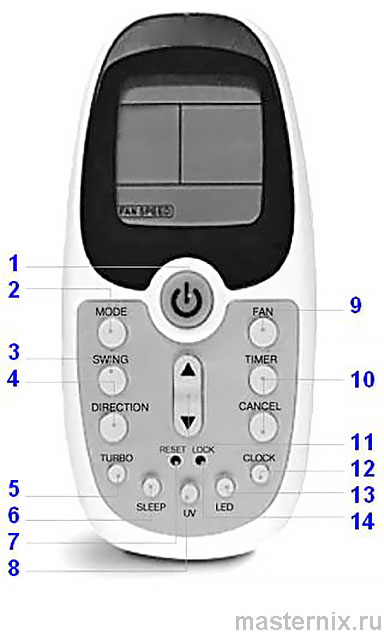
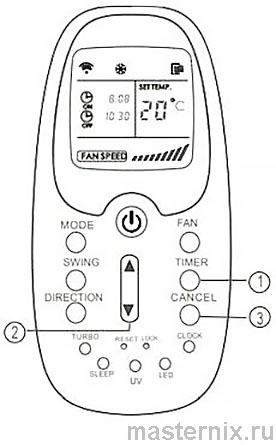
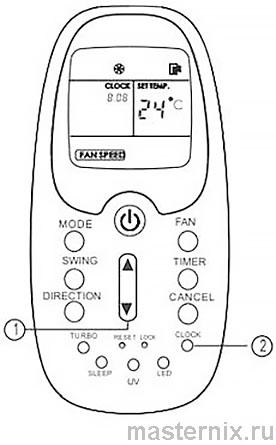
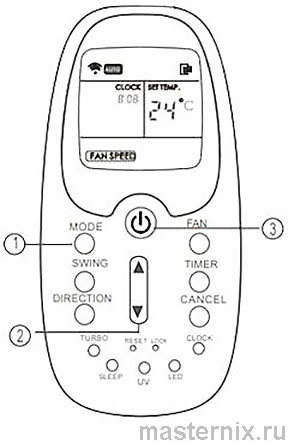
Нумерация для быстрого ориентира:
- 【ON/OFF】 Включение/Отключение
- 【MODE】 Выбор режима работы
- 【COOL】 Охлаждение
- 【HEAT】 Нагрев
- 【FAN】 Вентиляция
- 【SLEEP】 Ночной режим
- 【RESET】 Сброс настроек
- 【UV】 Включение UV-генератора
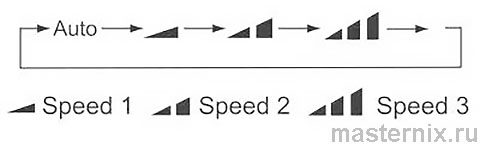
- 【FAN SPEED】 Скорость вентилятора (высокая/средняя/низкая/авто)
- 【TIMER】 Настройки таймера (вкл/выкл/коррекция/отмена)
- 【TEMP】 Установка температуры
- 【TIME】 Установка времени
- 【CLEAR】 Очистка дисплея
- 【LOCK】 Блокировка кнопок
Обратите внимание: на вашем пульте некоторые кнопки могут отсутствовать — зависит от модели кондиционера. Это не дефект.
Символы на дисплее: что они означают
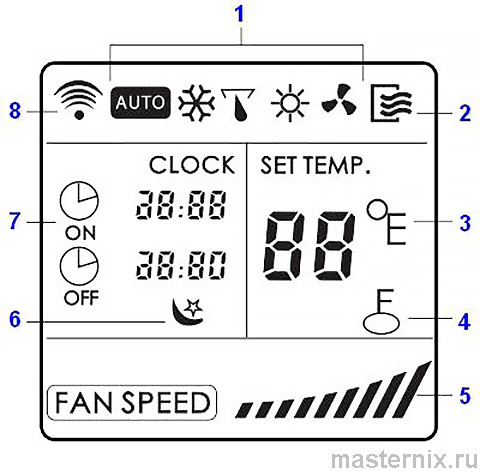
Расшифровка индикации:
- ★ Режим работы (иконка снега, солнца, капли и т.д.)
- ★ Индикатор питания
- ★ Текущая температура
- ★ Значок блокировки
- ★ Скорость вентилятора (полоски или слово AUTO)
- ★ Режим SLEEP (луна или звезда)
- ★ Время/таймер
- ★ Индикатор передачи сигнала
Всё отображается автоматически. Никаких лишних телодвижений.
Базовое управление: включение и режимы
Старт и выбор режима работы
Нажали 【ON/OFF】 — кондиционер включился. Еще раз — выключился. Просто. При выключении сбрасываются настройки таймера и спящего режима. Имейте в виду.
Кнопка 【MODE】 переключает циклы: АВТО → ОХЛАЖДЕНИЕ → СУШКА → НАГРЕВ → ВЕНТИЛИРОВАНИЕ → (повтор). Удобно, правда?

Важно: если ваш кондиционер только охлаждает, режим НАГРЕВА не активируется. Система просто пропустит этот шаг.
Направление воздушного потока
【SWING】 запускает автоматическое качание жалюзи вверх-вниз. Нажмите еще раз — остановка в текущем положении. 【DIRECTION】 меняет угол вручную, 6 позиций. Если угол снижает эффективность, система скорректирует его автоматически — без уведомления на экране.
Турбо, Спящий режим и блокировка
Быстрое достижение комфорта
【TURBO】 — ваш спаситель, когда в комнате слишком жарко или холодно. Кондиционер выходит на максимум. Почувствовали комфорт? Нажмите еще раз для отмены. Всё.
【SLEEP】 экономит энергию ночью. Доступен в режимах Охлаждения, Обогрева, Авто. В ВЕНТИЛЯЦИИ — не работает. Логично: зачем экономить, если просто гоняете воздух?
Защита от случайных нажатий
【LOCK】 блокирует все кнопки. Дети, кошки, случайные касания — не страшны. Разблокировка — повторное нажатие. Совет: используйте тонкий предмет (спичку, зубочистку), чтобы не поцарапать панель.
【RESET】 — крайняя мера. Сбрасывает все настройки к заводским. Тоже через углубленную кнопку. Не нажимайте без необходимости.
Скорость вентилятора и отображение
【FAN】 переключает: Низкий → Средний → Высокий → Авто. В режиме ВЕНТИЛЯЦИИ авто-скорость недоступна — выбирайте вручную.
【LED】 отключает подсветку дисплея кондиционера. Для тех, кто не любит свет в спальне. Гениально просто.
Таймер: программирование включения и выключения
Гибкое планирование работы
【TIMER】 + 【TEMP/TIME】 = ваш личный расписатель. Нажали TIMER — увидели мигающий индикатор. Кнопками ▲▼ выставили время. Готово.
Отмена — кнопка 【CANCEL】. Быстро, без лишних меню.
Примеры сценариев
Включение к возвращению домой:
- Нажмите 【TIMER】 до появления TIMER ON
- Выставьте время (например, 18:00) кнопками ▲▼
- Подождите 0.5 сек — индикатор перестанет мигать

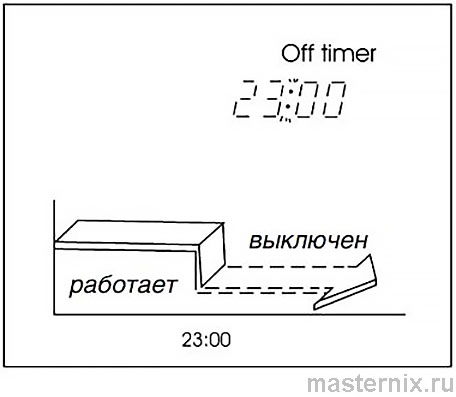
Выключение перед сном: Аналогично, но с TIMER OFF. Например, 23:00 — и кондиционер сам выключится.
Комбинированные сценарии
Хотите, чтобы кондиционер выключился в 23:00 и включился в 6:00?
- Настройте TIMER OFF на 23:00
- Нажмите 【TIMER】 еще раз — перейдете к TIMER ON
- Выставьте 6:00
- Подтвердите ожиданием
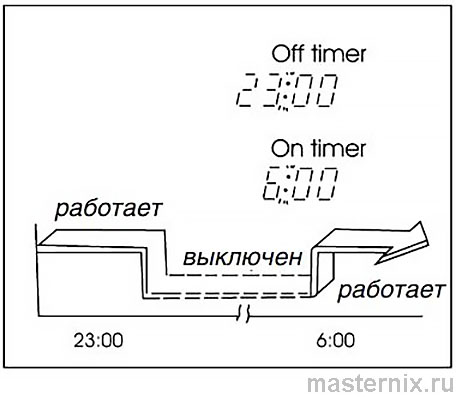
Важно: интервалы менее 15 минут могут обрабатываться некорректно. Ставьте с запасом.
Замена батареек за 30 секунд
Пошаговая инструкция без ошибок
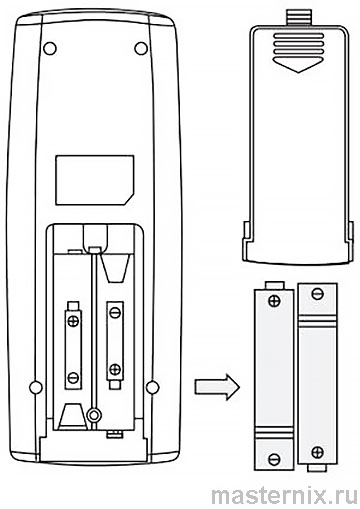
- Сдвиньте крышку отсека
- Извлеките старые батарейки
- Вставьте новые LR03, соблюдая полярность (+/-)
- Закройте крышку
Критично: не смешивайте старые и новые элементы. Не используйте разные типы. Иначе — сбои, тусклый дисплей, потеря сигнала.
Если пульт «завис»: выньте батарейки, подождите 30 секунд, вставьте снова. Помогает в 9 из 10 случаев.
Настройка часов и автоматические сценарии
Точное время — основа таймеров
После установки батареек дисплей покажет 00:00. Настраиваем:
- Кнопками ▲▼ выставите текущее время (шаг 1 мин, зажатие — 10 мин)
- Нажмите и удерживайте 【CLOCK】 5 секунд — время сохранится
Перенастройка: удерживайте 【CLOCK】 3 секунды до начала мигания, повторите шаги.
Важно: часы должны быть настроены перед использованием AUTO-TIMER. Иначе таймеры сработают не вовремя.
Автоматический режим: умный климат
В режиме AUTO кондиционер сам подбирает параметры. Вы задаете желаемую температуру — система решает, охлаждать или греть.
- 【MODE】 → выберите AUTO
- 【TEMP】 → задайте комфортное значение
- 【ON/OFF】 → старт
Не нравится? В любой момент переключите режим кнопкой 【MODE】. Гибкость — это про Intellect.
Ручной запуск при потере пульта
Аварийный сценарий без паники
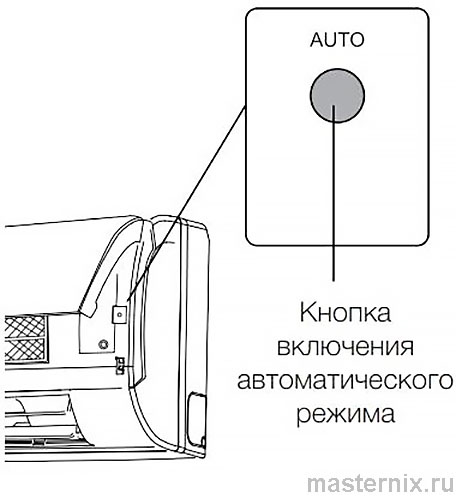
Пульт потерян? Не беда. На внутреннем блоке есть кнопка 【AUTO】:
- → Одно нажатие: запуск в авто-режиме (система сама подберет настройки)
- → Два нажатия: включение в режиме охлаждения, +24°С
- → Третье нажатие: выключение
Ограничение: вручную нельзя выбрать режим, температуру или скорость вентилятора. Но для экстренного случая — более чем достаточно.
Решение типичных проблем
Быстрые ответы на частые вопросы
Пульт не реагирует? Проверьте:
- Батарейки: полярность, заряд, отсутствие утечки
- Дистанцию: не более 8 метров, прямая видимость
- Препятствия: мебель, стены, металлические предметы
- Перезагрузку: вынуть батарейки на 30 секунд
Дисплей тусклый? Скорее всего, батарейки садятся. Замените.
Время сбилось? Статическое электричество или разряд. Перенастройте часы по инструкции выше.
Кнопки не работают? Возможно, активирована 【LOCK】. Разблокируйте.
И последнее: если ничего не помогает — сброс 【RESET】. Но помните: все настройки вернутся к заводским.


