User manual for the Biryusa YKR-P/002E air conditioner remote control
Руководство / инструкция
Поддерживаемые модели сплит-систем
Полный перечень совместимых кондиционеров Бирюса
Пульт дистанционного управления YKR-P/001E (YKR-P/002E) разработан для работы с линейкой сплит-систем Бирюса. Перед использованием сверьтесь со списком поддерживаемых моделей.
Основные серии, работающие с данным пультом:
- Бирюса B-07FPR / B-07FPQ и модификации с индексом -IK
- Бирюса B-09FPR / B-09FPQ и модификации с индексом -IK
- Бирюса B-12FPR / B-12FPQ и модификации с индексом -IK
- Бирюса B-18FPR / B-18FPQ и модификации с индексом -IK
- Бирюса B-24APR / B-24FPQ и модификации с индексом -IK
- Бирюса B-30APR / B-30FPO
- Бирюса B-36FPR / B-36FPQ
Также поддерживаются инверторные модели серий FIR, FIG и другие модификации.
| Обозначение | Расшифровка |
|---|---|
| F | Серия оборудования |
| P | Постоянная скорость компрессора |
| I | Инверторный тип компрессора |
| R | Внутренний блок |
| Q | Внешний блок |
| IK | Дополнительный монтажный комплект |
Правила безопасной эксплуатации
Базовые требования к обращению
Пульт работает по инфракрасному каналу. Для стабильной связи с внутренним блоком соблюдайте простые рекомендации.
- Направляйте ИК-передатчик прямо на приёмник кондиционера
- Максимальная дальность — 8 метров по прямой линии
- Угол приёма сигнала: ±45° от центральной оси
- Исключите препятствия между устройствами
- Размещайте пульт не ближе 1 метра от ТВ и радиоаппаратуры
Чего делать нельзя
Пульт — не игрушка. Не допускайте детей к управлению без присмотра.
- ✖️ Не роняйте и не подвергайте ударам
- ✖️ Избегайте прямых солнечных лучей и перегрева
- ✖️ Исключите контакт с водой и высокой влажностью
- ✖️ Не нажимайте кнопки острыми предметами
- ✖️ Не используйте растворители и химические салфетки
Если пульт перестал реагировать — извлеките батарейки, подождите 30 секунд, вставьте обратно. Часто проблема решается без визита в сервис.
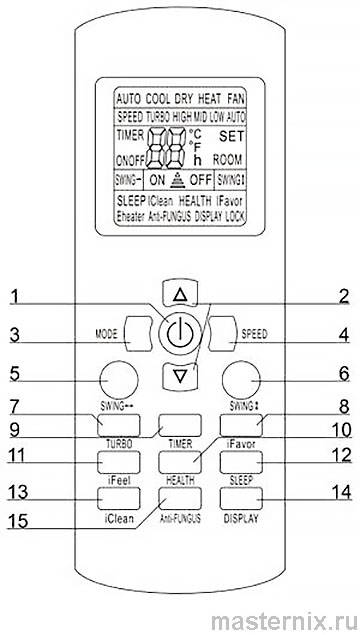
Расшифровка кнопок и индикаторов
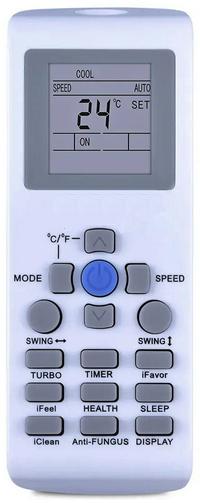
Общий вид пульта управления
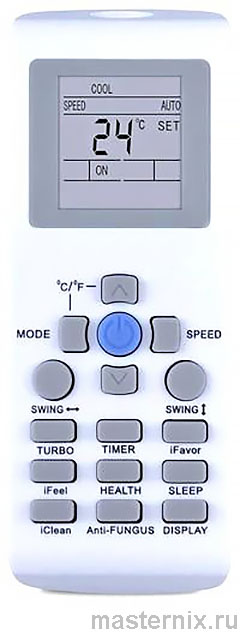
На изображении представлена стандартная комплектация с полным набором клавиш. Фактическое расположение кнопок на вашей модели может незначительно отличаться.
(!) Если ваша модель не поддерживает какую-либо функцию, нажатие соответствующей кнопки не вызовет реакции внутреннего блока.
1. Включение и выключение 【ON/OFF】
Кнопка управляет питанием системы. При включении восстанавливаются предыдущие настройки работы.
2. Регулировка температуры 【▲】/【▼】
Кнопки изменяют заданное значение с шагом 1°. Диапазон: 16–32°C. Удержание более 2 секунд ускоряет изменение.
3. Выбор режима 【MODE】
Циклическое переключение пяти программ:
【AUTO】 → 【COOL】 → 【DRY】 → 【HEAT】 → 【FAN】 → 【AUTO】
Особенности режимов:
- 【AUTO】 — температура не регулируется вручную, система сама поддерживает 23±2°C
- 【FAN】 — работает только вентилятор, температура не поддерживается
(!) Кондиционер не обеспечивает приток свежего воздуха!
4. Скорость вентилятора 【SPEED】
Циклическое переключение:
Auto → Низкая → Средняя → Высокая → Auto
Индикация на дисплее: "AUTO", "LOW", "MID", "HIGH". В авторежиме скорость подбирается автоматически.
5–6. Управление жалюзи 【SWING】
Две отдельные кнопки для горизонтального и вертикального качания:
- 【SWING ↕】 — вертикальные жалюзи (индикатор "SWING 1")
- 【SWING ↔】 — горизонтальная жалюзи (индикатор "SWING 2")
Повторное нажатие останавливает качание и фиксирует положение. Не регулируйте жалюзи вручную — это может привести к поломке.
7. Интенсивный режим 【TURBO】
Вентилятор работает на максимальной скорости для быстрого выхода на заданную температуру. Индикатор: "TURBO".
Режим отключается при:
- Переключении режима работы
- Изменении скорости вентилятора
- Повторном нажатии 【TURBO】
8. Запоминание настроек 【iFAVOR】
Функция сохраняет любимые параметры работы:
- Настройте желаемый режим
- Удерживайте 【iFAVOR】 3 секунды до появления индикации
- Для возврата к сохранённым настройкам — однократное нажатие
9. Таймер 【TIMER】
Установка включения/выключения по расписанию. Диапазон: 0,5–24 часа. Подробности — в отдельном разделе.
10. Ионизация 【HEALTH】
Активирует режим очистки воздуха. Индикатор: "HEALTH". Повторное нажатие отключает функцию.
11. Датчик температуры в пульте 【iFEEL】
Кондиционер ориентируется на температуру в месте расположения пульта. На дисплее отображается значение с индикатором "ROOM".
12. Ночной режим 【SLEEP】
Оптимизирует работу для комфортного сна. Доступен в режимах 【AUTO】, 【COOL】, 【HEAT】.
13. Самоочистка 【iCLEAN】
Удаляет влагу с испарителя, предотвращая рост бактерий. Продолжительность цикла: 35 минут. Индикаторы: "iCLEAN", "CL".
14. Отключение подсветки 【DISPLAY】
Выключает индикацию на внутреннем блоке — удобно для ночного использования.
15. Защита от плесени 【Anti-FUNGUS】
После выключения вентилятор работает ещё 3 минуты на низкой скорости для просушки внутреннего блока.
Основные режимы работы кондиционера
Автоматический режим 【AUTO】
Система сама поддерживает комфорт 23±2°C:
- При +20°C и ниже — включается обогрев
- При +26°C и выше — активируется охлаждение
Ручная регулировка температуры в этом режиме недоступна.
Охлаждение 【COOL】 и обогрев 【HEAT】
Точность поддержания: ±1°C.
Важные нюансы:
- В 【COOL】: если заданная температура выше комнатной более чем на 1°C — система не запустится
- В 【HEAT】: если заданная ниже комнатной более чем на 1°C — кондиционер не включится
Осушение 【DRY】
Поддержание температуры с точностью ±2°C. При превышении заданной более чем на 2°C система переключается в охлаждение.
Логика ночного режима 【SLEEP】
При охлаждении
- Через 1 час: температура +1°C
- Ещё через час: +1°C (итого +2°C)
- Дальнейшее поддержание на этом уровне
При обогреве
- Через 1 час: температура -2°C
- Ещё через час: -2°C (итого -4°C)
- Поддержание достигнутого значения
(!) В режиме 【SLEEP】 функция таймера не активируется.
Программирование таймера
Установка включения 【TIMER ON】
- При выключенном пульте нажмите 【TIMER】 — замигает "TIMER ON"
- Кнопками 【▲】/【▼】 установите время (шаг 0,5 часа до 10 часов, затем 1 час)
- Повторно нажмите 【TIMER】 для подтверждения
Через заданное время кондиционер включится с сохранёнными настройками.
Установка выключения 【TIMER OFF】
Алгоритм аналогичен, но кнопка нажимается при включённом пульте. Индикатор: "TIMER OFF".
Для отмены таймера — ещё раз нажмите 【TIMER】.
Дополнительные функции пульта
Самоочистка 【iCLEAN】 — зачем она нужна
Функция удаляет влагу с испарителя и внутренних полостей, предотвращая появление плесени и неприятного запаха.
Активация:
- При выключенном кондиционере нажмите 【iCLEAN】
- На дисплеях пульта и внутреннего блока появятся индикаторы "CL"
- Цикл длится 35 минут
Блокировка кнопок
Защита от случайных нажатий:
- Одновременно нажмите две специальные кнопки (см. инструкцию к вашей модели)
- На дисплее появится индикатор "LOCK"
- Для разблокировки — повторите сочетание
Режим 【iFEEL】 — точный контроль температуры
Кондиционер ориентируется на датчик в пульте, а не на внутренний блок. Это полезно, если пульт находится в зоне вашего комфорта.
Защита от плесени 【Anti-FUNGUS】
После каждого выключения вентилятор работает ещё 3 минуты для просушки. Функция активируется автоматически при включении.
Замена элементов питания
Пошаговая инструкция
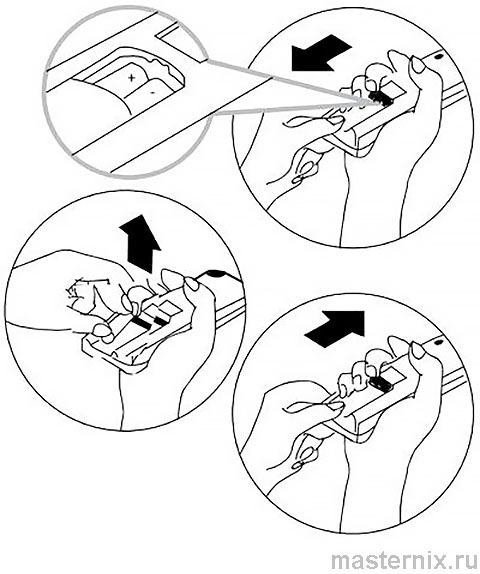
- Сдвиньте крышку батарейного отсека на задней панели
- Извлеките старые элементы типа AAA
- Вставьте новые щелочные батарейки, соблюдая полярность
- Задвиньте крышку до фиксации
Требования к элементам питания
- Используйте только новые щелочные батарейки типа AAA
- ✖️ Не смешивайте старые и новые элементы
- ✖️ Не применяйте батарейки разных типов
Признаки разряда: тусклая индикация, отсутствие реакции кондиционера, сокращение дальности действия.
Если не используете пульт дольше месяца — извлеките батарейки для предотвращения протекания.
Управление без пульта ДУ
Аварийный переключатель на внутреннем блоке
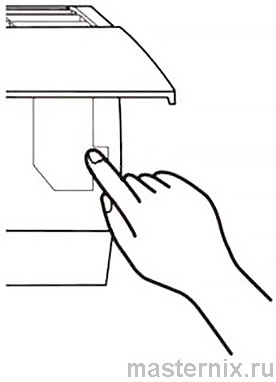
При утере или неисправности пульта используйте кнопку на самом кондиционере:
- Аккуратно откройте переднюю панель внутреннего блока
- Кратковременно нажмите кнопку аварийного управления
- Кондиционер включится в автоматический режим
- Закройте и зафиксируйте панель
Для выключения — повторите кратковременное нажатие.
(!) Не удерживайте кнопку нажатой длительное время — это может вызвать сбой в работе системы.
Диагностика неполадок
Если пульт не реагирует
Возможные причины:
- Сели батарейки → замените элементы питания
- Препятствия между устройствами → уберите преграды
- Превышена дальность → подойдите ближе 8 метров
- Загрязнён ИК-передатчик → протрите мягкой тканью
- Активирована блокировка → разблокируйте кнопки
Кондиционер не включается
Проверьте:
- Подачу электропитания на внутренний блок
- Правильность выбранного режима
- Соответствие заданной температуры условиям запуска
- Положение аварийного переключателя
Профилактика для стабильной работы
Несколько советов:
- ✔️ Очищайте воздушные фильтры раз в 2 недели
- ✔️ Используйте 【iCLEAN】 после работы в режиме охлаждения
- ✔️ Не направляйте поток воздуха непосредственно на людей
- ✔️ Проверяйте плотность закрытия окон при работе кондиционера
- ✔️ Храните пульт в сухом месте, вдали от источников тепла
Соблюдение рекомендаций продлит срок службы вашей сплит-системы Бирюса и обеспечит комфортный микроклимат в помещении.
Возникли вопросы? Обратитесь в сервисный отдел по телефону 8 800 250 0014 (бесплатный звонок по РФ) или посетите официальный сайт www.biryusa.ru.


