User guide for the Centek YKR-H/009E remote control
Руководство / инструкция
 Скажу прямо: универсальный пульт — это удобно, но есть нюансы. Centek YKR-H/009E (он же Shuft YKR-H/101E) выглядит как стандартный контроллер, но скрывает функции, о которых многие пользователи не догадываются. Давайте разберёмся, как выжать из него максимум без лишних телодвижений.
Совместимые модели сплит-систем
Поддерживаемые кондиционеры
Пульт YKR-H/009E работает с настенными сплит-системами Rovex серии RS-ALS1. Вот полный перечень:
| Модель кондиционера |
|---|
| Rovex RS-07ALS1 |
| Rovex RS-09ALS1 |
| Rovex RS-12ALS1 |
| Rovex RS-18ALS1 |
| Rovex RS-24ALS1 |
Важный момент: пульт универсален и оснащён всеми возможными кнопками. Если какая-то функция не реагирует — значит, ваш кондиционер её просто не поддерживает. Это не брак, а особенность совместимости.
Меры предосторожности при эксплуатации
Базовые правила безопасности
Перед первым использованием вставьте две батарейки типа 【AAA】 1,5 В, соблюдая полярность 【+】 / 【–】. Ошибка в полярности — частая причина «неработающего» пульта, хотя проблема решается за 10 секунд.
Направляйте пульт на внутренний блок, убедитесь, что на пути ИК-сигнала нет препятствий. Максимальная дальность — 8 метров при прямой видимости. Стены, зеркала, мебель могут ослабить сигнал — это физика, а не дефект.
⚠️ Избегайте падений, попадания влаги и прямых солнечных лучей. Электроника не любит экстремальных условий.
Обслуживание и хранение
Если пульт перестал реагировать — выньте батарейки на 30 секунд, вставьте заново. Часто это решает проблему без визита в сервис. Не смешивайте старые и новые элементы питания, не используйте батарейки разных типов — напряжение может отличаться, что приведёт к сбоям.
При длительном простое (месяц и более) извлекайте батарейки — это предотвратит окисление контактов от возможной утечки электролита.
Размещайте пульт не ближе 1 метра от телевизоров и радиоаппаратуры — это снижает риск взаимных помех.
Конструкция пульта и элементы управления
Расположение и функции клавиш
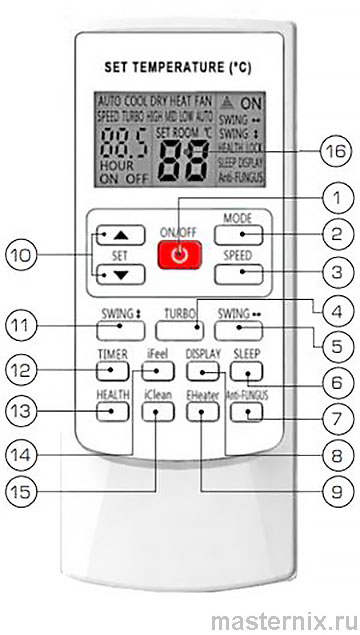
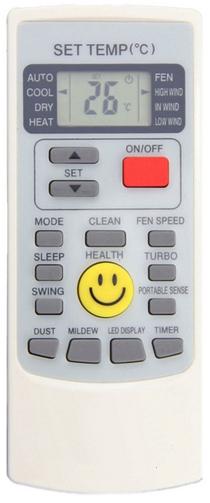
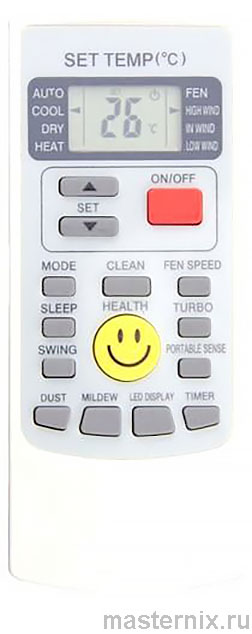
Основные кнопки: 【ON/OFF】 включает и выключает систему, 【MODE】 переключает режимы работы, 【SPEED】 регулирует скорость вентилятора, 【Set▲】 / 【Set▼】 меняют температуру.
【SWING2】 управляет горизонтальными жалюзи, 【SWING】 — вертикальными, 【SLEEP】 активирует ночной режим, 【TIMER】 программирует автозапуск, 【CLEAN】 запускает самоочистку, 【Fungusproof】 включает защиту от плесени, 【SCREEN】 управляет подсветкой дисплея блока, 【LOCK】 блокирует кнопки.
⚠️ Кнопка 【Heater】 недоступна для данной модели — не тратьте время на её поиск в меню.
Индикаторы на дисплее пульта
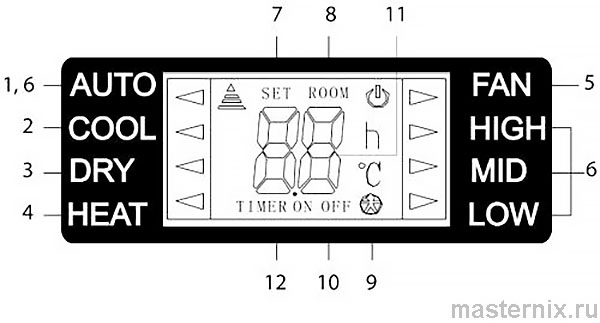
Разберём обозначения: 【AUTO】, 【COOL】, 【DRY】, 【HEAT】, 【FAN】 — основные режимы. Индикаторы скорости: 【HIGH】, 【MID】, 【LOW】, 【AUTO】. 【SET】 показывает заданную температуру, 【ROOM】 — желаемую температуру в помещении, 【TIMER】 — настройки таймера.
⚠️ Значок 【HEALTH】 в данной серии не используется — это нормально.
Выбор режима работы и температуры
Последовательность переключения режимов
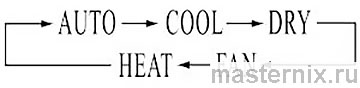
Нажимайте 【MODE】 для цикла: 【AUTO】 → 【COOL】 → 【DRY】 → 【HEAT】 → 【FAN】. Каждый режим решает свою задачу:
✔️ 【AUTO】 — система сама подбирает параметры, температура не регулируется вручную, комфорт поддерживается на уровне 25±2 °С.
✔️ 【COOL】 — охлаждение в жару, основная летняя функция.
✔️ 【DRY】 — осушение при высокой влажности без сильного охлаждения.
✔️ 【HEAT】 — обогрев в межсезонье, начальная уставка 24 °С.
✔️ 【FAN】 — только циркуляция воздуха, температура не меняется.⚠️ В режиме 【AUTO】 ручная регулировка температуры отключена — это особенность алгоритма, а не баг.
Настройка целевой температуры
Кнопками 【Set▲】 / 【Set▼】 задайте желаемую температуру в диапазоне 16–32 °С. В режимах 【COOL】 / 【HEAT】 кондиционер поддерживает заданную температуру с точностью ±1 °С.
Важный нюанс: если заданная температура в режиме охлаждения выше комнатной более чем на 1 °С — система автоматически переключится в режим вентиляции. Логично: нет смысла охлаждать, если в помещении и так прохладнее.
Управление воздушным потоком и жалюзи
Регулировка скорости вентилятора
【SPEED】 переключает четыре уровня: 【AUTO】 → 【HIGH】 → 【MID】 → 【LOW】. В авторежиме система сама подбирает обороты под разницу между заданной и фактической температурой.
В режиме 【CLEAN】 (самоочистка) вентилятор автоматически работает на низкой скорости — это нужно для эффективной продувки теплообменника.
Настройка положения жалюзи
【SWING2】 управляет горизонтальными заслонками: нажатие включает качание, повторное — фиксирует текущее положение. 【SWING】 работает аналогично с вертикальными жалюзи.
⚠️ Вертикальные жалюзи можно отрегулировать и вручную — аккуратно поверните их пальцами в нужное положение.
Совет: направляйте поток воздуха параллельно полу — так холодный воздух распределяется равномернее, без сквозняков.
Спецфункции: самоочистка, защита от плесени
Режим 【CLEAN】 для самоочистки испарителя
При выключенном пульте нажмите кнопку 【CLEAN】 — запустится 35-минутный цикл очистки. Система просушивает теплообменник, удаляет влагу и предотвращает появление запаха сырости.
Для принудительного завершения цикла нажмите 【CLEAN】 или 【ON/OFF】 повторно. Удобно запускать эту функцию раз в 1–2 недели для поддержания гигиены.
Функция 【Fungusproof】 против плесени
При активации этой функции после выключения кондиционера вентилятор продолжает работать ещё 3 минуты на минимальных оборотах, а жалюзи закрываются. Цель: просушить внутренние компоненты и предотвратить образование плесени.
⚠️ Включение: при выключенных кондиционере и пульте направьте пульт на блок, удерживайте 【Fungusproof】 — пять звуковых сигналов подтвердят активацию.
⚠️ Отключение: аналогично, но после пяти сигналов прозвучат ещё три — функция деактивирована.
⚠️ Пока функция работает, не включайте кондиционер повторно — дождитесь полного завершения цикла.
Программирование таймера включения и выключения
Настройка автоматического включения
При выключенном пульте нажмите 【TIMER】 — на дисплее появится 【TIMER ON】 и время. Диапазон: 0,5–24 часа.
Кнопками 【▲】 / 【▼】 задайте нужное время: до 10 часов шаг 0,5 ч, после — 1 ч. Подтвердите настройку повторным нажатием 【TIMER】.
Кондиционер включится с последними сохранёнными параметрами: режим, температура, скорость вентилятора, положение жалюзи. Удобно настроить запуск за 30 минут до возвращения домой.
⚠️ Пульт должен находиться в зоне прямой видимости приёмника сигнала — иначе команда не дойдёт в назначенное время.
Программирование автоотключения
Алгоритм идентичен: нажмите 【TIMER】 при работающем кондиционере, дождитесь 【TIMER OFF】, задайте время, подтвердите.
Полезная фишка: можно настроить и включение, и выключение в одном цикле. Например, включить утром и выключить, когда уходите на работу. Экономия энергии без потери комфорта.
Ночной режим и дополнительные настройки
Как работает функция 【SLEEP】
Активация: кнопка 【SLEEP】 — на дисплее появится индикатор 【SLEEP】. Алгоритм работы зависит от текущего режима:
• В режиме охлаждения: температура повышается на 1 °С через 1 час, ещё на 1 °С через 2 часа.
• В режиме обогрева: температура снижается на 2 °С через 1 час, ещё на 2 °С через 2 часа.
• Через 7 часов кондиционер автоматически выключается.✔️ Зачем это нужно? Ночью метаболизм замедляется, и нам требуется меньше охлаждения. Режим адаптирует работу под естественные ритмы организма — комфортный сон без переохлаждения.⚠️ В режимах 【AUTO】 и 【FAN】 функция 【SLEEP】 недоступна.
Управление подсветкой и блокировка
【SCREEN】 включает/выключает подсветку дисплея на внутреннем блоке. Полезно ночью, чтобы яркий экран не мешал спать.
【LOCK】 блокирует все кнопки пульта (кроме самой 【LOCK】) — защита от случайных нажатий детьми или питомцами. Повторное нажатие разблокирует панель.
Замена батареек и уход за пультом
Пошаговая инструкция замены
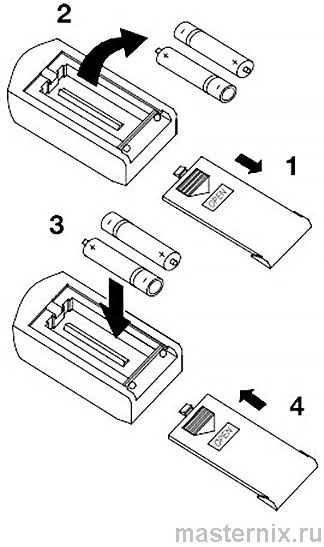
1) Сдвиньте крышку на задней панели, нажав на рычаг.
2) Вставьте две новые щелочные батарейки типа 【AAA】 1,5 В, соблюдая полярность.
3) Закройте крышку до фиксации.
4) Нажмите 【ON/OFF】 для проверки работы.
⚠️ Используйте только новые батарейки одного типа. Не смешивайте старые и новые элементы.
⚠️ При длительном хранении извлекайте батарейки — это предотвратит коррозию контактов.
Правила чистки корпуса
Протирайте пульт мягкой сухой или слегка влажной салфеткой. Если загрязнение стойкое — используйте воду температурой не выше 45 °С.
⚠️ Запрещено: промывать под проточной водой, использовать спирт, бензин, абразивы или металлические мочалки — это повредит пластик и покрытие.
⚠️ Не давите сильно на переднюю панель — мембранные кнопки чувствительны к механическому воздействию.
Решение типичных проблем
Если пульт не реагирует
Проверьте базовые вещи: батарейки свежие? Полярность соблюдена? Направляете ли вы пульт на блок? Нет ли препятствий на пути ИК-сигнала?
Если дисплей погас или мерцает — замените элементы питания. Если кнопки нажимаются, но блок не реагирует — возможно, проблема в приёмнике внутреннего блока. Обратитесь в сервис.
Важный нюанс: не производите диагностику и ремонт самостоятельно. Поручайте это квалифицированным специалистам — так вы сохраните гарантию и избежите серьёзных поломок.
Советы для стабильной работы системы
Рекомендации от практиков
Держите пульт в чистоте: пыль и жир с пальцев со временем забивают зазоры между кнопками. Протирайте мягкой сухой тканью — без спирта и абразивов.
Есть нюансы: после выключения прибора жалюзи внутреннего блока закрываются автоматически — это штатное поведение, а не сбой.
В режиме 【DRY】 кондиционер поддерживает температуру с точностью ±2 °С. Если фактическая температура выше заданной более чем на 2 °С — система переключится в режим охлаждения. Логично: осушение эффективно только в определённом диапазоне.
Проверяйте работу пульта после замены батареек: иногда требуется повторная синхронизация. Просто направьте пульт на кондиционер и нажмите 【ON/OFF】 — если блок отреагировал, всё в порядке.


