Smart thermostat MK71GC Wifi with LCD display for a gas boiler or underfloor heating temperature control. Installation and operation manual
Руководство / инструкция
Electronic Programmable Thermostat with LCD Display MK71GC Wifi Operating Manual
This digital thermostat MK71 is a push-button thermostat with a liquid crystal display for a gas boiler, water heater, and heating systems. It uses an advanced microcomputer control chip and a high-precision sensor to control the temperature of electric heating devices. It is used to control the temperature in industrial, commercial, and residential premises and to start controlling heating devices, especially for underfloor heating systems. Optional system: IOS and Android.
Introduction
We thank you for your trust and support. Thanks to the use of the latest and more advanced technologies, your new thermostat will maintain the desired temperature daily in the future, making your life more comfortable and your living environment more stylish and attractive. For detailed instructions on the installation and use of this thermostat, please read this manual carefully.
Please contact a specialist for thermostat installation, as well as for installation and use of the product in accordance with applicable legislation.
Note
The intelligent digital temperature controller MK71GC Wifi Tuya is an underfloor heating control system designed to regulate indoor temperature. It controls the operating state of the underfloor heating equipment by comparing the ambient temperature with the set temperature, thereby increasing comfort and ensuring energy savings. This digital thermostat uses microcomputer control technology and is equipped with touch buttons and a full-screen display, which features an elegant design and ease of use. The thermostat has manual control, automatic programming, and state memory functions.
.
Features:
➠ Wi-Fi function for IOS and Android, Tuya Smart App
➠ Built-in Wi-Fi module allows adjusting thermostat settings via the Internet from anywhere in the world
➠ Integration with voice control services such as Yandex Alice, Alexa, Google Home
➠ Large touch keys with backlight
➠ Programming function for 5 + 2, 6 + 1, or 7 days per week to choose from
➠ Six-period program for your settings
➠ Data retention when power is off
➠ Built-in voltage stabilizer — capable of operating at mains voltage from 95 to 240 volts
➠ Temperature hysteresis adjustment
➠ Three sensor operating modes can be configured
➠ Support for Celsius and Fahrenheit
Specifications:
Current load:
— For electric heating: 16 A
— For water/gas boiler: 3 A
Power supply: AC90 ~ 250 V 50/60Hz
Temperature range: 5 ~ 60°C
Accuracy: ±1°C
Maximum current: 3A
Power consumption ‹ 0.3 W
Operating environment temperature: 0 ~ +45°C
Ambient temperature: -5 to +50°C
Storage ambient temperature: 0 ~ +55°C
Installation temperature: 5 ~ 95°C
Relative humidity: RH ‹ 85%
Housing material: polycarbonate + ABS (flame-retardant)
Mounting hole distance: 60 mm (suitable for standard European round mounting box 80x80)
Wire terminals: wire 2 ? 1.5 mm? or 1 ? 2.5 mm?
Dimensions without terminal block: 86 ? 86 ? 15 mm
Product dimensions (front panel with terminal block): 85 ? 85 ? 42 mm
Certificates: CE, ROHS
Product Model
GA Plumbing 3 AGB Electric Heating 16A
Connection GC, gas boiler 3A
Backlight (you can adjust brightness or turn off the backlight via the mobile app)
W: W IF IN
R2: internal sensor and external grounding sensor, e.g., V70H-LWGB
Model Differences
| Model | Application | Load | Wi-Fi Function | External Sensor | Color |
| MK71-GA-wifi | For water heating | 3 A | Yes | Completely white | |
| MK71-GA | For water heating | 3 A | Completely white | ||
| MK71-GB-wifi | For electric heating | 16 A | Yes | Yes | Completely white |
| MK71-GB | For electric heating | 16 A | Yes | Completely white | |
| MK71-GC-wifi | For gas boiler | “dry” contact | Yes | Completely white | |
| MK71-GC | For gas boiler | “dry” contact | Completely white |
Package Contents
Wi-Fi thermostat — 1 pc.
Manual — 1 pc.
Mounting screws — 2 pcs.
Measuring line (optional) — 1 pc.
Box.
..
Main Functions:
1. Support for 5 + 2 / 6 + 1 / 7 days
2. Wi-Fi support, remote control via mobile phone. One mobile phone can control one device as well as multiple devices. With voice control function, compatible with Amazon Alexa, Google Home, and Yandex Alice.
3. Manual or automatic mode
4. Backlight brightness can be adjusted via the application.
5. Keypad lock function to prevent incorrect use by children.
Operating Instructions
1. Please read this manual carefully. Incorrect operation may result in damage to the device or the occurrence of hazardous situations.
2. The installation specialist must have the appropriate maintenance qualifications.
3. After installation, please read this manual carefully and operate the device in accordance with the instructions.
❗👉➨ Warning: Risk of electric shock or equipment damage.
Electrical Connection Diagram
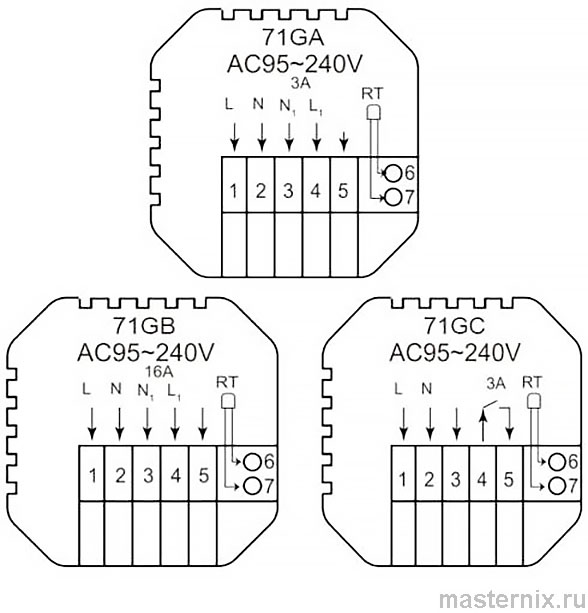
❗👉➨ Note: GA for water heating; GB for electric heating; GC for gas boiler
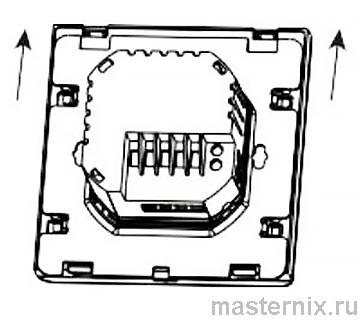
Installation Procedure
This product is installed using a standard control switch 86 (in accordance with European standards).
1. Slide the mounting plate down in this direction
2. Remove the mounting plate in this direction
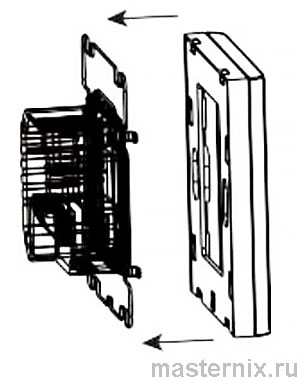
3. Secure the mounting plate to the box with screws
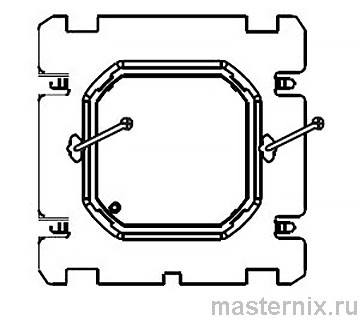
4. After installation, secure the product in this direction
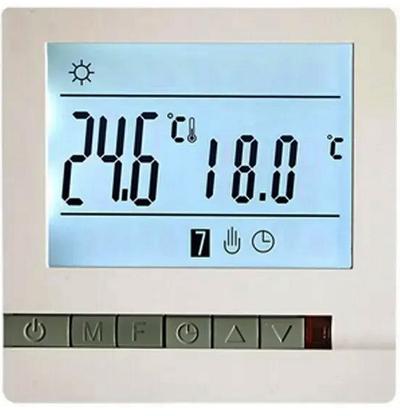
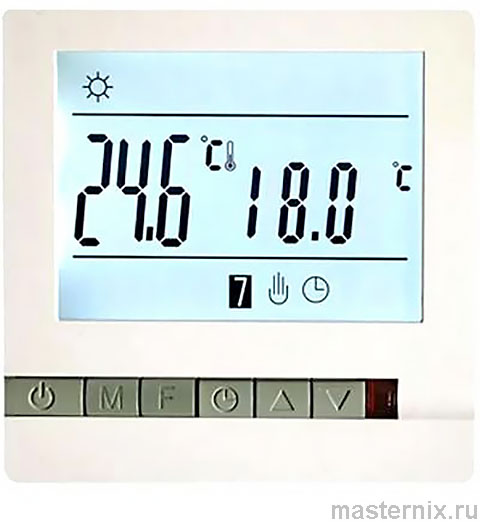
Display Symbols Description
1. Week/time icon
2. Room temperature
3. Heating icon
4. Mode icon
5. Time display
6. Lock icon
7. Control button icons (sensors)
Operating Instructions
1. Power on/off: Press  to turn the thermostat on or off.
2. Press [M] to switch between manual and automatic modes.
3. In automatic mode, press the  or
or  button to set the temperature and switch to the automatic temporary mode. This mode operates only for a certain period of time.
4. To enter clock settings, press [M] to switch setting options, then press to change the value of each parameter.
❗👉➨ Note: The Wi-Fi model will automatically set the time when connected to the Internet.
5. Press and hold the and buttons simultaneously for 5 seconds to add or remove the screen lock.
6. Wi-Fi connection: When the thermostat is turned on, press and hold the and [F] buttons for 5 seconds. The Wi-Fi icon will flash in the upper right corner of the thermostat screen. At this time, the thermostat enters code matching mode. Please refer to the mobile phone operating instructions in the user manual of the application.
The Wi-Fi icon in the upper right corner of the thermostat display remains constantly on when the connection is established. If you want to cancel pairing, press and hold and [F] for 5 seconds. When the Wi-Fi icon in the upper right corner of the thermostat disappears, it means that the current code status has been cancelled.
Time Programming Instructions
Press and hold the [M] key to enter programming settings, press the [M] key briefly to switch options, press the or key to adjust each option parameter, and press the button to exit and save.
| Button | Parameter | Icon | Time | Change | Default | Change | |
| [M] | Weekday | 1 | PRG 1 | 06:00 | |
20°C | |
| 2 | PRG 2 | 08:00 | 15°C | ||||
| 3 | PRG 3 | 11:30 | 15°C | ||||
| 4 | PRG 4 | 12:30 | 15°C | ||||
| 5 | PRG 5 | 17:00 | 22°C | ||||
| 6 | PRG 6 | 22:00 | 15°C | ||||
| Weekend | 1 | PRG 1 | 08:00 | 22°C | |||
| 2 | PRG 6 | 23:00 | 15°C | ||||
Additional Parameters
With the power on, press [M] and [F] simultaneously and hold for 5 seconds to enter additional parameters.
Press [M] to go to the next parameter, press and to adjust, and press to exit the advanced mode.
1 Temperature Compensation
The default indoor temperature calibration value is -2°C. To adjust, press the and keys. The adjustment range is from 9.9°C to -9.9°C.
2 Sensor Selection
By default, the temperature sensor is set to internal. Press the and keys to adjust to "IN", indicating the internal sensor is selected.
3 Changing the Temperature Limit
The default temperature limit is 35°C. Press the and keys to adjust the range from 5°C to 60°C.
4 Temperature Difference
The default temperature difference is set to 1°C. Press the and keys to adjust the range from 1°C to 10°C.
5 Frost Protection Function
Set the frost protection function to "OFF" by default, turn off the display, press the "up" key to enable frost protection mode and turn on the display.
6 "Holiday" Option and Weekly Programming Deactivation
Set the default holiday mode to "double weekend". Use the and keys to set values for "double weekend" (1–5), "single weekend" (1–6), "no weekend" (1–7), or turn off weekly programming (OFF).
7 Primary and Secondary Reverse
Reverse selection. Set the default value of primary and secondary reverse to 0. Press the and keys and set the value to 0 to disable primary and secondary reverse.
01 means primary reverse, 02 means secondary reverse, 03 means primary and secondary reverse, antifreeze output off, output stop.
8 Passive Transmission Delay Time
Set the default passive transmission delay time to 0. Press the and keys to set the range from 0 to 5 minutes.
9 Setting the Upper Temperature Limit
The default upper set temperature limit is 60°C, and the adjustment range is 35–95°C. Use the and keys to set the required value.
10 Restoring Factory Defaults
To restore factory default settings, display “-”, press the button to display “---”, then press the "Enter" button to restore factory settings.
.
Wi-Fi Connection
Before first use of the MK71GC Wifi thermostat, it is necessary to set up the Wi-Fi signal and configure it using a smartphone or tablet to ensure communication between connected devices.
1. Download the Application
Search for “Tuya” in the App Market or scan the QR code below to download the application.

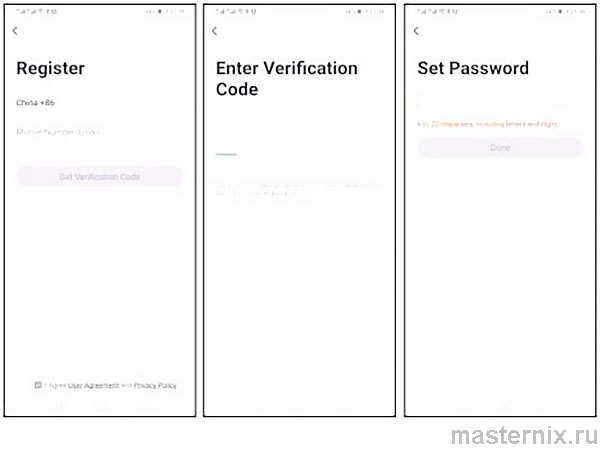
2. Register an Account
If you do not have an account in the application, you can register or log in using an SMS verification code. Click "Create a new account" and you will be taken to the Tuya Smart Platform Privacy Policy page. After clicking "Agree", you will be redirected to the mobile phone registration page.
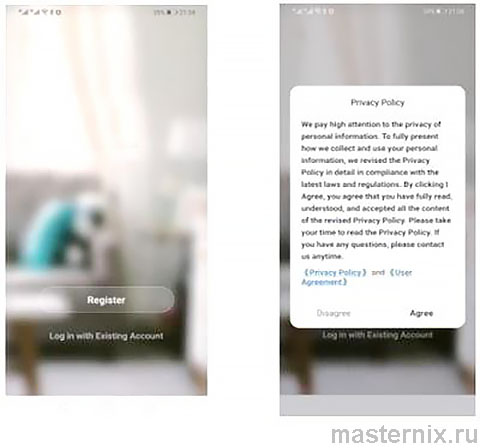
The system automatically detects the current country/region. You can also select the country/region manually. After entering your mobile phone number or email address, click “Get verification code”. Enter the received verification code, then enter a password and click "Done" to complete the registration successfully.
..
3. Add a Device
Click "Add Device" or the "+" icon in the upper right corner of the main page of the application to go to the "Add Device" page. Currently, there are two ways to add a device: manual addition and device search.
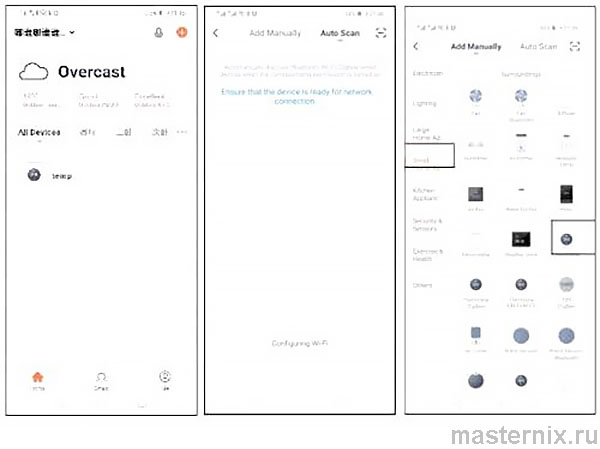
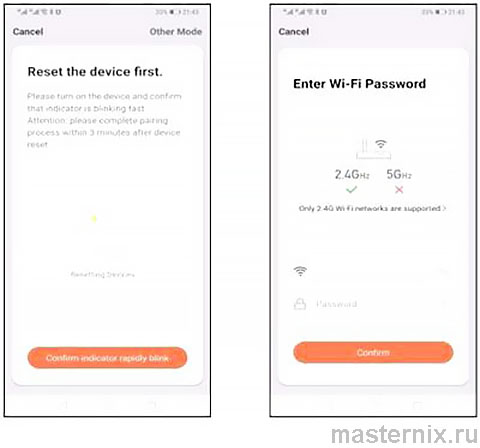
Find the thermostat (Wi-Fi model) in the list of devices. In the specified network mode, the indicator flashes (slow flashing), then press the confirmation button on the page. Select the device working area to connect to the Wi-Fi network and enter the Wi-Fi password. Click "OK" to proceed to the corresponding network configuration process.
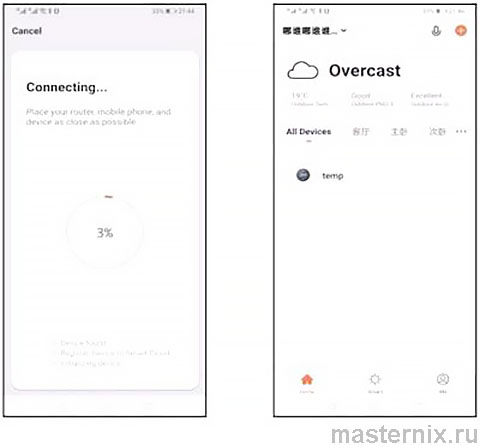
If the default distribution network mode is selected, the distribution process will be shown in Figure 1 below, and upon successful network configuration the interface shown in Figure 2 will be displayed. You can change the device name or select the room location.
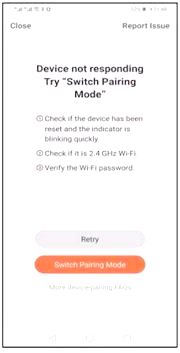
In case of network failure, the application will display the page shown in the figure below. You can check the help section or add the device again.
❗👉➨ Note: In case of connection failure, please confirm whether the temperature control device has entered code pairing mode; see item 6 of the operating instructions.
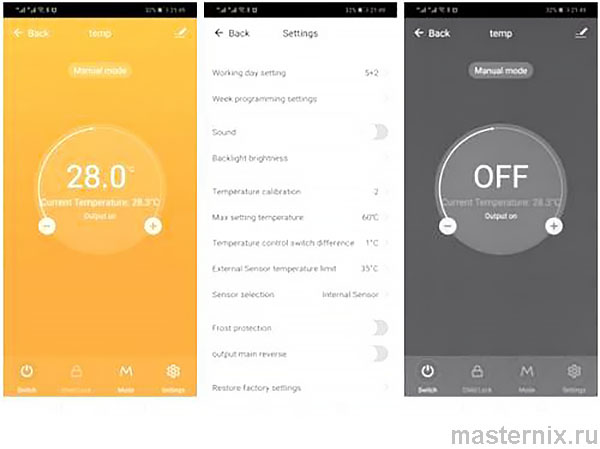
4. Application Interface for Temperature Control