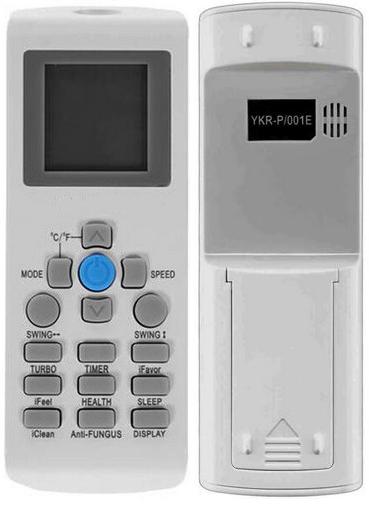
User manual for the universal remote control for Centek YKR-P/002E (YKR-P/001E) air conditioners
Руководство / инструкция

Меры безопасности для надёжной работы
Базовые правила эксплуатации
Прежде чем приступать к использованию пульта, потратьте пару минут на изучение инструкции. Это сэкономит нервы и продлит жизнь устройству. Помните: пульт — не игрушка. Дети не всегда понимают ценность электроники, поэтому храните его вне их досягаемости.
Направляйте излучатель сигнала строго на внутренний блок кондиционера. Максимальная дистанция уверенного приёма — 8 метров по прямой, с допустимым отклонением 45° в каждую сторону. Любые препятствия между пультом и приёмником ухудшают связь.
Держите пульт подальше от телевизоров и радиоаппаратуры — минимум 1 метр. Это исключит взаимные помехи. Берегите устройство от ударов, влаги, прямых солнечных лучей и источников тепла. Резкие перепады температуры вредят электронике.
Что категорически нельзя делать
Не используйте острые предметы для нажатия кнопок — так легко повредить мембраны. Забудьте про бензин, растворители и агрессивные салфетки при очистке корпуса. Достаточно мягкой сухой ткани.
Если пульт «заглючил», выньте батарейки, подождите 30 секунд и вставьте обратно. Часто это решает проблему. Не помогло? Попробуйте новые элементы питания. При длительном перерыве в использовании обязательно извлекайте батарейки — окисление контактов никому не нужно.
Обзор кнопок и их практическое применение
Стандартная компоновка и особенности моделей
На схеме показаны все возможные функции. Ваш пульт может иметь чуть меньше кнопок — это нормально, зависит от конкретной модели кондиционера.
Обратите внимание: отдельные функции могут быть недоступны на вашем кондиционере. Это не брак, а особенность комплектации.
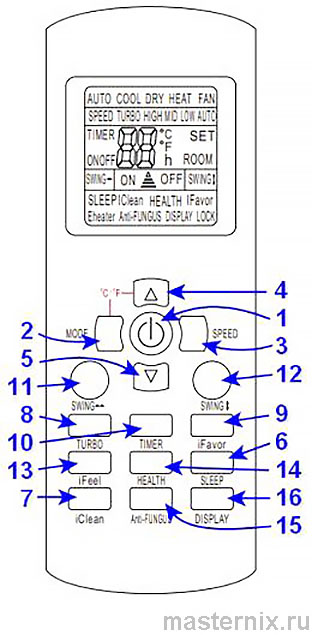
Кнопка 【ON/OFF】 — включение и выключение
Одно нажатие — система запускается с последними сохранёнными настройками. На дисплее появляется 【ON】. Повторное нажатие отключает кондиционер, индикатор меняется на 【OFF】. Просто и интуитивно.
Кнопка 【MODE】 — переключение режимов работы
Каждое нажатие циклически меняет режим: 【AUTO】 → 【COOL】 → 【DRY】 → 【HEAT】 → 【FAN】 → и снова по кругу. При первом включении по умолчанию активируется 【AUTO】.
В автоматическом режиме кондиционер сам решает, греть или охлаждать, ориентируясь на температуру в комнате. Целевое значение при этом не отображается и не регулируется — система работает на поддержание комфортных 23±2°С.
Режим 【FAN】 запускает только вентилятор внутреннего блока без контроля температуры. Полезно для циркуляции воздуха без изменения микроклимата.
Важный нюанс: если ваш кондиционер работает только на охлаждение, режим 【HEAT】 в нём физически отсутствует.
Выбор режимов: охлаждение, обогрев, осушение
Как работает каждый режим на практике
В режимах 【COOL】 и 【HEAT】 система поддерживает заданную температуру с точностью ±1°С. Если разница между целевым и текущим значением меньше градуса, компрессор не запустится — это экономит ресурс.
Режим 【DRY】 (осушение) поддерживает температуру с точностью ±2°С. Когда в помещении жарче заданного более чем на 2°С, кондиционер временно переключается на охлаждение для быстрого снижения влажности.
При достижении температуры ниже заданной более чем на 2°С компрессор и внешний вентилятор останавливаются, внутренний вентилятор работает на минимуме. Так система избегает сквозняков и перерасхода энергии.
Точная настройка температуры и скорости обдува
Регулировка целевой температуры
Кнопка  повышает значение на 1°С, кнопка
  — понижает. Диапазон: от +16 до +32°С. Выбранное значение отображается на дисплее пульта и на панели внутреннего блока.
Управление скоростью вентилятора 【SPEED】
Нажатия на кнопку 【SPEED】 переключают скорость обдува: 【AUTO】 → 【LOW】 → 【MID】 → 【HIGH】 → и по кругу. Индикация на дисплее соответствует выбранному режиму.
В автоматическом режиме скорость зависит от разницы между заданной и текущей температурой: чем больше разница, тем интенсивнее обдув. В режиме 【FAN】 автоматическая скорость недоступна — выбирайте вручную.
Полезные функции: таймер, ночной режим, самоочистка
Ночной режим 【SLEEP】 для комфортного сна
Активация 【SLEEP】 включает тихий режим работы: вентилятор переходит на минимальную скорость, дисплей внутреннего блока гаснет, чтобы не мешать сну.
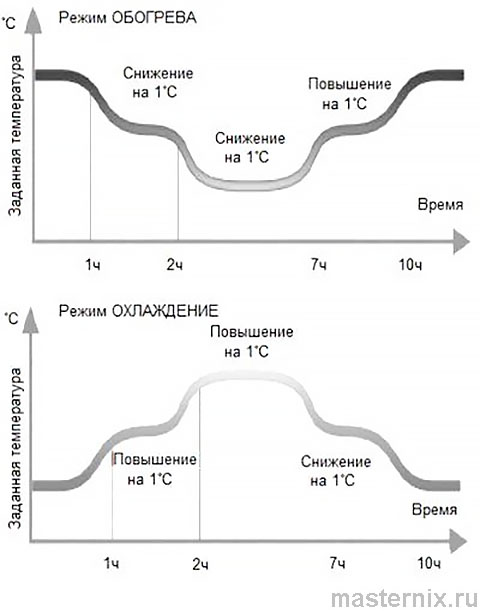
Температура плавно корректируется: при охлаждении через час повышается на 1°С, ещё через час — ещё на 1°С. При обогреве — наоборот, постепенно снижается. Это соответствует естественным ритмам тела во время сна.
Отключается режим повторным нажатием 【SLEEP】 или выключением кондиционера. Обратите внимание: в этом режиме таймер не активируется.
Самоочистка 【iCLEAN】 — забота о гигиене
Нажатие 【iCLEAN】 при выключенном кондиционере запускает 35-минутный цикл просушки испарителя. На дисплеях появляется индикация 【CL】. Влажная среда — рассадник плесени и бактерий, поэтому регулярная просушка критически важна для здоровья.
Интенсивный режим 【TURBO】 для быстрого результата
Нужно быстро охладить или прогреть комнату? Нажмите 【TURBO】 — вентилятор выйдет на максимум, и целевая температура будет достигнута в кратчайшие сроки. Индикатор 【TURBO】 на дисплее подтвердит активацию.
Режим отключается автоматически при смене режима работы, изменении скорости вентилятора или повторном нажатии кнопки.
Персональные настройки 【iFAVORIT】
Любите определённую комбинацию параметров? Сохраните её: настройте комфортные значения, затем зажмите 【iFAVORIT】 более 3 секунд. Три мигания индикатора подтвердят запись. В дальнейшем одно нажатие вернёт ваши любимые настройки.
Таймер 【TIMER】 — включение и выключение по расписанию
Для настройки 【TIMER ON】 (включение) нажмите кнопку при выключенном пульте. Для 【TIMER OFF】 (выключение) — при включённом. Диапазон: от 30 минут до 24 часов.
Кнопки регулировки температуры изменяют время с шагом 0,5 часа до 10 часов, далее — с шагом 1 час. Активация — повторное нажатие 【TIMER】. Кондиционер выполнит команду точно в срок.
Дополнительные полезные функции
【SWING 1】 и 【SWING 2】 управляют качанием вертикальных и горизонтальных жалюзи. Дождитесь нужного положения и нажмите кнопку снова для фиксации. Не двигайте жалюзи вручную — механизм может выйти из строя.
【iFEEL】 переключает контроль температуры на датчик в пульте. Система ориентируется на микроклимат там, где находится пульт, а не на внутренний блок. Удобно, если вы сидите далеко от кондиционера.
【HEALTH】 активирует ионизацию воздуха. Повторное нажатие отключает функцию.
【Anti-FUNGUS】 — защита от плесени. После выключения кондиционера вентилятор работает ещё 3 минуты на низкой скорости, просушивая испаритель. Индикатор 【AntiFUNGUS】 подтверждает активацию. Не включайте кондиционер повторно во время этого цикла.
【DISPLAY】 отключает подсветку дисплея внутреннего блока — удобно для спальни. Повторное нажатие возвращает индикацию.
Расшифровка индикаторов на дисплее
Полная карта символов и их значений
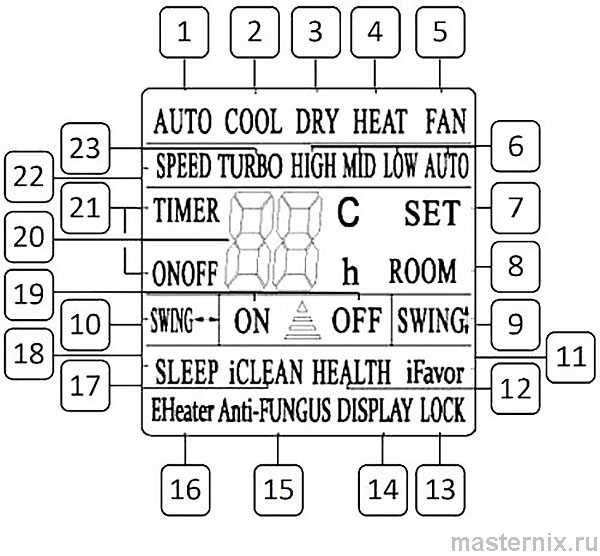
1. 【AUTO】 — автоматический режим| 2. 【COOL】 — охлаждение| 3. 【DRY】 — осушение| 4. 【HEAT】 — обогрев| 5. 【FAN】 — вентиляция| 6. 【HIGH】/【MID】/【LOW】/【AUTO】 — скорость вентилятора| 7. 【SET】 — целевая температура| 8. 【ROOM】 — температура в помещении| 9-10. 【SWING 1】/【SWING 2】 — положение жалюзи| 11. 【iFAVORIT】 — пользовательские настройки| 12. 【HEALTH】 — ионизация| 13. 【LOCK】 — блокировка кнопок| 14. 【DISPLAY】 — отключение подсветки| 15. 【Anti-FUNGUS】 — защита от плесени| 17. 【iCLEAN】 — самоочистка| 18. 【SLEEP】 — ночной режим| 19. 【ON】/【OFF】 — состояние питания| 20. Цифровое значение температуры| 21. 【TIMER ON】/【TIMER OFF】 — таймер| 23. 【TURBO】 — интенсивный режим.
Пошаговый алгоритм управления кондиционером
Быстрый старт для новичков
1. После подачи питания нажмите 【ON/OFF】. 2. Кнопкой 【MODE】 выберите 【COOL】 или 【HEAT】. 3. Кнопками регулировки температуры установите комфортное значение (16-30°С). 4. Кнопкой 【SPEED】 задайте скорость обдува. 5. При необходимости активируйте 【SWING】, 【SLEEP】, 【TIMER】 или другие функции.
В режиме 【AUTO】 температура не регулируется вручную — система сама поддерживает 23±2°С, переключаясь между обогревом и охлаждением при достижении пороговых значений (20°С и 26°С соответственно).
Замена батареек без ошибок
Пошаговая инструкция по обслуживанию
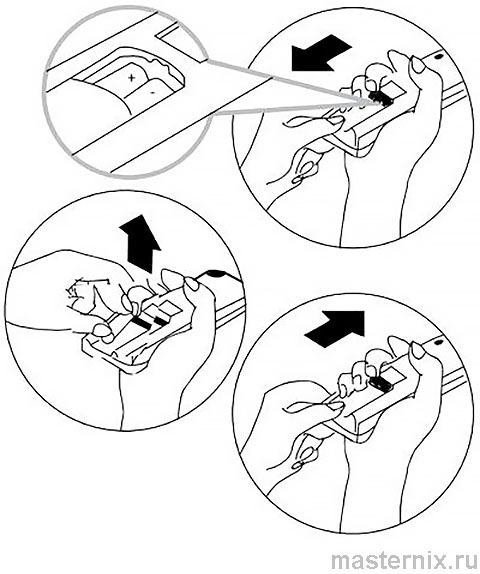
1. Сдвиньте крышку на задней панели пульта. 2. Вставьте две новые щелочные батарейки типа ААА, соблюдая полярность. 3. Закройте отсек до щелчка.
Замена требуется, если дисплей тускнеет, кнопки реагируют с задержкой или пульт перестал управлять кондиционером. Используйте только новые элементы — смешивать старые и новые батарейки нельзя. При хранении пульта более месяца извлекайте питание.
Аварийное включение при потере пульта
Управление кондиционером без пульта ДУ
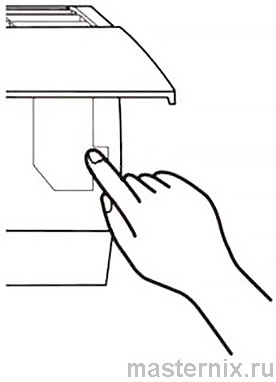
Если пульт утерян или неисправен, найдите на внутреннем блоке кнопку аварийного управления. Кратковременное нажатие включает кондиционер в режим 【AUTO】. Повторное нажатие — выключает.
Важно: не удерживайте кнопку долго, это может вызвать сбой в работе электроники. После включения аккуратно закройте переднюю панель блока.
| Совместимые модели кондиционеров Centek |
|---|
| Centek CT-65U10, CT-65U13, CT-65U18, CT-65U24 |
| Centek CT-65E07+, CT-65E09, CT-65E12, CT-65E18, CT-65E24 |
| Centek CT-65Z10, CT-65Z13, CT-65Z18, CT-65Z24 |


