User manual for the remote control of Loriot split-system air conditioners of the NEON, TC, TCI, TCF, and TCFI series
Руководство / инструкция
Совместимость с моделями кондиционеров
Бытовые настенные сплит-системы
Пульт дистанционного управления работает с линейкой кондиционеров Loriot серии NEON, выпущенных в 2024 году. Вы наверняка сталкивались с ситуацией, когда пульт «не видит» кондиционер — чаще всего причина именно в несовместимости моделей. Давайте разберёмся, какие устройства поддерживаются.
Инверторные модели DC Inverter: LAC IN-07TA, LAC IN-09TA, LAC IN-12TA, LAC IN-18TA, LAC IN-24TA.
Обычные On-Off модели: LAC-07TA, LAC-09TA, LAC-12TA, LAC-18TA, LAC-24TA.
Полупромышленные системы
Для коммерческих помещений и больших комнат производитель предлагает расширенную линейку. Кассетные и напольно-потолочные решения тоже управляются этим пультом.
Кассетные системы Серия TC: LAC-12TC, LAC-18TC, LAC-24TC, LAC-36TC, LAC-48TC, LAC-60TC.
Инверторные кассетные TCI: LCAC-18TCI, LCAC-24TCI, LCAC-36TCI, LCAC-48TCI, LCAC-60TCI.
Напольно-потолочные TCF: LAC-18TCF, LAC-24TCF, LAC-36TCF, LAC-48TCF, LAC-60TCF.
Инверторные напольно-потолочные TCFI: LCAC-18TCFI, LCAC-24TCFI, LCAC-36TCFI, LCAC-48TCFI, LCAC-60TCFI.
Есть нюансы. Если ваша модель не в списке — проверьте маркировку на шильдике внутреннего блока. Иногда достаточно обновить прошивку или перенастроить пульт.
Меры предосторожности
Базовые правила эксплуатации
Пульт — не игрушка. Это кажется очевидным, но статистика сервисных центров говорит об обратном. Не разрешайте детям играть с устройством и сами относитесь к нему бережно.
- ✔️ Направляйте излучатель сигнала строго на внутренний блок кондиционера
- ✔️ Подтверждение приёма сигнала — короткий звуковой «бип» от сплит-системы
- ✔️ Дальность действия: до 8 метров по прямой, угол ±45° от оси блока
Между пультом и кондиционером не должно быть препятствий: шторы, мебель, декоративные панели могут блокировать ИК-сигнал. Практика показывает, что даже прозрачное стекло иногда создаёт помехи.
Защита от повреждений
Устройство чувствительно к внешним воздействиям. Не роняйте, не подвергайте ударам. Прямые солнечные лучи, источники тепла, высокая влажность — всё это сокращает срок службы электроники.
Важный момент: не используйте острые предметы для нажатия кнопок. Механизм мембран рассчитан на нажатие пальцем. Бензин, растворители, химические салфетки — под запретом. Протирайте только сухой мягкой тканью.
Если пульт «завис»: извлеките батарейки, подождите 30 секунд, вставьте обратно. Не помогло? Замените элементы питания. И да, при длительном простое (месяц и более) батарейки лучше вынимать — окисление контактов случается чаще, чем кажется.
(!) Производитель оставляет за собой право вносить изменения в конструкцию без предварительного уведомления. Это стандартная практика, но стоит иметь в виду при сравнении пультов разных партий.
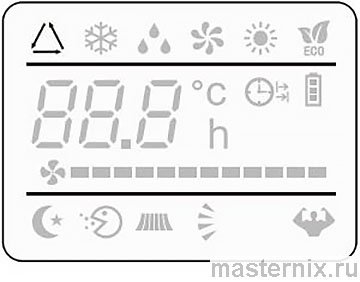
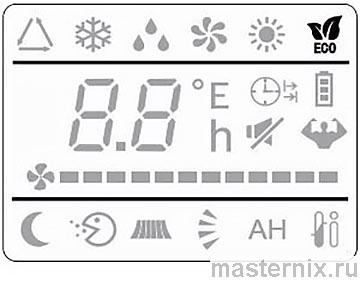
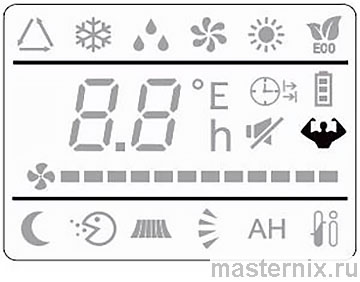
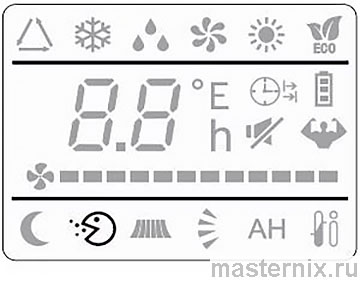
Обозначения элементов управления
Кнопки и их функции
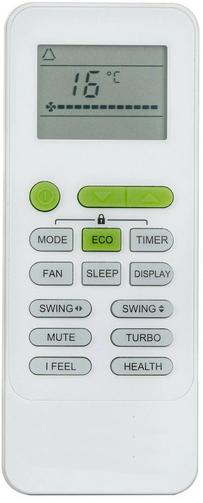
На изображении показан стандартный пульт с полным набором функций. Ваша модель может иметь чуть меньше кнопок — это нормально, базовый функционал сохраняется.
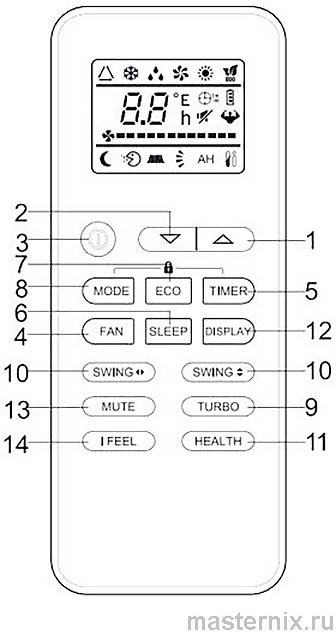
1. 【TEMP UP】 — повышение температуры или времени на 1 единицу
2. 【TEMP DN】 — понижение температуры или времени на 1 единицу
3. 【ON/OFF】 — включение и выключение кондиционера
4. 【FAN】 — выбор скорости вентилятора: авто / низкая / средняя / высокая
5. 【TIMER】 — программирование таймера включения/выключения
6. 【SLEEP】 — активация ночного режима с плавной регулировкой температуры
7. 【ECO】 — экономичный режим: +2°С в охлаждении, −2°С в обогреве относительно заданного значения
8. 【MODE】 — переключение режимов работы: охлаждение, обогрев, осушение, вентиляция, авто
9. 【TURBO】 — максимальная производительность: 16°С в охлаждении, 31°С в обогреве, вентилятор на максимуме
10. 【SWING】 — управление положением жалюзи для распределения воздушного потока
11. 【HEALTHY】 — включение/выключение ионизатора воздуха
12. 【DISPLAY】 — отключение светодиодного дисплея на внутреннем блоке (удобно ночью)
13. 【Mute】 — минимальная скорость вентилятора для тихой работы
14. 【i FEEL】 — интеллектуальный контроль температуры по датчику в пульте
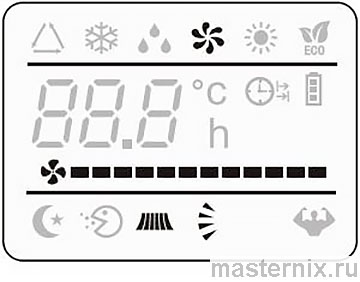
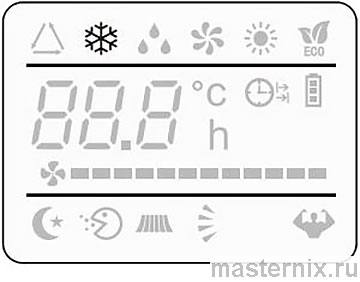
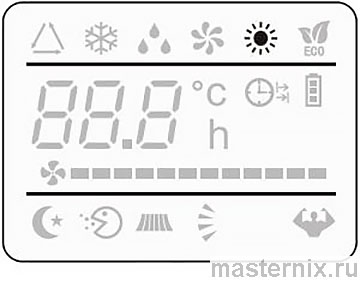
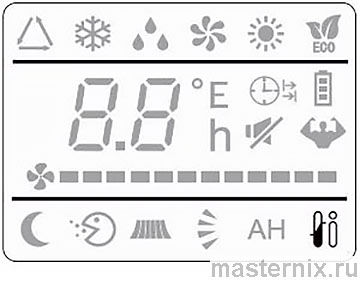
Индикаторы на дисплее
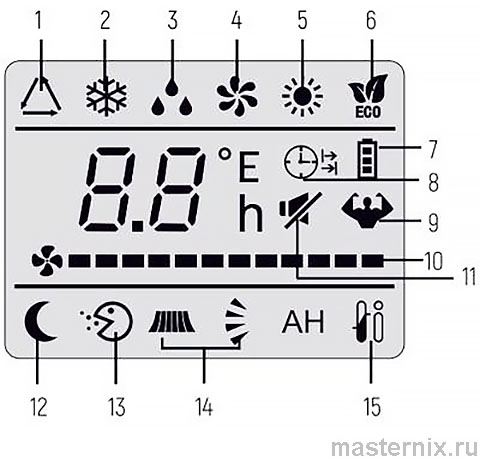
Экран отображает активные режимы и состояние системы. Разберём значки по порядку:
- ★ Авто, охлаждение, осушение, вентиляция, обогрев — основные режимы
- ★ ECO, TURBO, SLEEP — специальные функции
- ★ Индикатор батареи — мигает при низком заряде
- ★ Таймер — показывает запланированное включение/выключение
- ★ Скорость вентилятора — визуальная шкала из 3-4 делений
- ★ i FEEL, ионизация, направление заслонок — дополнительные опции
Всё интуитивно. Если значок горит — функция активна. Мигает — ожидает подтверждения или настройки.
Подготовка к работе
Установка элементов питания
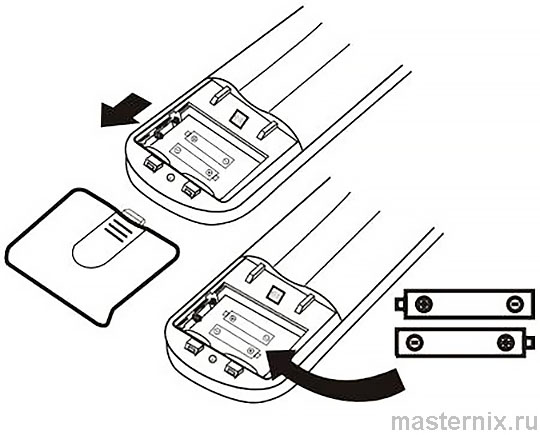
Процесс простой, но есть детали, которые стоит знать:
- Сдвиньте крышку батарейного отсека по направлению стрелки
- Вставьте две батарейки типа AAA (LR03) 1.5 В, соблюдая полярность +/−
- Закройте отсек до щелчка
(!) Примечание: используйте только новые щелочные батарейки. Аккумуляторы не рекомендуются — их напряжение может быть недостаточно для стабильной работы ИК-передатчика.
Если дисплей не светится или команды не проходят — первым делом замените элементы питания. И да, утилизируйте старые батарейки согласно местным нормам. Это важно для экологии.
Переключение °C / °F
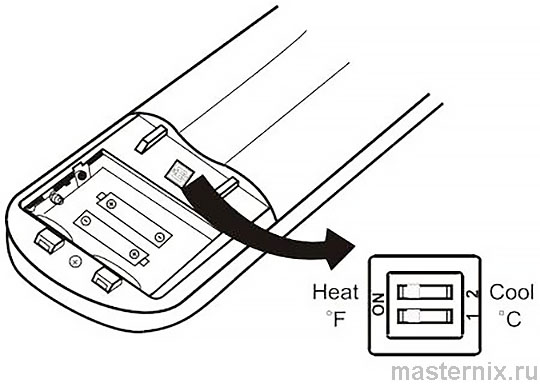
Под задней крышкой расположен двухрядный переключатель. Он отвечает за две настройки:
| Положение переключателя | Значение |
|---|---|
| C | Отображение температуры в градусах Цельсия |
| F | Отображение в градусах Фаренгейта |
| Cool | Пульт настроен только на режим охлаждения |
| Heat | Пульт настроен только на режим обогрева |
(!) После изменения положения переключателя обязательно извлеките и заново установите батарейки — иначе настройки не применятся.
Настройка режима работы
Выбор между охлаждением и обогревом
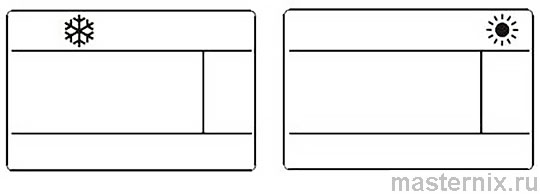
При первой установке батареек на экране начинают мигать символы охлаждения и обогрева. Нажмите любую кнопку в момент, когда горит нужный значок — пульт запомнит выбор.
Если выбрали 【COOL】 — пульт будет работать только в режиме охлаждения. Выбрали 【HEAT】 — только обогрев. Это защищает от случайного переключения, но ограничивает гибкость. Хотите оба режима? Оставьте переключатель в нейтральном положении (если такая опция есть в вашей версии).
(!) Направляйте пульт на кондиционер, убирайте препятствия, избегайте прямых солнечных лучей. Храните устройство не ближе 1 метра от телевизоров и другой электроники — возможны помехи.
Рекомендации по размещению
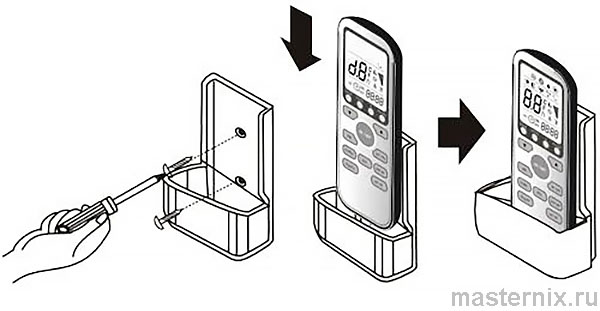
Пульт можно разместить на специальной настенной подставке — удобно, когда нужно быстро найти устройство. Но помните: ИК-сигнал требует прямой видимости. Если пульт в подставке за шторой — сигнал может не пройти.
Контроль направления воздушного потока
Регулировка заслонок
Равномерное распределение воздуха — залог комфортного микроклимата. Кнопка 【SWING】 управляет положением заслонок:
- → Вертикальное качание (вверх-вниз) для охвата всей высоты помещения
- → Горизонтальное направление (слева-направо) — опция «4D Air flow», доступна в отдельных моделях
Практический совет: в режиме охлаждения направляйте поток горизонтально — холодный воздух опускается сам. В режиме обогрева разверните заслонки вниз — тёплый воздух поднимается, и такое положение ускоряет прогрев комнаты.
(!) Ручная регулировка дефлекторов возможна только при выключенном приборе. Попытка поправить заслонки во время работы может повредить хрупкий механизм.
(!) Никогда не вставляйте пальцы или предметы в воздуховод! Вращающиеся на высокой скорости лопасти вентилятора опасны.
Основные режимы работы
Охлаждение (COOL)
Нажмите 【MODE】 до появления значка  . Установите температуру ниже текущей в помещении с помощью 【TEMP UP】/【TEMP DN】.
Для эффективной работы настройте также скорость вентилятора 【FAN】 и направление потока 【SWING】. Кондиционер сам подберёт циклы компрессора, но ваша предварительная настройка ускорит достижение комфорта.
Обогрев (HEAT)
Активируйте режим нажатием 【MODE】 до значка  . Установите температуру выше комнатной.
(!) Функция «Hot Start»: при включении обогрева вентилятор запускается с задержкой 2-5 минут — это нормально, система прогревает теплообменник, чтобы не дуть холодным воздухом.
(!) В холодную погоду может автоматически запускаться цикл разморозки (2-10 минут). Вентиляторы останавливаются, на дисплее может мигать индикатор. После завершения кондиционер вернётся к обогреву.
Вентиляция и осушение
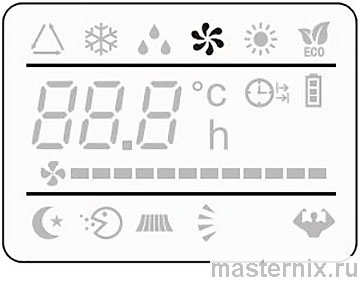
Для чистой циркуляции воздуха без изменения температуры выберите режим вентилятора: 【MODE】 → значок  . Скорость переключается кнопкой 【FAN】: низкая → средняя → высокая → авто.
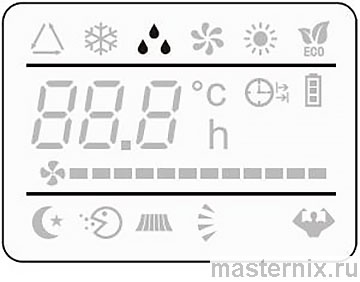
Осушение (значок  ) снижает влажность без сильного охлаждения. Система чередует короткие циклы охлаждения и паузы — комфортно в сырую погоду.
Автоматический режим
Активируется значком  . Кондиционер сам выбирает режим и температуру на основе данных с датчика во внутреннем блоке.
| Температура в помещении | Выбранный режим | Целевая температура |
|---|---|---|
| ‹ 20°С | Обогрев (или вентиляция) | 23°С |
| 20°С ~ 26°С | Осушение | 18°С |
| › 26°С | Охлаждение | 23°С |
Можно скорректировать целевую температуру на ±2°С кнопками 【TEMP】. Удобно, когда не хочется вникать в настройки.
Программирование таймера
Автоматическое включение

Работает только при выключенном кондиционере:
- Нажмите 【TIMER】
- Задайте желаемую температуру и режим кнопками 【MODE】 и 【TEMP】
- Снова нажмите 【TIMER】 и установите время до включения стрелками
(!) Перед настройкой таймера обязательно выключите кондиционер кнопкой 【ON/OFF】 — иначе команда не сохранится.
(!) Отмена: ещё раз нажмите 【TIMER】. При отключении электроэнергии таймер сбрасывается — настройте заново.
Автоматическое выключение
Программируется при включённом кондиционере. Нажмите 【TIMER】, установите время до выключения. Шаг настройки — 30 минут.
Лайфхак: установите выключение через 2-3 часа после засыпания — экономия энергии без потери комфорта.
Специальные режимы комфорта
Режим сна (SLEEP)

Нажмите 【SLEEP】 до появления значка  . Система плавно корректирует температуру: в охлаждении +1°С каждый час (макс. +2°С за 2 часа), в обогреве — аналогично в обратную сторону.
Через 10 часов кондиционер автоматически выключится. Идеально для ночного использования: тихо, экономно, без риска проснуться от холода или жары.
Экономичный режим (ECO)
【ECO】 снижает энергопотребление: в охлаждении температура повышается на 2°С относительно заданной, в обогреве — понижается на 2°С. Разница почти не ощущается, а счёт за электричество становится приятнее.
Турбо-режим (TURBO)
Нужно быстро охладить или прогреть комнату? Нажмите 【TURBO】. Система выйдет на максимум: 16°С в охлаждении, 31°С в обогреве, вентилятор на полной мощности.
Используйте кратковременно — 15-20 минут достаточно для быстрого эффекта. Затем переключитесь на обычный режим для экономии.
Дополнительные функции
Ионизация воздуха (HEALTHY)
【HEALTHY】 активирует генератор ионов. Воздух насыщается заряженными частицами, которые связывают пыль, аллергены, микроорганизмы. Особенно актуально в сезон простуд или при аллергии.
Эффект накопительный: для заметного результата используйте режим регулярно по 2-3 часа в день.
Интеллектуальный контроль (i FEEL)
【i FEEL】 — умная фишка. Датчик температуры в пульте передаёт данные о микроклимате в зоне вашего нахождения. Кондиционер подстраивается не под температуру у блока под потолком, а под реальные условия там, где вы сидите или лежите.
Условие: пульт должен находиться в зоне действия ИК-сигнала и не быть накрытым. Положите его на столик рядом — и система будет «чувствовать» ваш комфорт.
Решение типичных проблем
Пульт не управляет кондиционером
Возможные причины и решения:
- ✖️ Сели батарейки → замените на новые щелочные AAA
- ✖️ Препятствие между пультом и блоком → уберите шторы, декор, проверьте прямую видимость
- ✖️ Помехи от другой электроники → отодвиньте пульт от ТВ, роутеров, микроволновок
- ✖️ Неправильный режим (только Cool/Heat) → проверьте переключатель под крышкой
Если ничего не помогает: извлеките батарейки на 30 секунд, вставьте обратно. Сброс часто «лечит» зависания электроники.
Дисплей пульта не светится
Первым делом — проверьте полярность батареек. Затем попробуйте новые элементы. Если проблема остаётся, возможно, повреждён контакт в отсеке — аккуратно почистите его ластиком.
И последнее: если пульт падал или намокал, внутренние компоненты могли пострадать. В таком случае проще заменить устройство, чем ремонтировать.
Помните: бережное обращение и своевременная замена батареек продлевают жизнь пульта на годы. А правильная настройка режимов делает использование кондиционера по-настоящему комфортным.


