
Manual of the automotive tester 12V LED BATTERY/ALTERNATOR TESTER
Руководство / инструкция
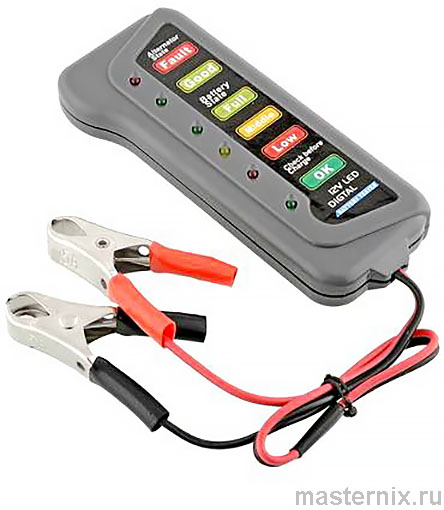
Рис. 1. Компактный тестер 12V LED BATTERY/ALTERNATOR TESTER
Для чего нужен компактный светодиодный тестер
Вы наверняка сталкивались с ситуацией, когда автомобиль не заводится, а причина неочевидна: сел аккумулятор, неисправен генератор или проблема в проводке. Автоматический тестер 12V LED BATTERY/ALTERNATOR TESTER создан именно для таких случаев. Он помогает быстро оценить состояние батареи, проверить работу генератора и понять, нуждается ли АКБ в зарядке или замене.
Устройство не требует внешнего питания — оно забирает энергию непосредственно от тестируемой батареи. Это удобно: не нужно искать розетку или носить с собой дополнительные блоки. Практика показывает: простой инструмент в бардачке экономит время и деньги на вызов эвакуатора.
Кстати, тестер подходит для всех типов свинцово-кислотных автомобильных аккумуляторов напряжением 12 В. Если честно, для мотоциклов, квадроциклов и лёгкой коммерческой техники он тоже сгодится.
Три функции в одном компактном корпусе
За небольшие габариты (18×123×52 мм) производитель уместил три полезных режима: проверка напряжения АКБ, оценка просадки при запуске стартера, диагностика генератора под нагрузкой. Это серьёзный аргумент в пользу универсальности.
Светодиодная индикация делает результат наглядным: не нужно вчитываться в цифры мультиметра, достаточно увидеть цвет и положение горящего индикатора. Логично?
Гарантия 12 месяцев и условия её сохранения
Производитель даёт 12 месяцев гарантии с даты покупки. Но есть нюансы: гарантия действует только при сохранении чека и отсутствии следов стороннего ремонта.
Запомните три правила, которые помогут не потерять право на бесплатный ремонт:
- ✔️ Храните чек или иной документ, подтверждающий покупку
- ✔️ Не вскрывайте корпус — внутри нет сменных деталей, а вскрытие аннулирует гарантию
- ✔️ Используйте устройство только по назначению: для тестирования 12-вольтовых свинцово-кислотных АКБ
Если прибор неисправен — возвращайте его по месту приобретения. Не пытайтесь чинить самостоятельно: это может привести к окончательной поломке.
Действия, которые аннулируют гарантию
Производитель чётко обозначил ситуации, когда гарантия не действует:
- ⚠️ Ошибки подключения и установки
- ⚠️ Механические повреждения или скачки напряжения
- ⚠️ Несанкционированные модификации устройства
- ⚠️ Использование в целях, не описанных в инструкции
- ⚠️ Попадание жидкостей внутрь корпуса
Звучит жёстко? Зато честно. И это нормально.
Меры безопасности: высоковольтные узлы авто
Будем откровенны: автомобильная электрика — не игрушка. Даже 12 вольт могут нанести вред при неосторожном обращении, а высоковольтные узлы системы зажигания — тем более.
Запомните ключевые правила:
- Не используйте тестер во влажной среде или под дождём
- Держите прибор подальше от легковоспламеняющихся материалов и взрывоопасных паров
- Не прикасайтесь к катушке зажигания, свечам и высоковольтным проводам во время работы двигателя
- Убедитесь, что автомобиль надёжно припаркован, включён ручной тормоз и (для АКПП) режим 【Park】
- Не оставляйте тестер подключённым на постоянной основе — это инструмент для разовой диагностики
Звучит банально? Зато безопасно.
Почему важно избегать катушки и свечей зажигания
В момент искрообразования напряжение на свечах достигает 20–30 тысяч вольт. Случайное прикосновение к высоковольтному проводу при работающем двигателе может привести к удару током.
Простой совет: подключайте тестер только к клеммам АКБ, а руки держите подальше от вращающихся и высоковольтных узлов. Тут всё ясно.
Шесть светодиодов: расшифровка показаний
Вся информация выводится через светодиодную панель. Шесть индикаторов покрывают основные сценарии диагностики.
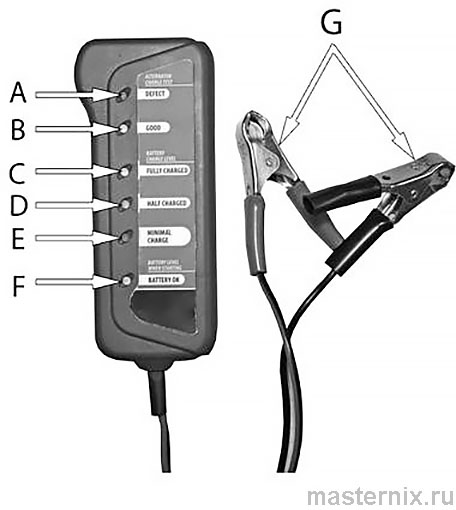 Рис. 2. Обозначения светодиодов на панели тестера
Что означает каждый индикатор
Разберём светодиоды по порядку, чтобы вы не гадали в процессе:
- ✔️ 【Battery OK】 (F) — батарея в норме, напряжение ≥10 В
- ✔️ 【GOOD】 (B) — генератор исправен, выдаёт правильное напряжение
- ✔️ 【DEFECT】 (A) — генератор выдаёт >14,8 В, риск выкипания электролита
- ✔️ 【FULLY CHARGED】 (C) — АКБ полностью заряжена
- ✔️ 【HALF CHARGED】 (D) — заряд на уровне 50 %
- ✔️ 【MINIMAL CHARGE】 (E) — батарея почти разряжена, требуется зарядка
Если ни один светодиод не горит при проверке генератора — напряжение ниже 13,8 В, возможна неисправность. Стоит подумать над диагностикой.
Быстрый тест напряжения АКБ за 30 секунд
Самый простой сценарий: нужно понять, жива ли батарея. Алгоритм элементарный:
- Подключите красный зажим к клемме 【+】 аккумулятора
- Подключите чёрный зажим к клемме 【-】
- Смотрите на индикатор 【Battery OK】 (F)
Если светодиод загорелся — напряжение не ниже 10 В, батарея пригодна к дальнейшей проверке. Если нет — АКБ глубоко разряжена или неисправна.
По окончании теста снимайте зажимы в обратном порядке: сначала 【-】, потом 【+】. Это минимизирует риск искрения.
Почему порог 10 вольт — критичный параметр
Напряжение ниже 10 В на ненагруженной АКБ говорит о глубоком разряде или сульфатации пластин. Запуск двигателя в таком состоянии маловероятен, а попытка «прикурить» может повредить электронику.
Справедливости ради: если батарея старая, даже 10,5 В могут не обеспечить уверенный пуск. Тестер показывает лишь базовый статус — для точной диагностики нужна нагрузочная вилка.
Диагностика батареи при запуске двигателя
Этот тест показывает, как АКБ ведёт себя под реальной нагрузкой — при работе стартера. Процедура чуть сложнее, но результат того стоит.
Важное условие: перед тестом батарея должна быть полностью заряжена. Иначе результаты будут некорректными.
- Подключите зажимы к АКБ: красный к 【+】, чёрный к 【-】
- Запустите двигатель
- Наблюдайте за индикатором 【Battery OK】 (F) в момент работы стартера
Если светодиод продолжает гореть — напряжение не проседает ниже 10 В, батарея справляется с нагрузкой. Если гаснет — просадка критическая, АКБ требует замены или глубокой зарядки.
Как интерпретировать просадку напряжения
Небольшое падение напряжения при пуске — норма. Но если индикатор 【Battery OK】 гаснет полностью, это сигнал:
- ⚠️ Внутреннее сопротивление АКБ выросло (старение, сульфатация)
- ⚠️ Ёмкость батареи снизилась ниже допустимого уровня
- ⚠️ Возможен дефект одной из банок
Не всё так просто, но в большинстве случаев такой результат означает, что батарею пора менять. Опыт подсказывает.
Проверка генератора под нагрузкой фар и магнитолы
Генератор должен не только заряжать АКБ, но и питать бортовую сеть под нагрузкой. Тестер помогает оценить его работу в реальных условиях.
- Подключите зажимы к АКБ
- Запустите двигатель
- Включите фары и магнитолу — это создаст нагрузку ~10–15 А
- Наблюдайте за индикаторами 【GOOD】 и 【DEFECT】
Результаты:
- ✔️ Горит 【GOOD】 (B) — генератор исправен, напряжение в норме
- ⚠️ Горит 【DEFECT】 (A) — напряжение >14,8 В, возможен сбой реле-регулятора
- ⚠️ Ни один индикатор не горит — напряжение 13,8 В, генератор не справляется
Это работает. Простой тест, но он экономит время на диагностику в сервисе.
Почему важно контролировать напряжение генератора
Перезаряд (>14,8 В) ведёт к выкипанию электролита и сокращению ресурса АКБ. Недозаряд (13,8 В) — к систематическому недозаряду и сульфатации.
Если честно, многие владельцы узнают о проблеме с генератором только когда АКБ перестаёт держать заряд. Регулярная проверка тестером помогает поймать неисправность на ранней стадии.
Оценка уровня заряда: FULLY, HALF, MINIMAL
Тестер позволяет оценить степень заряженности АКБ без сложных измерений. Но процедура требует точного соблюдения шагов.
- При неработающем двигателе включите фары и обогрев стёкол на 1–2 минуты
- Выключите нагрузку и выньте ключ зажигания
- Отсоедините минусовую клемму 【-】 от АКБ
- Выждите 10 минут — это нужно для стабилизации напряжения
- Подключите тестер: красный к 【+】, чёрный к 【-】
- Смотрите, какой индикатор загорится
Результаты:
- ★ 【FULLY CHARGED】 (C) — батарея заряжена полностью
- ★ 【HALF CHARGED】 (D) — заряд ~50 %, желательна подзарядка
- ★ 【MINIMAL CHARGE】 (E) — критически низкий заряд, требуется срочная зарядка
Баланс между простотой и точностью — именно то, что нужно для гаражного использования.
Зачем нужна 10-минутная выдержка перед тестом
После нагрузки напряжение на клеммах АКБ временно снижается. Если измерить сразу — результат будет занижен. Пауза 10 минут позволяет напряжению стабилизироваться и получить объективную картину.
Простой совет: поставьте таймер на телефоне. Занимает секунду, но повышает точность диагностики. Логично?
Таблица пороговых напряжений для каждого индикатора
Для тех, кто любит цифры: производитель закладывает конкретные пороги срабатывания светодиодов. Смотрите таблицу — она поможет понять логику работы тестера.
| Индикатор | Диапазон напряжения, В | Интерпретация |
|---|---|---|
| 【FULLY CHARGED】 (C) | ≥12,6 | Батарея заряжена полностью |
| 【HALF CHARGED】 (D) | 12,0–12,5 | Заряд ~50 %, желательна подзарядка |
| 【MINIMAL CHARGE】 (E) | 10,0–11,9 | Критический разряд, требуется зарядка |
| 【Battery OK】 (F) | ≥10,0 | Базовое напряжение в норме |
| 【GOOD】 (генератор) | 13,8–14,8 | Генератор исправен |
| 【DEFECT】 (генератор) | >14,8 | Перезаряд, неисправность реле-регулятора |
| Нет индикации (генератор) | 13,8 | Генератор не выдаёт нужное напряжение |
Что имеем в сухом остатке? Тестер не заменяет профессиональный диагностический сканер, но для быстрой оценки состояния — отличный инструмент.
Почему тестер не является измерительным прибором
Производитель прямо указывает: устройство не откалибровано и не имеет поверочного сертификата. Это значит, что показания носят оценочный характер.
Для точных замеров напряжения, тока и внутреннего сопротивления нужен профессиональный мультиметр или анализатор АКБ. Но для быстрой проверки «жива/не жива» — тестера достаточно. Есть нюансы, но они не отменяют полезности устройства.
Очистка и хранение: простые правила ухода
Устройство не требует сложного обслуживания. Но несколько правил продлят его жизнь:
- ✔️ Протирайте корпус мягкой слегка влажной тканью при загрязнении
- ✔️ Не используйте жидкие чистящие средства, растворители и абразивы
- ✔️ Храните в сухом месте, вдали от прямых солнечных лучей и источников тепла
- ✔️ Не используйте сторонние кабели — только штатные зажимы
После использования отключайте тестер и убирайте в чехол или коробку. Это не формальность, а способ защитить контакты от окисления.
Запрещённые действия при уходе за тестером
Запомните три «нет»:
- ❌ Не погружайте устройство в воду и не проливайте на него жидкости
- ❌ Не используйте легковоспламеняющиеся чистящие средства
- ❌ Не пытайтесь разобрать корпус — внутри нет пользовательских деталей
Простые правила, но они реально продлевают жизнь технике. Практика показывает.
Типичные показания и быстрые решения
Даже с простым устройством бывают неочевидные ситуации. Разберём частые сценарии — чтобы вы не тратили время на догадки.
Что делать при разных комбинациях индикаторов
Возможные сценарии и рекомендации:
- ⚠️ Горит 【DEFECT】 при проверке генератора — проверьте реле-регулятор, возможно, требуется замена
- ⚠️ Ни один индикатор не горит при подключении к АКБ — проверьте полярность, контакт зажимов, исправность самой батареи
- ⚠️ 【Battery OK】 гаснет при запуске — АКБ не справляется с нагрузкой, рассмотрите замену или зарядку
- ⚠️ 【MINIMAL CHARGE】 горит на «свежей» АКБ — возможна утечка тока в бортовой сети, проверьте электрику
Не всё так просто, но в большинстве случаев проблема решается базовой диагностикой. Если не уверены — обратитесь к профессионалу. Это разумно.


