User manual for the remote control of the split-system GZ01-BEJ0-000
Руководство / инструкция
Совместимые модели: Galanz KUDO, VIVA, GALAXY
Проверьте, подходит ли пульт к вашему кондиционеру
Один пульт — несколько линеек оборудования. Это удобно при замене утерянного пульта или расширении системы. Вот полный перечень совместимых моделей:
| Серия / Тип | Модели |
|---|---|
| Galanz KUDO (R410A) | GIOWI09/12RK3, GIOWI09/12/18/24RK16; инверторы: GIWI09/12/18/24RK3/16 |
| Galanz VIVA (R22) | GIOW07/09/12RV5, GIOW18/24RV8; GIOW07/09/12/18/24RG24, GIOW30/36RG2 |
| Galanz GALAXY (R22) | GIW24/30/36RG2 |
| Полупромышленные кассетные | GC-18/24HRT/U, GC-36/48HRST/U |
| Полупромышленные напольно-потолочные | GU-12/18/24HRT/AU, GU-36/48/60HRST/AU |
| Полупромышленные канальные | GD-18/24HMRT/U, GD-36/48/60HMRST/U, GD-36/48/60HTRS/U |
Нашли свою модель? Отлично. Если маркировка немного отличается — сверьтесь с табличкой на внутреннем блоке, совместимость часто шире заявленной.
Правила эксплуатации для надёжной работы
Простые меры, которые реально продлевают жизнь электронике
Практика показывает: бережное отношение экономит нервы и деньги. Вот что важно:
- ✔️ Направляйте пульт на внутренний блок при нажатии — сигнал должен «видеть» приёмник
- ✔️ Держите дистанцию до 6–8 метров по прямой, без препятствий между устройствами
- ✔️ Уберите пульт подальше от ТВ и радио: минимум 1 метр, чтобы избежать помех
- ✔️ Берегите от ударов, воды, прямых солнечных лучей и высокой влажности
- ✔️ Не используйте острые предметы для кнопок и химию для чистки корпуса
- ✔️ Если пульт «завис» — выньте батарейки на 30 секунд, затем вставьте обратно
(!) При длительном простое извлекайте элементы питания: протечка электролита выведет плату из строя. Это серьёзно.
Расположение кнопок и их функции
Визуальная схема управления
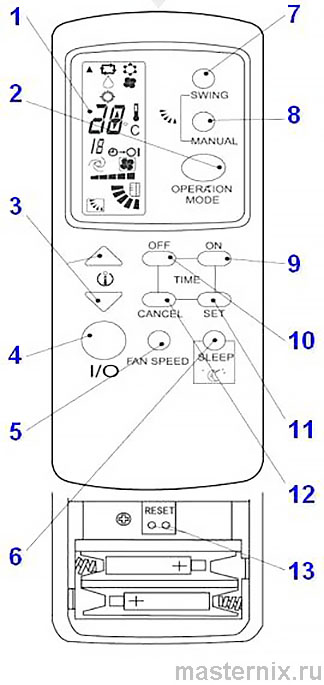
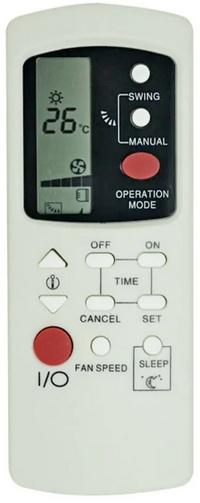
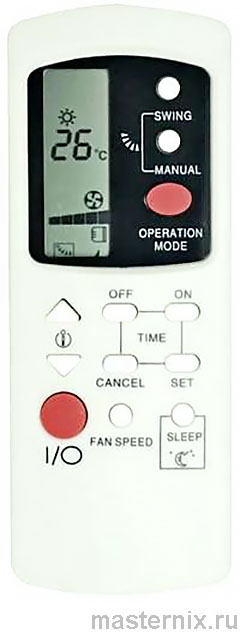
На изображении показан стандартный вариант. Ваша модель может незначительно отличаться — некоторые функции доступны не во всех комплектациях. Это нормально.
Ключевые элементы:
- 【ON/OFF】 — включение/выключение системы
- 【MODE】 — выбор рабочего режима: 【AUTO】, 【COOL】, 【DRY】, 【FAN】, 【HEAT】
- 【TEMP +】 / 【TEMP –】 — регулировка температуры (шаг 1°С, диапазон 16–31°С)
- 【FAN SPEED】 — выбор скорости вентилятора: малая → средняя → большая → автоматическая
- 【SWING】 / 【MANUAL】 — автоматическое и ручное управление жалюзи
- 【SLEEP】 — ночной режим комфорта
- 【ON TIMER】 / 【OFF TIMER】 / 【SET】 / 【CANCEL】 — программирование таймера
(!) Если пульт не реагирует на нажатия — найдите на задней панели две контактные точки и замкните их металлическим предметом для перезагрузки. Это как «жёсткий сброс» для электроники.
Основные режимы работы
Переключение между AUTO, COOL, DRY, FAN, HEAT
Каждое нажатие 【MODE】 переключает режим по кругу. Вот как это работает на практике:
Режим 【AUTO】 — интеллектуальный выбор
Кондиционер сам анализирует температуру в помещении и подбирает алгоритм:
| Температура в помещении | Выбранный режим |
|---|---|
| ‹ 20°С | 【HEAT】 (или 【DRY】, если обогрев недоступен) |
| 20–24°С | 【FAN】 |
| › 24°С | 【COOL】 |
Удобно, когда не хочется вникать в настройки. Система сама поддерживает комфорт.
Режим 【COOL】 — охлаждение
Активируйте значок охлаждения. Установите температуру кнопками 【TEMP +】/【TEMP –】 в диапазоне 16–31°С. Система начнёт охлаждать воздух и снижать влажность.
Режим 【HEAT】 — обогрев
(!) Доступен только в моделях с функцией теплового насоса. Установите желаемую температуру — система начнёт прогревать помещение.
Режим 【DRY】 — осушение
Температура фиксируется системой и не отображается на дисплее. Регулировка температуры и скорости вентилятора недоступна. Идеально в сырую погоду.
Режим 【FAN】 — только вентиляция
Наружный блок не работает. Вентилятор внутреннего блока обеспечивает циркуляцию воздуха без изменения температуры. Полезно для равномерного распределения воздуха.
Управление потоком и скоростью вентилятора
Настройка комфорта под ваши предпочтения
Скорость вентилятора 【FAN SPEED】
Последовательность переключения: малая → средняя → большая → автоматическая. В автоматическом режиме система сама подбирает скорость под текущую нагрузку.
Направление жалюзи 【SWING】 и 【MANUAL】

【SWING】 — автоматическое качание горизонтальных ламелей вверх/вниз. Повторное нажатие фиксирует положение.
【MANUAL】 — пошаговое изменение угла жалюзи. Каждое нажатие сдвигает заслонку на фиксированный угол.
(!) Важный нюанс: в режиме 【COOL】 направляйте поток горизонтально — холодный воздух лучше распространяется. В режиме 【HEAT】 — вниз, так как тёплый воздух поднимается сам.
Таймер: программирование включения и выключения
Работа по расписанию без лишних усилий
Установка таймера выключения (кондиционер работает)
- Нажмите 【OFF TIMER】 — на дисплее замигает пиктограмма
 → ◯
→ ◯ - Каждое нажатие 【OFF TIMER】 увеличивает время до выключения на 1 час (макс. 12 часов)
- Подтвердите настройку кнопкой 【SET】 — мигание прекратится
Установка таймера включения (кондиционер выключен)
- Нажмите 【ON TIMER】 — замигает пиктограмма → I
- Кнопками 【ON TIMER】 выставите время до включения (шаг 1 час, макс. 12 часов)
- Подтвердите 【SET】
(!) Нюансы:
• Отмена: нажмите 【CANCEL】 — настройки сбросятся.
• При отключении электроэнергии таймер сбрасывается — настройте заново.
• После подтверждения 【SET】 изменить время можно только через 【CANCEL】 и повторную настройку.
• Повторное нажатие 【SET】 после подтверждения перезапускает отсчёт времени.
Ночной режим SLEEP для комфортного сна
Автоматическая корректировка температуры во время отдыха
Нажмите 【SLEEP】 для активации. Функция работает в режимах 【COOL】, 【DRY】, 【HEAT】.
В режиме охлаждения или осушения:
- Вентилятор переходит на минимальную скорость
- Через 1 час температура повышается на 1°С
- Ещё через час — ещё +1°С (итого +2°С)
- Далее температура поддерживается на этом уровне
В режиме обогрева:
- Вентилятор на минимальной скорости
- Через 1 час температура снижается на 2°С
- Ещё через час — ещё –2°С (итого –4°С)
- Далее поддерживается установленное значение
Зачем это нужно? Чтобы вы не просыпались от холода под утро или не перегревались ночью. Система подстраивается под естественные циклы тела.
Замена элементов питания за 3 шага
Если дисплей потускнел или пульт не реагирует
- Сдвиньте крышку отсека питания в направлении стрелки.
- Извлеките старые элементы типа AAA (LR03, 1,5 В).
- Установите новые батарейки, соблюдая полярность (+ / –), закройте отсек.
(!) Важные нюансы:
• Не используйте аккумуляторные батарейки — напряжение может не подойти.
• Не смешивайте старые и новые элементы.
• При простое более месяца извлекайте батарейки: протечка электролита необратимо повредит электронику.
• Утилизируйте отработавшие элементы согласно местным нормам.
Расшифровка индикаторов на дисплее
Что означают значки на экране внутреннего блока
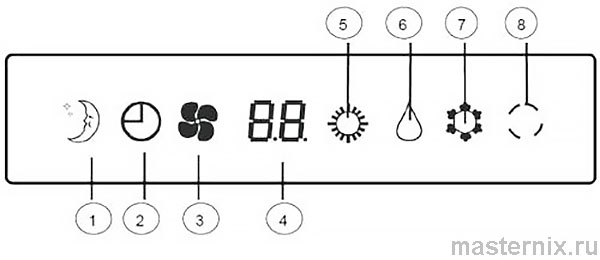
| Индикатор | Значение |
|---|---|
| 🌙 | Активен режим 【SLEEP】 |
| ⏱️ | Запрограммирован таймер включения/выключения |
| 💨 | Режим 【FAN】 — только вентиляция |
| 🌡️ (мигает) | Процесс изменения температуры или настройки таймера |
| 🔥 / ❄️ / 💧 | Режимы: 【HEAT】 / 【COOL】 / 【DRY】 |
| ⚠️ + код | Неисправность — см. таблицу кодов ошибок |
Коды неисправностей и пути решения
Диагностика по кодам на дисплее
Если система обнаруживает проблему, на ЖК-дисплее внутреннего блока отображается код. Вот расшифровка:
| Код | Неисправность | Что делать |
|---|---|---|
| A0 | Отсутствует питание в сети | Проверить фазировку и наличие напряжения |
| C0 | Неисправность контура управления | Проверить подключение проводов управления |
| C1 | Ошибка обмена данными между блоками | Обратиться в сервисный центр |
| E1 | Неисправен датчик температуры помещения | Обесточить, проверить подключение, заменить датчик |
| E2 / E4 | Неисправен датчик теплообменника (внутр./наруж.) | Аналогично E1 |
| H1–H3 | Неисправность внешнего блока / защита по давлению | Выяснить причину по индикации наружного блока |
| P1–P3, P6, P7 | Защита от обледенения / перегрева | Подождать авто-восстановления |
| CF | Загрязнён воздушный фильтр | Обесточить и очистить фильтры |
| FF | Сработала защита, система не включилась | Выключить и включить систему заново |
(!) Если используется проводной настенный пульт, ошибки могут отображаться миганием индикатора: 1 мигание — сбой питания, 4 мигания — датчик наружного блока, 5–8 миганий — защита компрессора.
Аварийное управление
Если пульт не работает, на внутреннем блоке есть кнопка аварийного переключения. Нажатие циклически меняет режимы: 【AUTO】 → 【COOL】 → 【STOP】.
(!) Если подключён проводной пульт, кнопка на блоке не активна. Для доступа к ней нужно временно отключить проводной блок.


