User manual for the universal Loriot YKR-T/011E air conditioner remote control
Руководство / инструкция
Loriot YKR-T/011E Split System Remote Control. Operating Instructions
Please read this manual carefully before operation, as it contains important information for the correct and safe use of the device. Keep this manual for future reference.
The manufacturer shall not be liable for any misuse of the device, failure to follow the rules and conditions specified in this manual, or attempts to repair the device without proper qualifications.
An air conditioning system of the "Split" type (hereinafter referred to as the split system) must be installed only by qualified specialists.
❗👉➨ Do not attempt installation yourself. Improper installation may result in malfunction or damage to the device!
Compatibility
The Loriot YKR-T/011E remote control is suitable for (Refrigerant R410):
PRESTIGE DC Inverter Series Wall-Mounted Split System
Loriot LAC-09AHI
Loriot LAC-12AHI
Loriot LAC-18AHI
Loriot LAC-24AHI
PRESTIGE On-Off Series Wall-Mounted Split System
Loriot LAC-07AH
Loriot LAC-09AH
Loriot LAC-12AH
Loriot LAC-18AH
Loriot LAC-24AH
RESIDENCE SMART DC Inverter Series Wall-Mounted Split System
Loriot LAC-09AJI
Loriot LAC-12AJI
Loriot LAC-18AJI
Loriot LAC-24AJI
RESIDENCE SMART On-Off Series Wall-Mounted Split System
Loriot LAC-07AJ
Loriot LAC-09AJ
Loriot LAC-12AJ
Loriot LAC-18AJ
Loriot LAC-24AJ
SKY On-Off Series Wall-Mounted Split System
Loriot LAC-07AS
Loriot LAC-09AS
Loriot LAC-12AS
Loriot LAC-18AS
Loriot LAC-24AS
Loriot LAC-30AS
Loriot LAC-36AS
.
Dear Customer!
Thank you for your successful choice and purchase of the Loriot household air conditioner. It will serve you for many years. This electric air conditioner is designed for cooling and dehumidifying the air in household premises. Please read the operating manual carefully before using the product.
Important Information
The device is intended for cooling the air in household premises.
The manufacturer reserves the right, without prior notice to the customer, to make changes to the design, package contents, or manufacturing technology of the product to improve its performance. The text and numerical data in this operating manual may contain typographical errors.
If you still have questions regarding the operation and use of the device after reading the manual, please contact the seller or a specialized service center for clarification.
❗👉➨ NOTE: The device has a label indicating all necessary technical data and other useful information. Use the device only for the purposes specified in this manual.
Safety Precautions
1. Do not attempt to install the air conditioner yourself. Contact a qualified installation specialist.
2. When using the air conditioner, a number of precautions must be observed. Improper use due to neglecting these precautions may cause harm to the user’s health, to other people, or to their property.
3. The electrical appliance must be supervised during operation, especially if children are nearby.
4. Do not insert fingers or foreign objects into the air outlet grille of the indoor and outdoor units, as this may result in injury from the rotating fan.
5. Do not allow children to operate the air conditioner on their own. Children may operate the unit only under adult supervision.
6. Do not attempt to repair the air conditioner yourself. Internal components are live and can be life-threatening! Contact an authorized service center for repairs.
7. Do not use the device if it is faulty, has been dropped, or damaged.
8. Do not open the front panel of the device while it is in operation.
9. Do not disassemble or modify the device.
10. Immediately disconnect the air conditioner from the power supply if unusual smells or smoke are detected.
11. Do not spray or pour water or other liquids onto the air conditioner.
12. Always disconnect the air conditioner from the power supply during thunderstorms.
13. Always disconnect the air conditioner from the power supply when not in use.
14. Before cleaning and performing maintenance, disconnect the air conditioner from the power supply. Perform cleaning and maintenance in accordance with the instructions in this manual.
15. For efficient operation, use the air conditioner within the temperature and humidity conditions specified in this manual.
16. Do not use hazardous chemicals for cleaning or allow them to contact the device.
17. When removing the air filter, do not touch the metal parts of the device.
18. To avoid overheating, fire hazards, and damage to the internal wiring, do not alter the length of the power cord and do not use extension cords.
19. To prevent electric shock, a damaged power cord must be replaced only at authorized service centers by qualified specialists.
20. To prevent electric shock, do not place the power cord near heating appliances or flammable materials.
21. Do not start or stop the device by plugging or unplugging it from the power supply.
22. Do not press remote control buttons with any objects other than your fingers.
23. Do not use the device for purposes other than those specified in this manual.
..
Loriot YKR-T/011E Remote Control Display Panel
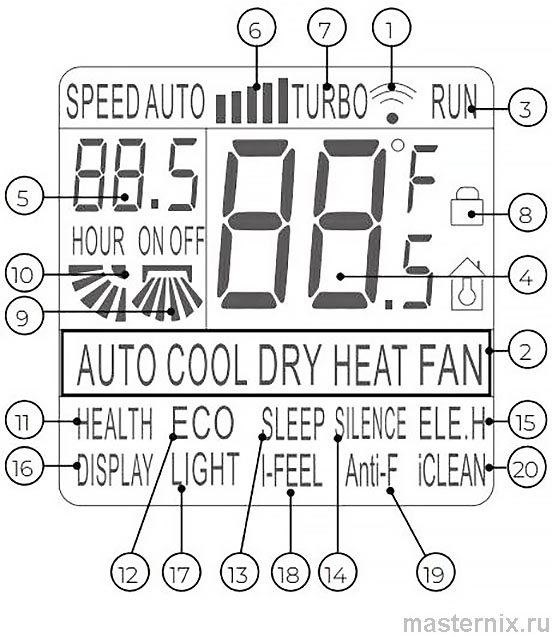
1. This indicator appears when the remote control sends a command to the indoor unit of the air conditioner.
2. Operating mode indicator.
3. ON/OFF status indicator “RUN.” Indicates whether the air conditioner is on or off via the remote control.
4. Digital set temperature indicator. Displays the temperature set by the user (in all modes except “FAN”). The value can range from 16 to 32 °C. When displaying room temperature, the “ROOM” indicator is also shown.
5. Digital ON/OFF timer setting indicator. Displays values from 0.5 to 24 in timer mode.
6. Indoor unit fan speed indicator.
7. TURBO mode indicator.
8. Child lock activation indicator.
9. Automatic vertical louver operation indicator (internal).
10. Automatic horizontal louver operation indicator (external).
11. HEALTH ionization function indicator*.
12. ECO economy mode indicator*.
13. “SLEEP” mode indicator. Note: “SLEEP” is unavailable in “FAN” and “AUTO” modes.
14. “SILENCE” quiet fan operation mode indicator*.
15. “ELE.H” intensive heating mode indicator*.
16. Display backlight indicator.
17. “LIGHT” function activation indicator*.
18. “I-FEEL” function indicator.
19. “Anti-F” self-cleaning function indicator.
20. iCLEAN self-cleaning function indicator.
* Not used in this series.
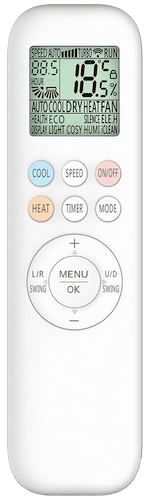
Designation of Remote Control Elements and Their Functions
The provided image refers to a standard remote control, showing all functional buttons. They may differ slightly from the buttons on your remote control (depending on the model).
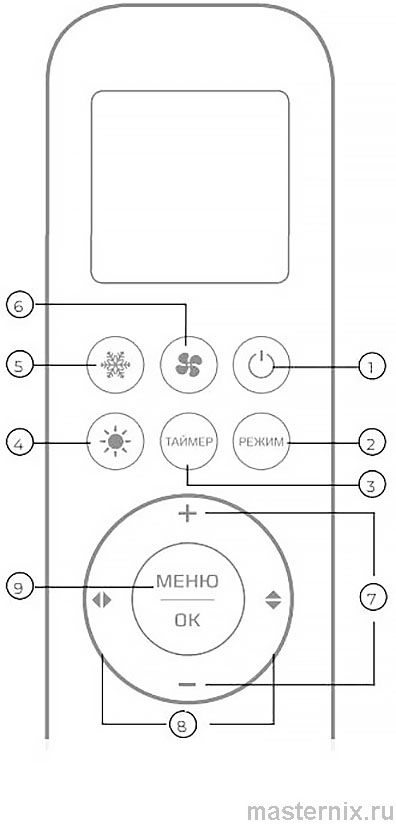
❗👉➨ Attention Depending on your air conditioner model, some remote control buttons may have no function.
1. ON/OFF Button  Power On/Off Button
➠ Press this button to turn the unit on or off.
➠ Press the button to reset the existing timer and sleep mode settings.
2. MODE Button
Each press of the button changes the operating mode of the air conditioner in the following sequence:
... → AUTO (Automatic) → Cool → Dry → Heat → Fan →...

“AUTO” MODE
In automatic mode, the air conditioner automatically selects the cooling or heating mode depending on the indoor air temperature, creating comfortable conditions for the user. The target temperature is not displayed on the remote control screen and cannot be changed.
➠ Press the “MODE” button and select the automatic mode “AUTO.”
➠ Press the  button to select the fan speed: Low — Medium — High — TURBO — Auto.
❗👉➨ Note: in “AUTO” mode, the temperature cannot be adjusted.
When the unit is first switched on, it is set by default to AUTO (Automatic mode).
“COOL” MODE
➠ Press the “MODE” button and select the “COOL” mode.
➠ Use the [+] or [—] buttons to set the desired temperature range from +16 to +32 °C; the numbers on the display change when the buttons are pressed.
➠ Press the button to select the fan speed: Low — Medium — High — TURBO — Auto.
“HEAT” MODE
➠ Press the “MODE” button and select the “HEAT” mode.
➠ Use the [+] or [—] buttons to set the desired temperature range from +16 to +32 °C; the numbers on the display change when the buttons are pressed.
➠ Press the button to select the fan speed: Low — Medium — High — TURBO — Auto.
❗👉➨ In air conditioners operating in “cooling only” mode, the heating mode is not available.
“DRY” MODE
➠ Press the “MODE” button and select the “DRY” mode.
➠ Use the [+] or [—] buttons to set the desired temperature range from +16 to +32 °C; the numbers on the display change when the buttons are pressed.
❗👉➨ Note: in “DRY” mode, the fan speed cannot be adjusted.
“FAN” MODE
In fan mode, the air conditioner activates only the indoor unit fan. In this mode, the air conditioner does not maintain the indoor temperature. The target temperature is not displayed on the remote control screen and cannot be changed.
➠ Press the “MODE” button and select the “FAN” mode.
➠ Press the button to select the fan speed: Low — Medium — High — TURBO — Auto.
❗👉➨ Note: in “FAN” mode, the temperature cannot be adjusted.
❗👉➨ Attention The air conditioner does not supply fresh air!
3. TIMER Button
➠ Press the “TIMER” button once; the “ON/OFF” indicator will start flashing on the display. Use the [+] or [—] buttons to set the desired time for the unit to turn on/off; the setting interval is 0.5 hours, range from 0.5 to 24 hours.
➠ Press the “TIMER” button again to confirm the setting; the “ON/OFF” indication will stop flashing.
➠ If the timer button is not pressed for more than 10 seconds after the “ON/OFF” indicator starts flashing, the timer setting will be completed.
➠ Pressing the “TIMER” button again will cancel the setting.
➠ The timer ON setting is only possible when the unit is switched off.
4.  HEAT Button
Press the button to activate the “HEAT” mode.
5.  COOL Button
Press the button to activate the “COOL” mode.
6. Button (Fan Speed Adjustment)
Press the button to select the fan speed: Low — Medium — High — TURBO — Auto.
❗👉➨ Note: automatic fan speed and fan speed adjustment are not available in “DRY” mode.
7. [+] and [—] Buttons
Use the [+] or [—] buttons to set the desired temperature range from +16 to +32 °C; the numbers on the display change when the buttons are pressed.
8. [L/R SWING] and [U/D SWING] Buttons
➠ Press the [L/R SWING] button to activate vertical louver swing.
➠ Press the [U/D SWING] button to activate horizontal louver swing. Pressing again will fix the position of the horizontal louvers.
❗👉➨ Note: when holding the [U/D SWING] button for 3 seconds, the remote control switches from horizontal louver swing activation to positional adjustment of horizontal louver position (5 positions + swing function). To cancel this function, hold the [U/D SWING] button for 3 seconds.
9. MENU and OK Buttons
Press the “MENU” button to enter the function selection mode (iFEEL/HEALTH/ECO/SLEEP/SILENCE/DISPLAY/LIGHT/ANTI-F/iCLEAN). Then press ▲▼ ◀▶ to select the desired function. After selecting the desired function, press the “OK” button to confirm it.
To disable the function, select it again and press the “OK” button.
❗👉➨ Note: some functions (for example, ANTI-F and iCLEAN) are activated only when the unit is switched off.
REMOTE CONTROL FUNCTIONS
“ANTI-F” Function
This function prevents mold and fungus from forming on the indoor unit heat exchanger. After turning off the air conditioner from the remote control, the indoor unit will automatically continue to operate in fan mode for 3 minutes to dry the heat exchanger.
❗👉➨ Note: the “ANTI-F” function starts only after the air conditioner has operated in cooling or drying mode. It is not recommended to restart the air conditioner while it is operating in “ANTI-F” mode until the process is complete.
“iCLEAN” Function
This function starts the self-cleaning program of the indoor unit heat exchanger using freezing/condensation. The self-cleaning program helps maintain the indoor unit heat exchanger cleanliness by removing accumulated dust and dirt, and consists of 3 stages:
➠ Operation in cooling mode for up to 15 minutes (condensate accumulation and/or frost/ice formation);
➠ Operation in heating mode for up to 10 minutes (melting the accumulated frost/ice, drying the remaining condensate, and sterilizing the heat exchanger);
➠ Operation in fan mode for up to 10 minutes (final drying of the heat exchanger and temperature equalization of the indoor unit).
❗👉➨ Note: when this function is operating, the “CL” code will be displayed on the indoor unit display.
“HEALTH” Function
This function allows you to switch the built-in air ionizer on or off.
“ECO” Function
This function allows you to switch the air conditioner’s energy-saving mode on or off.
“SLEEP” Function
This function activates the comfortable sleep mode. In this mode, the air conditioner turns off the indoor unit display and automatically changes the temperature setting according to a preset pattern.
➠ In cooling mode — increases the temperature setting by 1 degree one hour after activation, and by another 1 degree two hours after activation. Afterwards, the temperature setting remains unchanged. The air conditioner will stop operating in comfortable sleep mode 10 hours after it starts and return to normal operation.
➠ In heating mode — decreases the temperature setting by 1 degree one hour after activation, and by another 1 degree two hours after activation. Afterwards, the temperature setting remains unchanged. The air conditioner will stop operating in comfortable sleep mode 10 hours after it starts and return to normal operation.
❗👉➨ Note: the air conditioner does not adjust fan speed in “SLEEP” mode — set the fan speed manually if necessary.
“SILENCE” Function
This function activates the quiet operation mode of the air conditioner. In this mode, the air conditioner operates at the minimum indoor fan and compressor speed. Pressing the button disables the “SILENCE” function.
“DISPLAY” Function
This function switches the indoor unit display on or off.
“LIGHT” Function*
This function enables monitoring of the room’s illumination level to automatically switch the indoor unit display on or off.
.
“I-FEEL” Function
This function enables monitoring of the indoor temperature using the temperature sensor built into the remote control. Using this function allows you to maintain the most comfortable temperature conditions at the location of the user (remote control).
❗👉➨ Note:
➠ This function requires periodic transmission of information from the remote control to the indoor unit of the air conditioner. Ensure that the remote control and the indoor unit are within direct line of sight and at a distance of no more than 8 m.
➠ Do not block the air exchange vent on the back of the remote control while using this function, otherwise the accuracy of temperature control in the room may be reduced.
➠ When this function is active, the current room temperature is displayed on the remote control.
“ELE.H” Function
This function switches the additional electric heater on or off, if it is installed in the air conditioner.
❗👉➨ Note: the “ELE.H” function is automatically activated when the air conditioner is switched to heating mode.
Child Lock Function
Press the and “MODE” buttons simultaneously and hold for 3 seconds to activate/deactivate the remote control button lock. When the lock is active, the corresponding icon will be displayed on the remote control screen.
Control Procedure
1. After connecting the air conditioner to the power supply, press the ON/OFF button to turn it on.
2. Use the MODE button to select the cooling (COOL) or heating (HEAT) mode.
3. Press the TEMP button.
4. Use the [+] or [—] buttons to set the desired temperature between 16 °C and 30 °C.
In AUTO mode, the temperature value is set automatically and cannot be adjusted from the remote control.
5. Use the FAN button to select the desired fan speed:
AUTO FAN (automatic), LOW — low speed, MID — medium speed, HIGH — high speed.
6. Use buttons (11) SWING 1 and (12) SWING 2 to set the louver swing mode. To activate the SLEEP, TIMER, TURBO, or LIGHT functions, press the corresponding buttons.
Adjusting the Airflow Direction
1. Horizontal airflow direction (left-right) is adjusted via the remote control. Vertical airflow direction (up-down) is also adjusted via the remote control.
2. When starting the air conditioner, the horizontal louvers should not be turned too far upward or downward. Otherwise, cooling or heating efficiency may be reduced.
3. To avoid malfunctions of the control system, do not turn the horizontal or vertical louvers manually. If the horizontal louvers malfunction, turn off the air conditioner, unplug it, wait a few minutes, plug it back in, and turn it on again.
4. To prevent condensation from forming on the surface of the vertical louvers and dripping onto the floor during prolonged operation in cooling or drying modes, do not direct the airflow downward.
5. When the air conditioner is switched on again, the horizontal louvers may remain stationary for about 10 seconds.
6. During the first startup of the air conditioner, a noise may be heard when turning the horizontal louvers. This is normal and should be ignored.
7. Read this manual carefully and strictly follow the instructions provided. This will help you avoid serious air conditioner malfunctions, injuries, and property damage.
..
Replacing the Remote Control Batteries
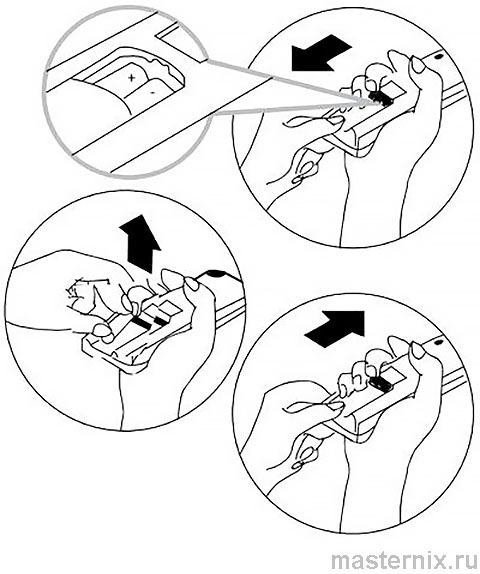
1. Slide the cover on the back of the remote control open.
2. Insert two AAA alkaline batteries, ensuring they are installed in the correct direction.
❗👉➨ NOTE:
➠ Replace the batteries if the remote control LCD does not light up or if the remote control cannot be used to change air conditioner settings.
➠ Use new AAA batteries.
➠ If you will not use the remote control for more than one month, remove the batteries.
Emergency Switch
➠ If the wireless remote control is lost or defective, the air conditioner can be turned on or off using the emergency switch.
Operating the Air Conditioner Without a Remote Control
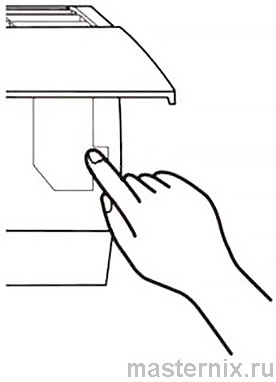
If you have lost the remote control or it is defective, perform the following steps:
➠ To turn on the air conditioner, briefly press the emergency control button. The air conditioner will start in automatic mode.
➠ Carefully close and secure the front panel of the indoor unit.
➠ To turn off the air conditioner, briefly press the emergency control button again.
❗👉➨ NOTE:
Do not hold the button down for a long time, as this may cause the air conditioner to malfunction.
BUILT-IN AIR CONDITIONER FUNCTIONS
Warm Start Function (Protection Against Cold Air Blowing)
The air conditioners of this series are equipped with a warm start function that prevents the indoor unit fan from starting at medium or high speed until the indoor heat exchanger is warmed up. If you select a high or medium speed, the fan will run at low speed until the heat exchanger warms up.
Temperature Compensation Function (Protection Against Cold Drafts)
The air conditioners of this series are equipped with a temperature compensation function that takes into account temperature stratification by height in the room and accurately maintains the temperature at the user’s location.
Automatic Restart Function
The air conditioners of this series are equipped with an automatic restart function in case of sudden power loss. After power is restored, the air conditioner will resume operation with the previously set mode, temperature, and fan speed.
Louver Position Memory Function
The air conditioners of this series are equipped with a louver position memory function. After the air conditioner is turned off and on again, the louvers will return to the position set by the user before shutdown.
“Smart Defrost” Function
The air conditioners of this series are equipped with a smart defrost function and do not use an additional outdoor unit temperature sensor (except for models 36 and 84). If the outdoor unit heat exchanger freezes during heating mode, the defrost mode will start automatically (for approximately 5–10 minutes).
Self-Diagnosis Function
The air conditioner’s microcontroller continuously monitors for abnormal operating conditions or unit malfunctions and automatically stops the system to prevent damage. At this time, an error or fault code will be displayed on the indoor unit screen.
High-Density Dust Filter
The air conditioners of this series are equipped with a high-density air dust filter with increased cleaning efficiency. The cell size of the filter is 0.54 ? 0.54 mm, or 225 holes per cm?.
Anti-Corrosion Coating
The air conditioners of this series have a special Blue Fin coating that increases heat exchange efficiency and extends the service life of the air conditioner.
Low-Temperature Kit (Option)
The optional low-temperature kit ensures the operation of the air conditioner in cooling mode when the outdoor air temperature is down to –30 or –40 °C (depending on the kit version). At outdoor temperatures from +5 °C to +15 °C (for example, in the evening, at night, or during the off-season), the air conditioner maintains 100% cooling capacity.